Launching MICHIRU RPA
Double click on the icon of MICHIRU RPA on the desktop to launch.
If license authentication screen is shown, please refer to the steps here to authenticate the license.

Overview of User Interface
Initial Screen (When Launched)
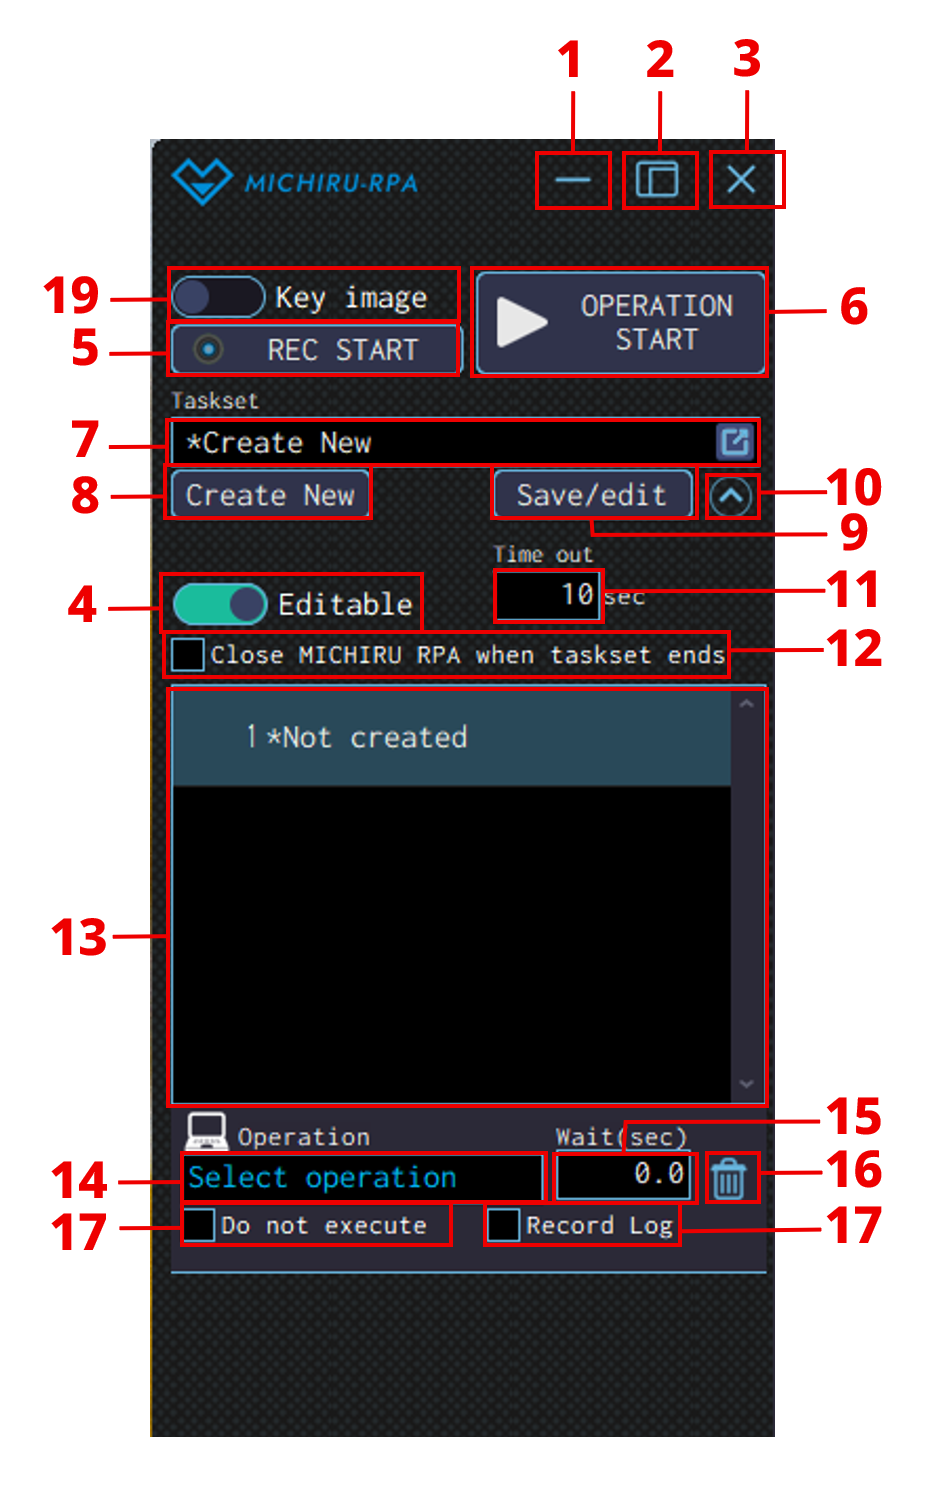
After launching, a window like the following image will be displayed on the desktop
| No. | Name | Explanation |
|---|---|---|
| 1 | Minimize the window button | Minimize the window. |
| 2 | Extend the window button | Display the extended window which allows for more detailed configuration. |
| 3 | Close button | End MICHIRU RPA. |
| 4 | Switch between different editing mode button | Switch between editing and non-editing mode. |
| 5 | Start screen recording button | Start screen recording. |
| 6 | Start automation button | Execute the operations in the automation set from the beginning to the end. |
| 7 | Select automation set | Select from automation sets saved. |
| 8 | Create new button | Create a new automation set. |
| 9 | Save/edit button | Save the automation set. |
| 10 | Display other configuration button | Display other configuration. |
| 11 | Timeout | Configure the time to process the target image. |
| 12 | Close window when automation set ends checkbox | Close MICHIRU RPA window when automation set ends. |
| 13 | List of operations | Operation created will be displayed here. |
| 14 | Select operation | Select the operation to create. |
| 15 | Waiting time | Specify the amount of time RPA should wait before starting the next operation. |
| 16 | Delete operation button | Delete the current operation from the automation set. |
| 17 | “Do not execute” checkbox | Target operation will not be executed. |
| 18 | “Record log” checkbox | Record the result of the operation to the log. |
| 19 | Switch between Key image mode and Element mode button *After version 1.4 | Switch between Key image mode and Element mode. |
Extended Screen (After Pressing “Display the extended screen” Button)
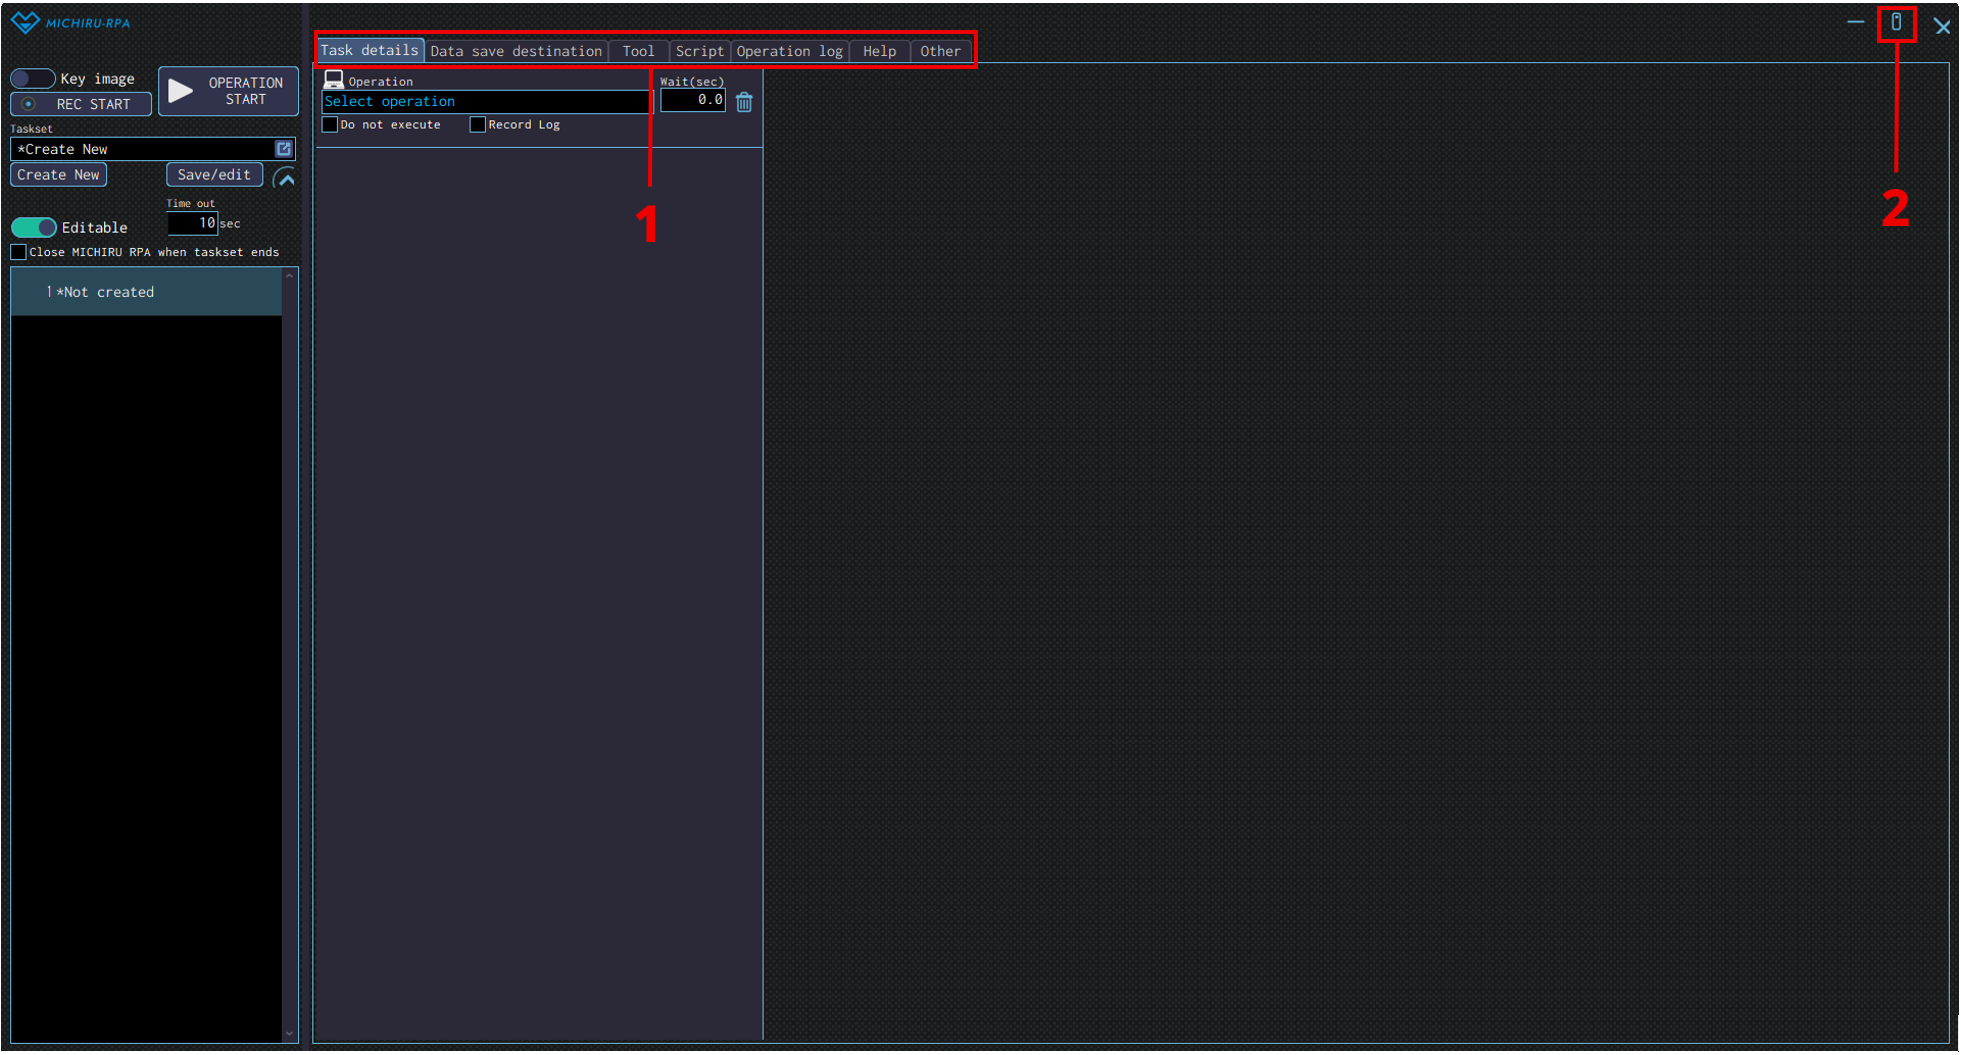
After pressing the “Display the extended screen”, a window like the following image will be displayed.
| No. | Name | Explanation |
|---|---|---|
| 1 | Various tabs | Click on each tabs to access various settings |
| 2 | “Close the extension screen” button | Close the extension screen and show the initial window. |
Here is more information regarding each tab.
- Task detail
-
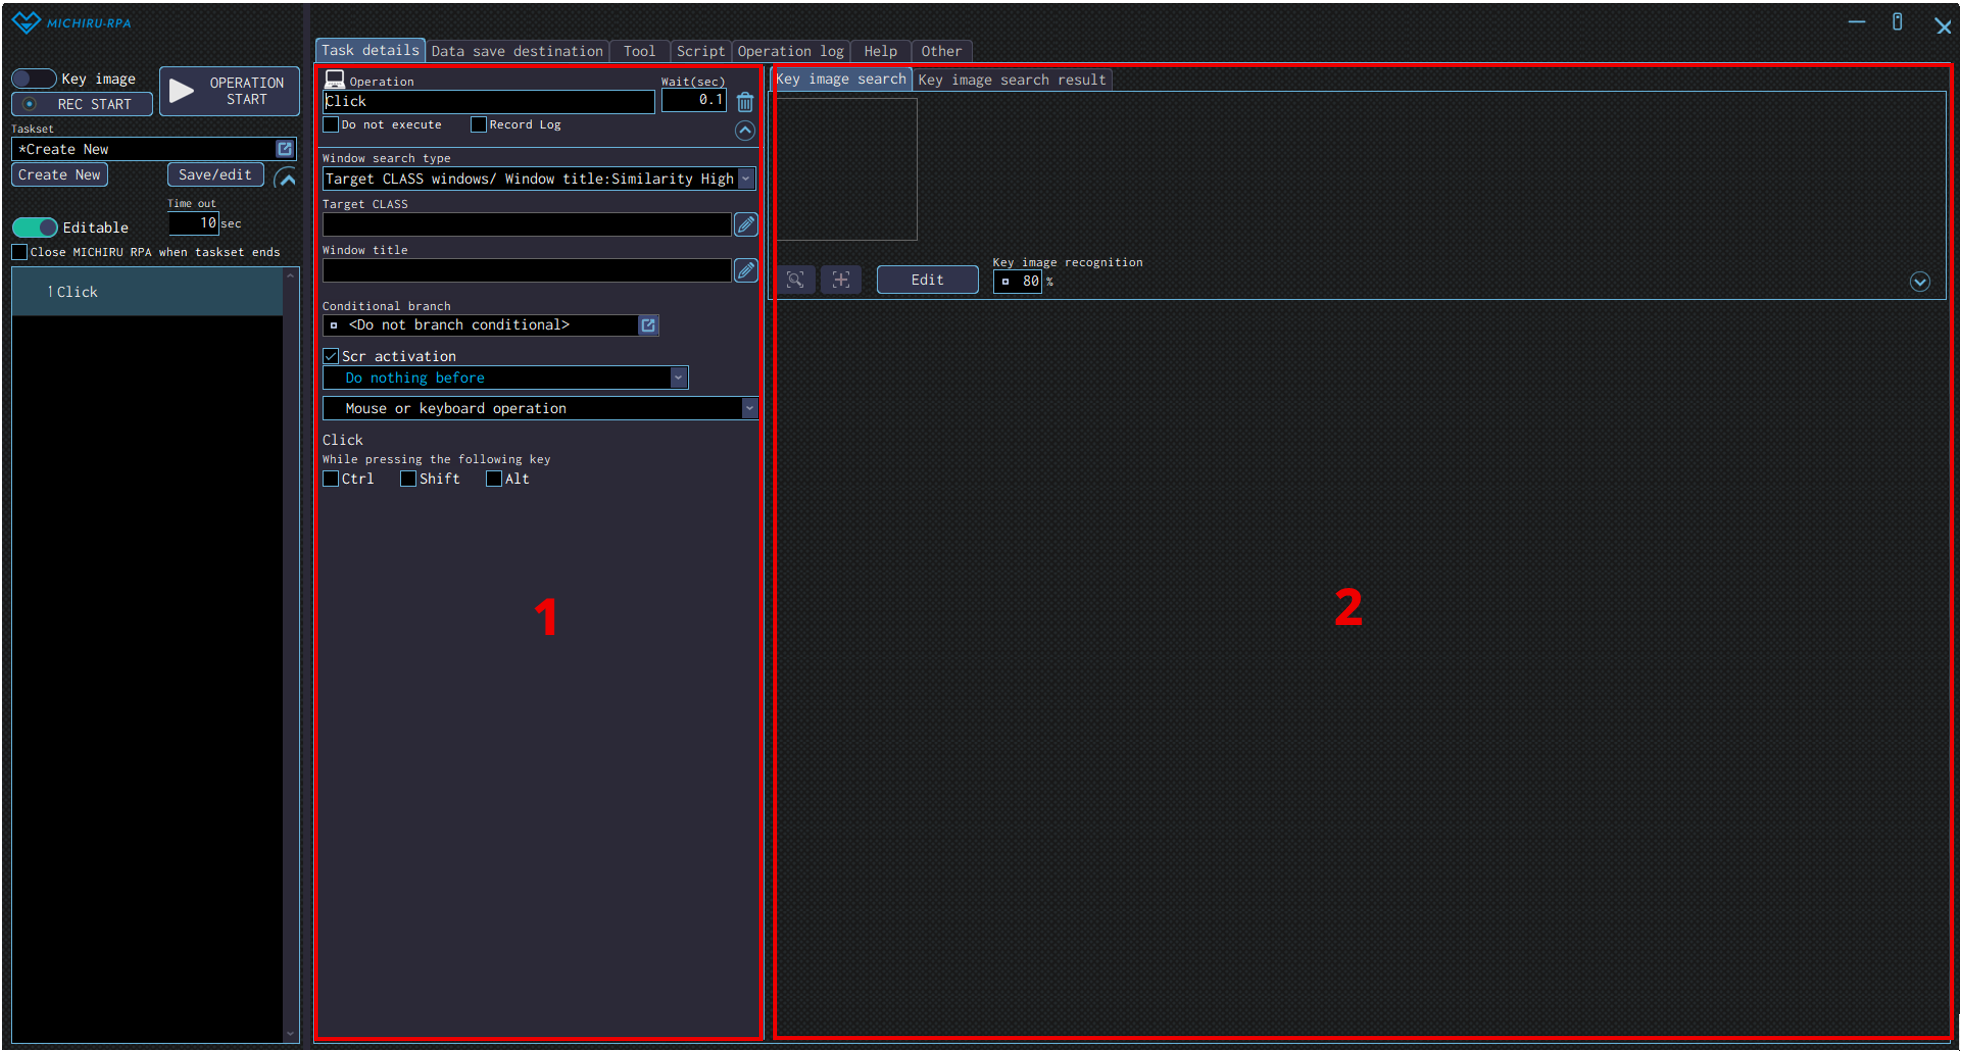
Clicking on the Task details tab will lead you to the same window as the image below.
This tab is used when you are configuring operations in detail. Options available differs depending on the operation you are working with.
Please refer to this page for more information regarding the configuration of each operation.
No. Name Explanation 1 Detailed configuration area Configure each operations in detail. Options available are different for each operation. 2 Key image setting area For operations that utilise Key image, settings related to Key image will be displayed here. For Additional script, the explanation of the script will be shown here. - Data save destination
-
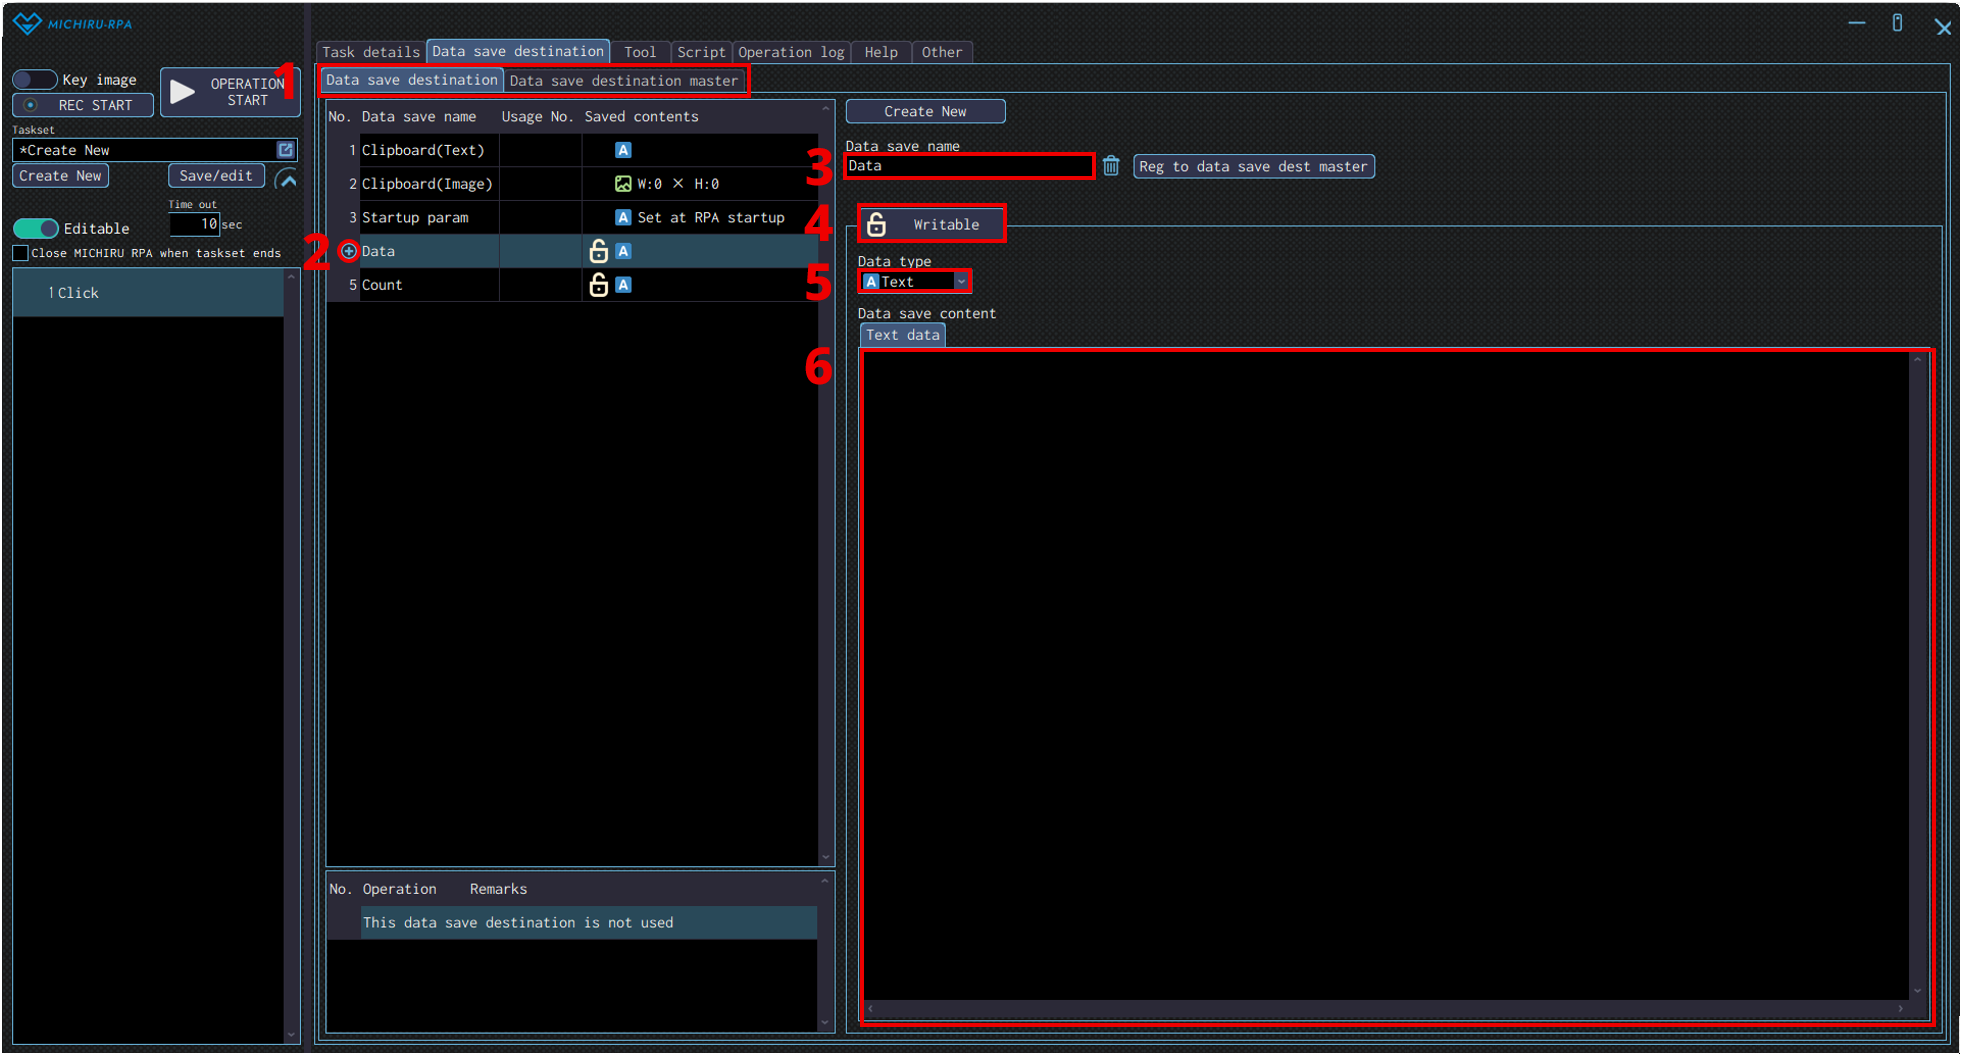
Clicking on the Data save destination tab will lead you to the same window as the image below.
This tab is where you manage the data save destination, or variables used for automation in MICHIRU RPA. The data saved here can be both the data that is prepared in advance, and the data that you get from an operation to use on another later. The data can be in text (string), number, and image format.
Please note that the data save destination named “Clipboard(Text)” and “Clipboard(Image)” cannot be moved or directly edited.Data save destination is unique to each automation set, meaning they do not carry over to other automation set, and will need to be create again when syou start on a new automation set.
If you have any that you will use regularly, you can register it in the “Data save destination master” tab to make it easily usable for all the automation set.No. Name Explanation 1 Tabs related to data save destination Data save destination: Only available for the current automation set. Linked to the each individual automation set.
Data save destination master: Those kept in here can be used as templates for every automation set. Register the ones that are used regularly here for ease of use. Click on “Reg to current data save dest” to register the one you need to the normal data save destination.2 Add new button Hovering your mouse cursor close to the left side of the list of data save destination will make a “+” mark appear. Click on the “+” to add a new data seve destination under the one currently selected. 3 Data save destination name Specify the name of the data save destination. 4 Switch between Writable/Unwritable button Specify the limitation on what you can do with the data save destination.
Writable: Data can be overwritten. This is the default setting.
Unwritable: Data cannot be overwritten. Select this when you want to sepcify the value in advance and don’t want it edited.5 Data type “Select the data type of the selected data save destination.
Number: Only number can be contained. Used when counting or when doing calculation.
Text: Can contain number, text, alphabet and special character. This is the default setting.
Image: Only image can be contained. Used when creating branching conditions or searching for image.”6 Data save content Current saved content will be displayed. - Tool
-
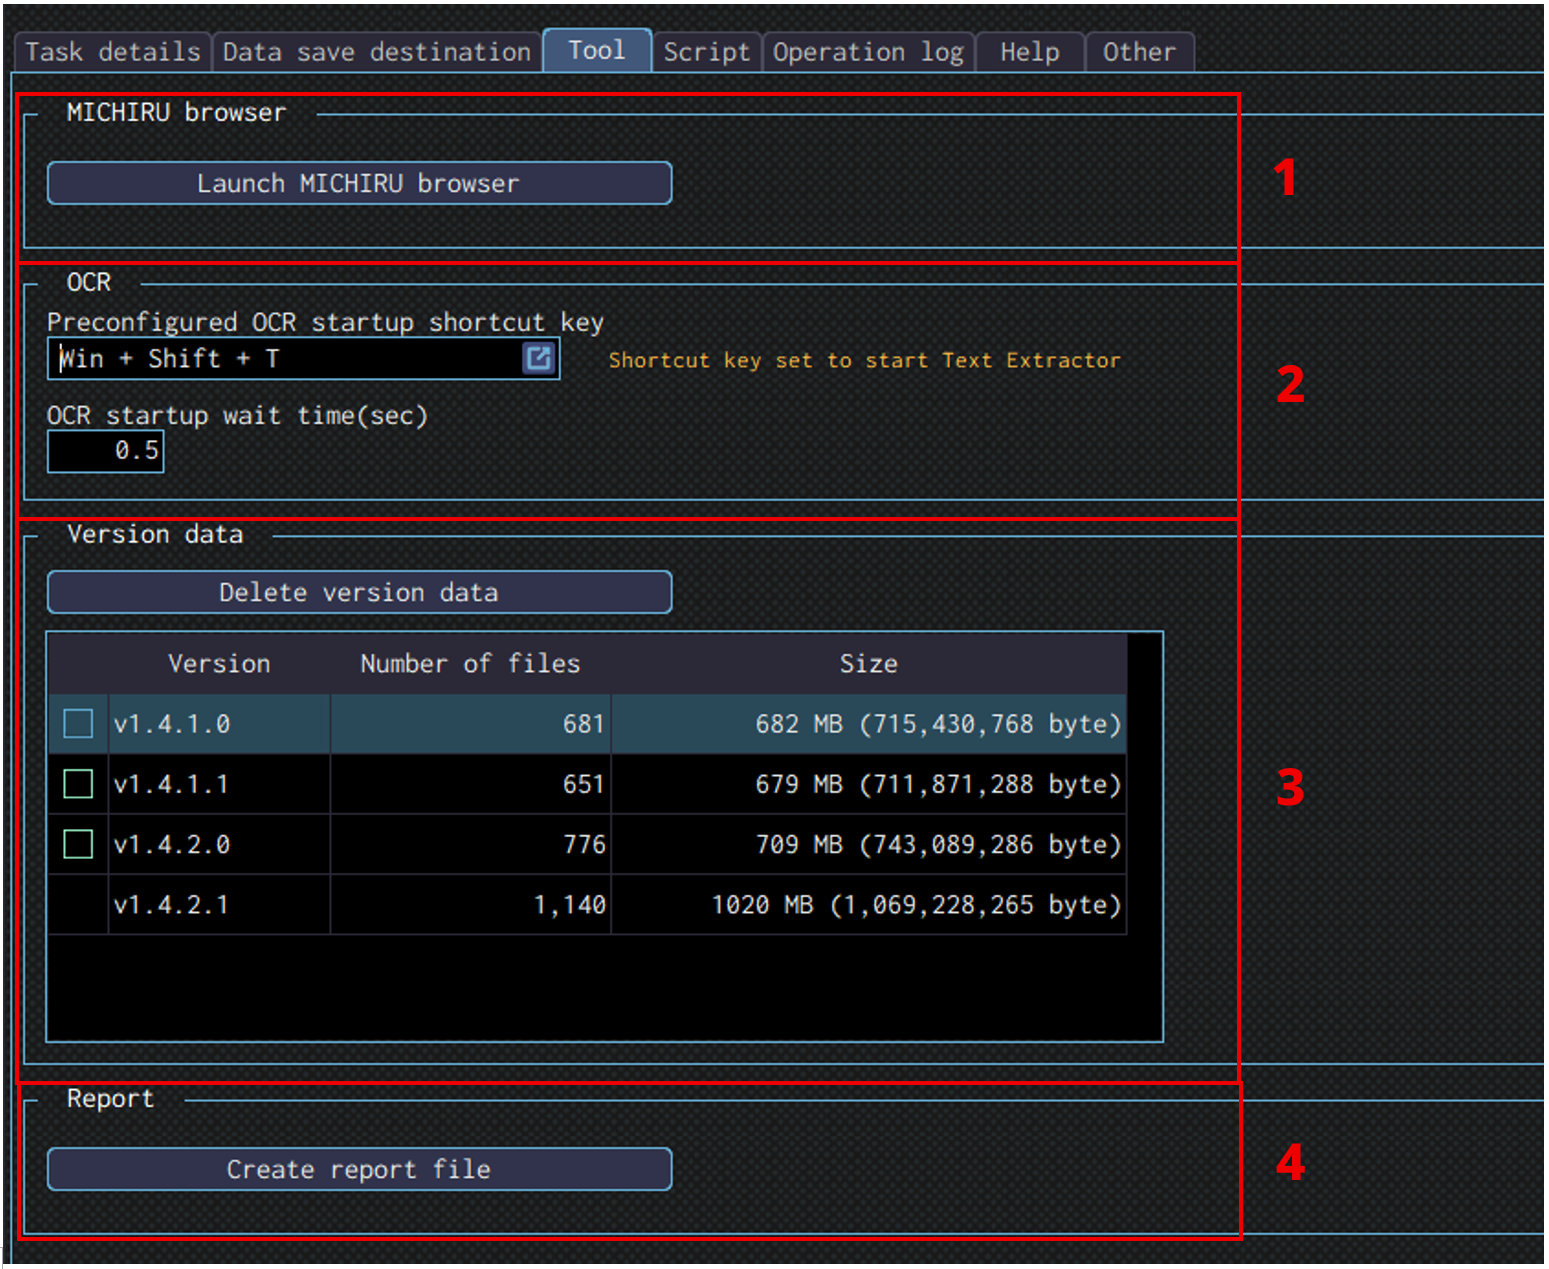
Clicking on the Tool tab will lead you to the same window as the image below.
This tab is for configuring and launching tools that work with MICHIRU RPANo. Name Explanation 1 MICHIRU browser Clicking on this button will launch MICHIRU browser.
Please refer to this page for more information regarding MICHIRU browser.2 OCR Basic configuration for OCR.
-If you make any changes to the shortcut key to launch the OCR (Text Extractor), make sure to change the shortcut key here as well.
-If it takes long time to launch the OCR, adjust the waiting time to match that.3 Version data You can check the data size of each version and delete the one that you no longer need. To delete old version, select the checkbox of the version and click on the “Delete version data” button. 4 Report file When requested for report file by us, please click on this button to generate and send the file to us via email or chat. - Script
-
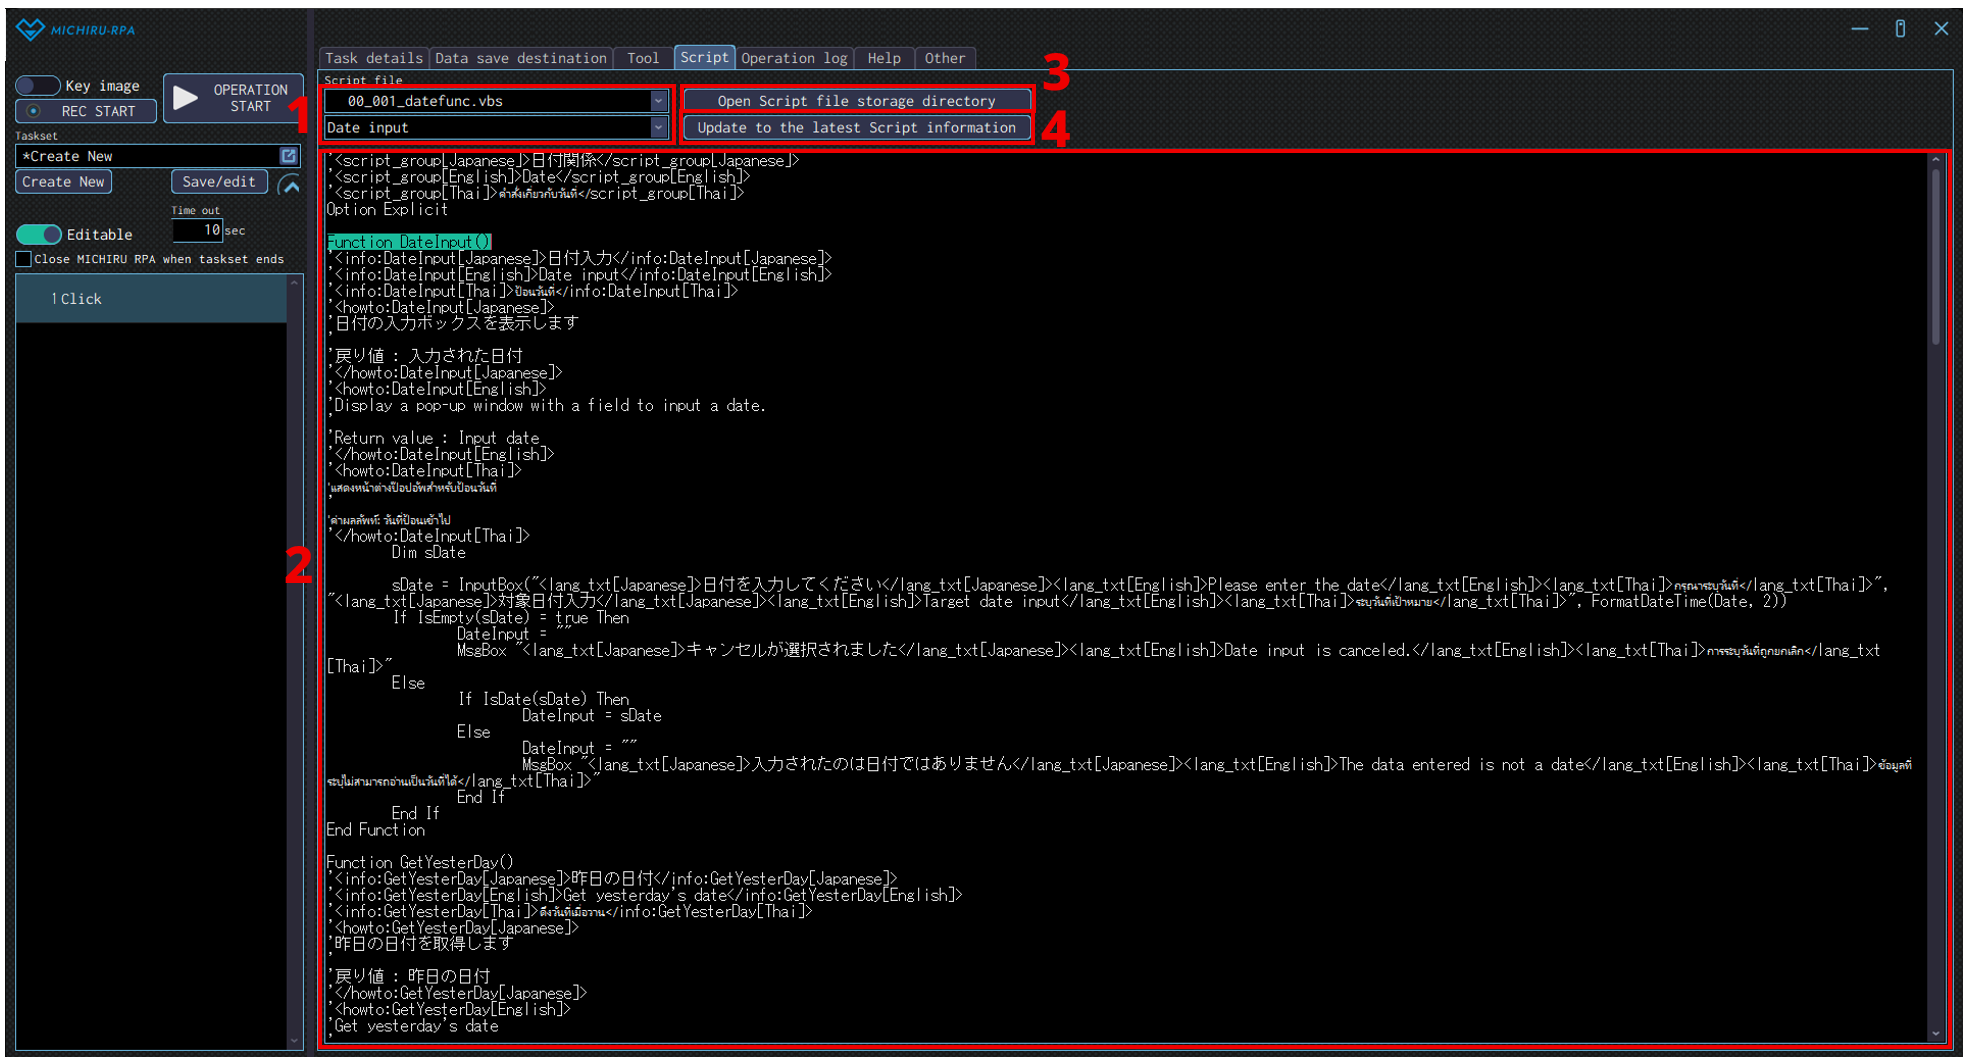
Clicking on the Script tab will lead you to the same window as the image below.
This tab will show the script being used in MICHIRU RPA.No. Name Explanation 1 Name of script file The upper part is the name of the script file.
The lower part is the method written in the script.2 Content of the script. This area will display the content of the script selected. 3 Open Script file storage directory Open the folder where the script file is stored. 4 Update to the latest Script information Update the script information based on the script file store in the Script file storage directory. - Operation log
-
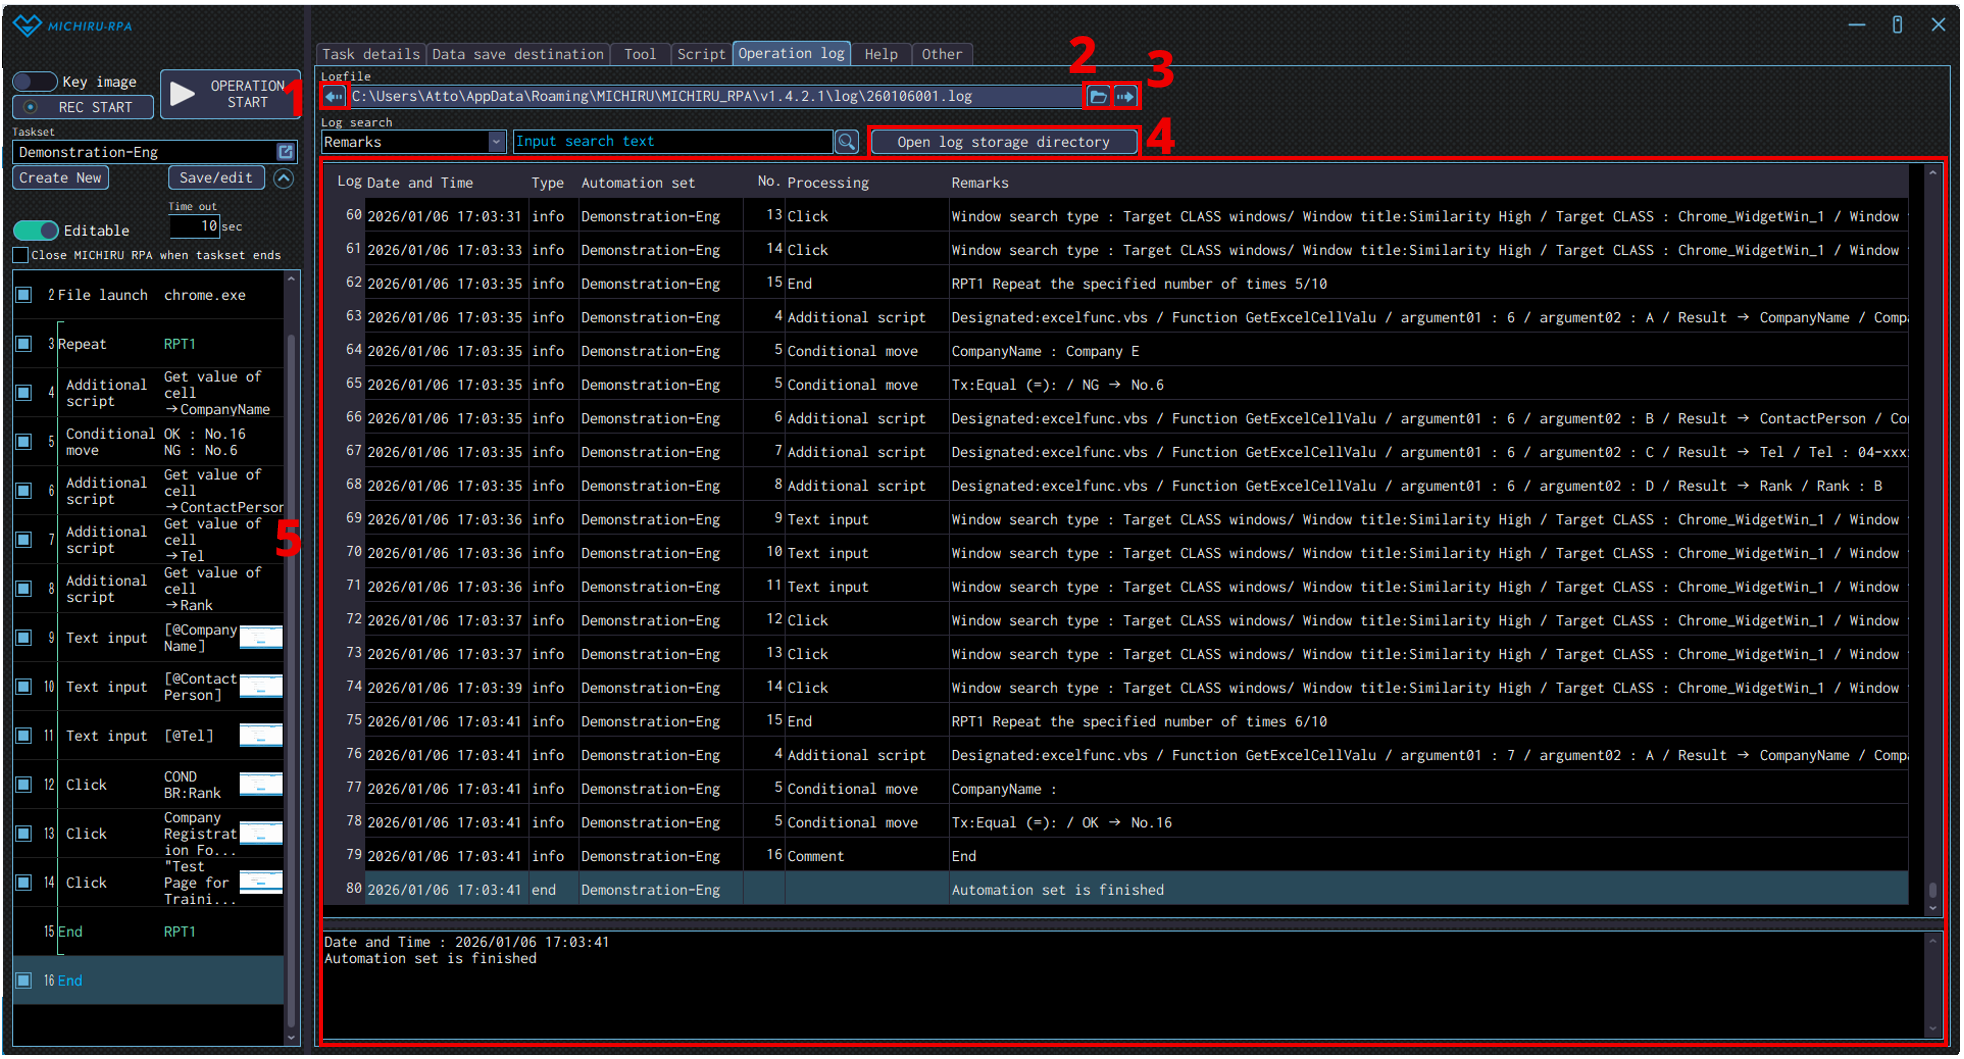
Clicking on the Operational log tab will lead you to the same window as the image below.
In this tab, you can check how the operations that have “Record log” checked work.
Regardless of the settings, if an error occurs, the content of error will be displayed here as well.After selecting the content to look for, input text or number in the “Input search text” field and click on the search button. You will be redirected to the matching log.
No. Name Explanation 1 Previous log file Show previous log file. 2 Select log file Select log file to display. 3 Next log file Show next log file. 4 Open log storage directory Open the folder where the log file is stored. 5 Content of the log Display the content of the selected log file - Help
-
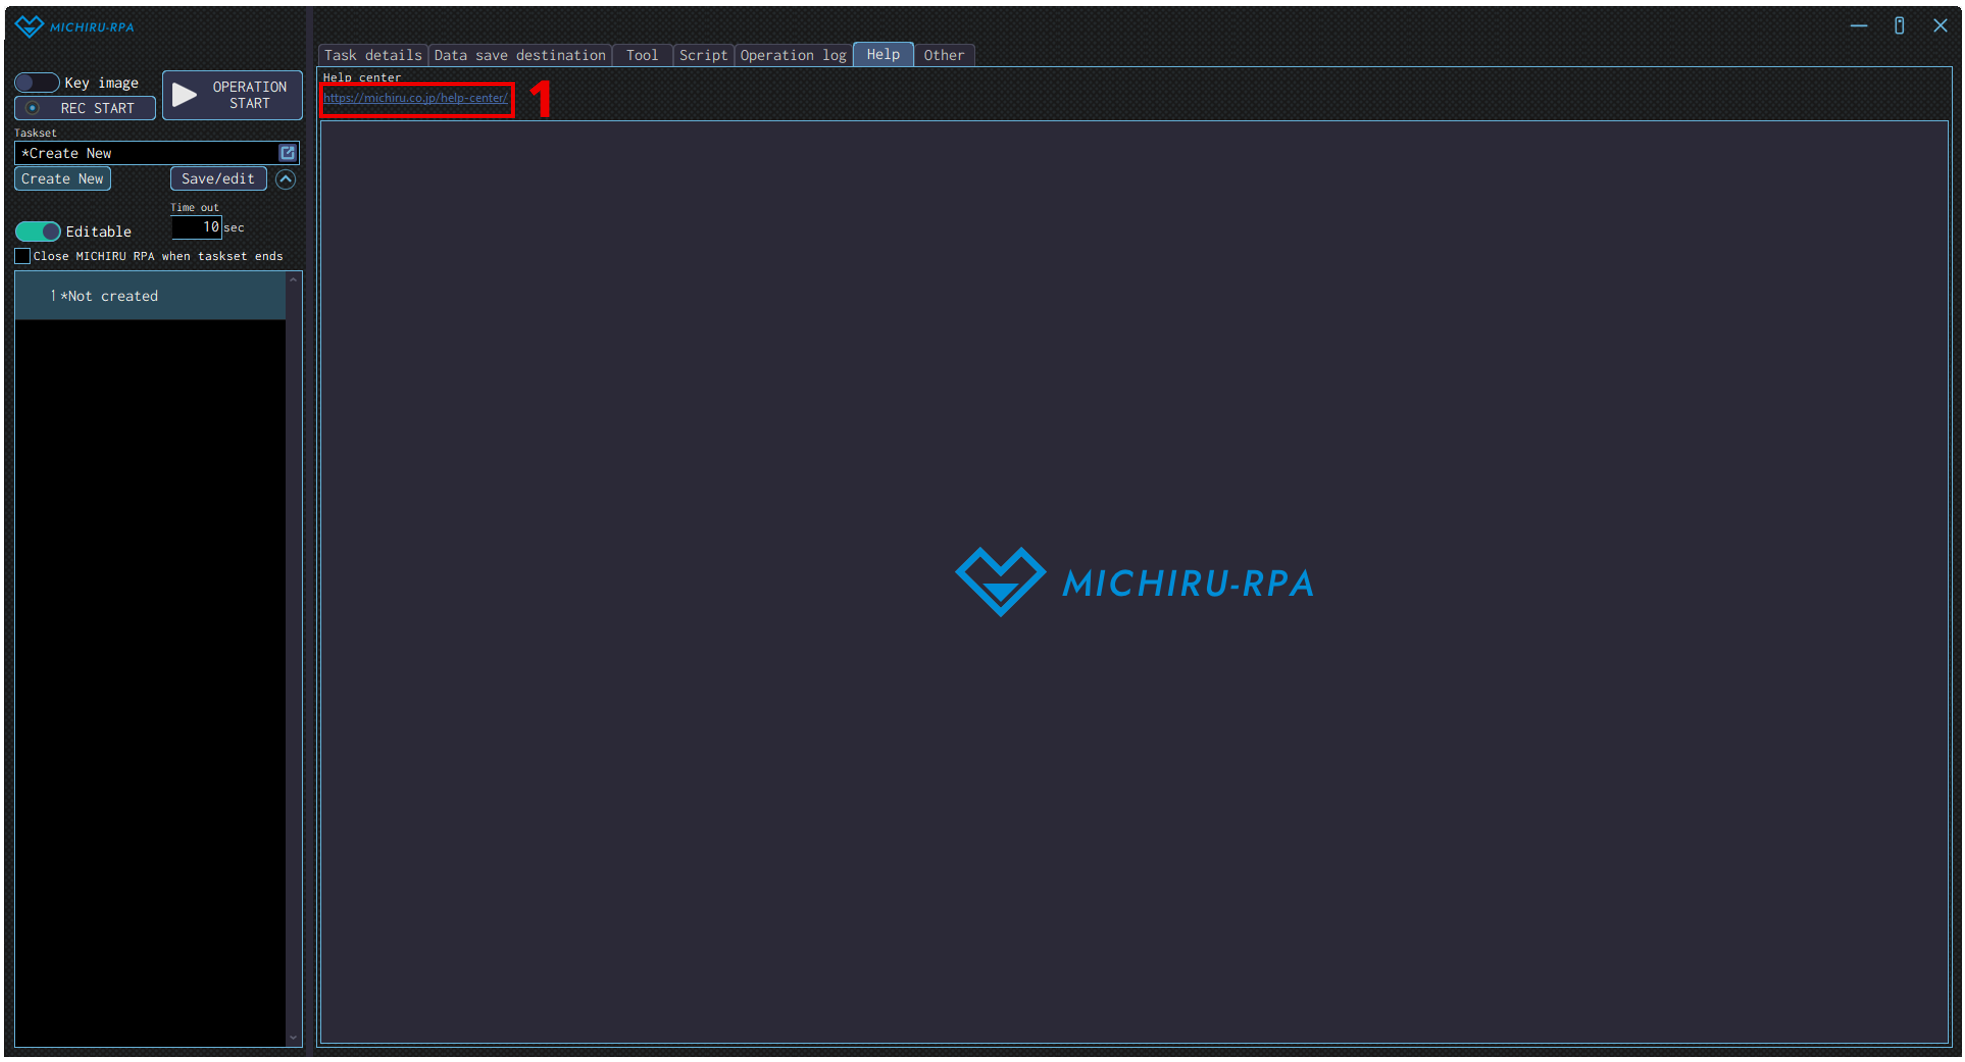
Clicking on the Help tab will lead you to the same window as the image below.
Clicking on the red frame shown in the image will display the help page of MICHIRU RPA in another window.
*The English version of the Help Center is a work in progress. This link will redirected you to the Japanese version. - Information
-
*The Information tab is no longer available as of version 1.4.2.0.
Important information will be sent to all users via email. - Other
-
Clicking on the Other tab will lead you to the same window as the image below.
You can view the license and version information, congifure the settings here.No. Name Explanation 1 License License information is displayed here.
Click on “License renewal” to begin the process of renewing your license .2 When key image is not found Configure what RPA should do when key image is not found. 3 Message display settings Configure what RPA should do when starting, or when ending unexpectedly. 4 Queue function setting Configuring what MICHIRU RPA should do when receiving external command to execute the automation set.
– Enable Queue function
– Disable Queue function only when there are automation set being executed
– Disable Queue function5 Settings related to automation set sharing Configure these settings when sharing automation set or script with other PC. 6 Shortcut key The shortcut key for stopping automatic operation, and for getting key image (key image / element after version 1.3) can be changed here. 7 Thumbnail Configure the thumbnail for the automation set 8 Proxy Configure the proxy to use when MICHIRU RPA or MICHIRU browser is connecting to internet. Detailed setting will be displayed when pressing “Proxy settings”
1: Choose to enable / disable proxy setting
2: Configure address of the proxy server
3: Configure the port to use when connecting to proxy server
4: Configure the user name to use when connecting to proxy server
5: Configure the password to use when connecting to proxy server
6: Configure addresses that will not be using proxy even if the proxy setting is enabled9 Screen pos during recording Configure screen position when recording 10 Screen style Configure the style of the UI screen (font, color) 11 Language in use Choosing the language to use, 12 Action Import or export automation set created. 13 Version Information Display version of the RPA 14 How elements are collected
After version 1.4Get all elements in the screen when pressing the shortcut key to capture Key image / element. 15 Get HTML
After version 1.4Get HTML when pressing the shortcut key to capture Key image / element. 16 Key used for displaying frame around elements
*After version 1.4Display frame around elements when you press this key in element mode.