When creating operation using mouse, keyboard or browser, you will need to configure “what action to execute (and how to execute)” on “which part (specifying position of the operation” of “which window (specifying target window)”.
When changing the position of an operation based on the value of data save destination, conditions will need to be configured as well.
Here is the step to specifying postion of operation and executing it in MICHIRU RPA.
MICHIRU RPA identifies target windows using window information, such as target CLASS and window title.
For actions such as click and text input, the position of operation is identified by searching for key image or element (element information).
Operation will be executed at the identified (discovered) position, or at a position relative to it. Besides mouse and keyboard, you can operate directly using XPath and element (element information) as well.
Topics related to these can be found below.
Specifying Target Window
The search method for the target window can be selected fom multiple options.
It is possible to combine various search methods of the target class and window title.
When multiple windows match the specified search conditions, the window closest to the front at the time the operation is executed will be selected.
Normally, you won’t have to configure this for every operation you create. If you need to customize the search method by yourself, try combining the selection from the “Target CLASS” and “Window title” dropdown menu.
Search Method for Target Window / Search Method for Window Title
- Search Method for Target Window
-
Target CLASS Window Search for target window from windows with the specified CLASS in the “Target CLASS” field. All windows Search all windows regardless of the target CLASS - Search Method for Window Title
-
Similarity High The window with the title most similar to the text specified in the “Window title” field will be the target of operation. Perfect match The window with a title that perfectly matches the text specified in the “Window title” field will be the target of operation.
If no title meets the specified conditions, an error will occur.Prefix match The window with a title that begins with and contains the text specified in the “Window title” field will be the target of operation.
If no title meets the specified conditions, an error will occur.Backward match The window with a title that ends with and contains the text specified in the “Window title” field will be the target of operation.
If no title meets the specified conditions, an error will occur.Including The window with a title that contains the text specified in the “Window title” field will be the target of operation. If no title meets the specified conditions, an error will occur. Foreground window The window at the foreground right before executing the operation will be the target of operation.The window title will not be used for search in this case.
MICHIRU RPA Settings Section
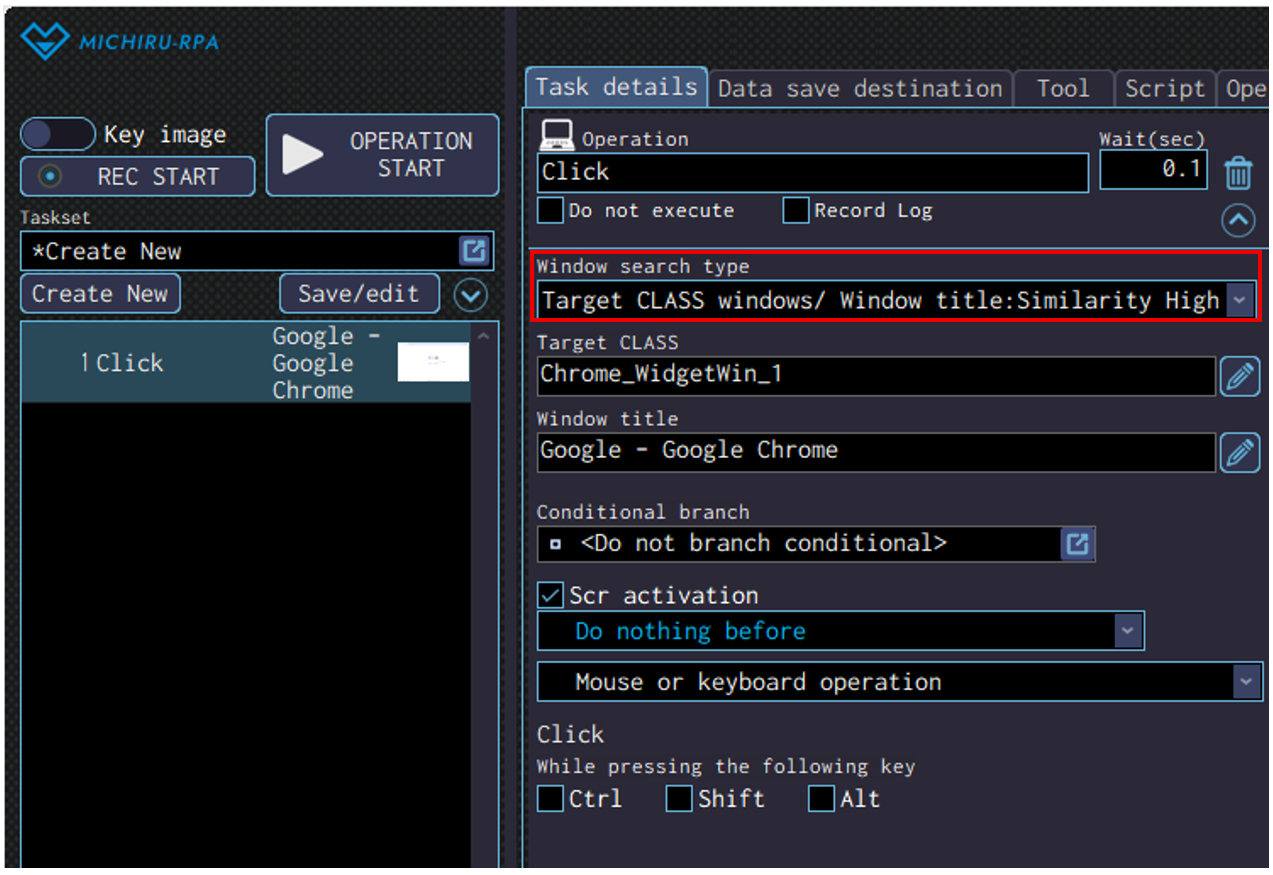
- Window Search Type
-
Specify the combination of “Search Method for Target Window / Search Method for Window Title”.

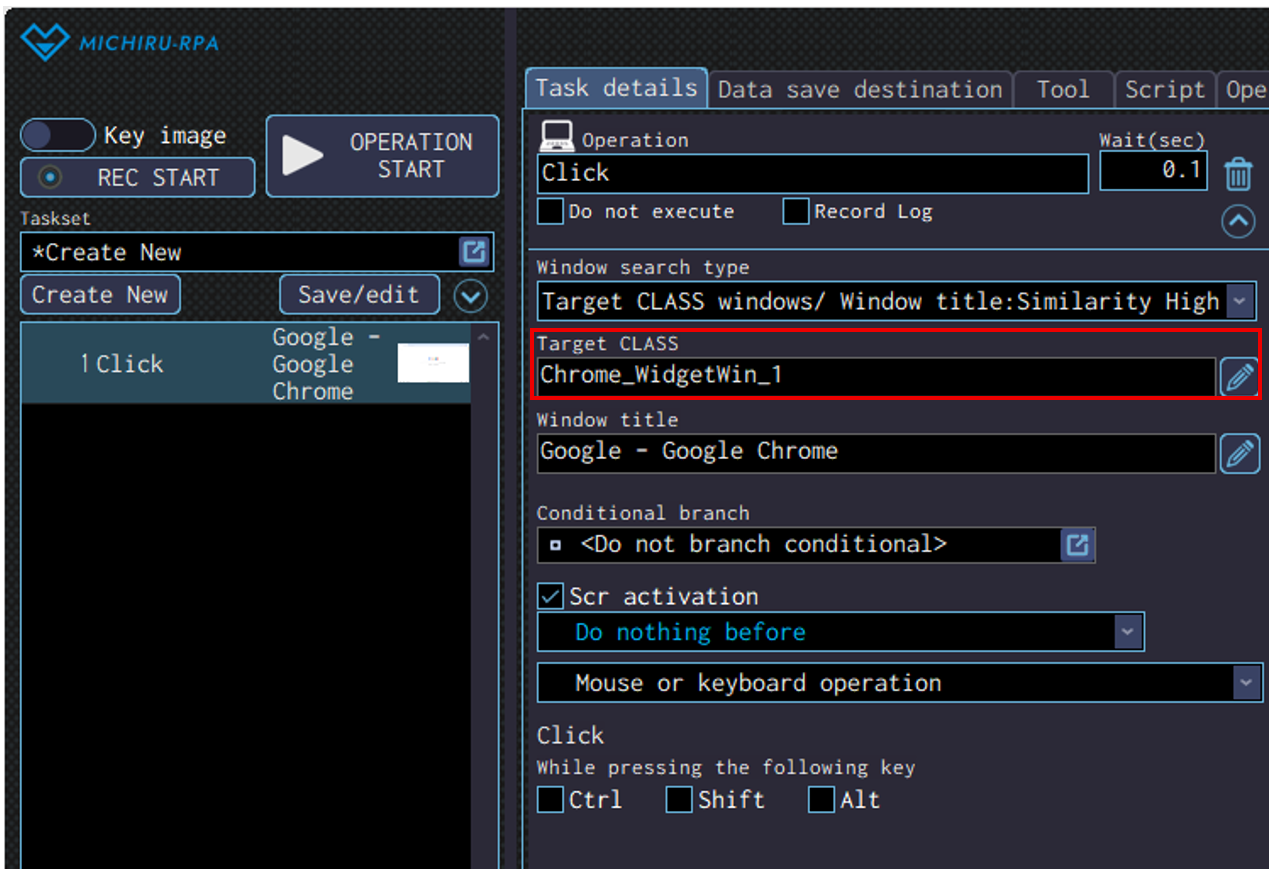
- Target CLASS
-
If “Target CLASS windows” is selected as the the search method for window in the “Window search type”, the window with CLASS name matching the text entered here will be selected as the target of operation.
The CLASS of a window is automatically collected and entered when capturing image / element for operations that require one.
To use contents saved in the data save destination, click on the pencil icon next to the “Target CLASS” field, and select the relevant data save name from “Insert data save name”.
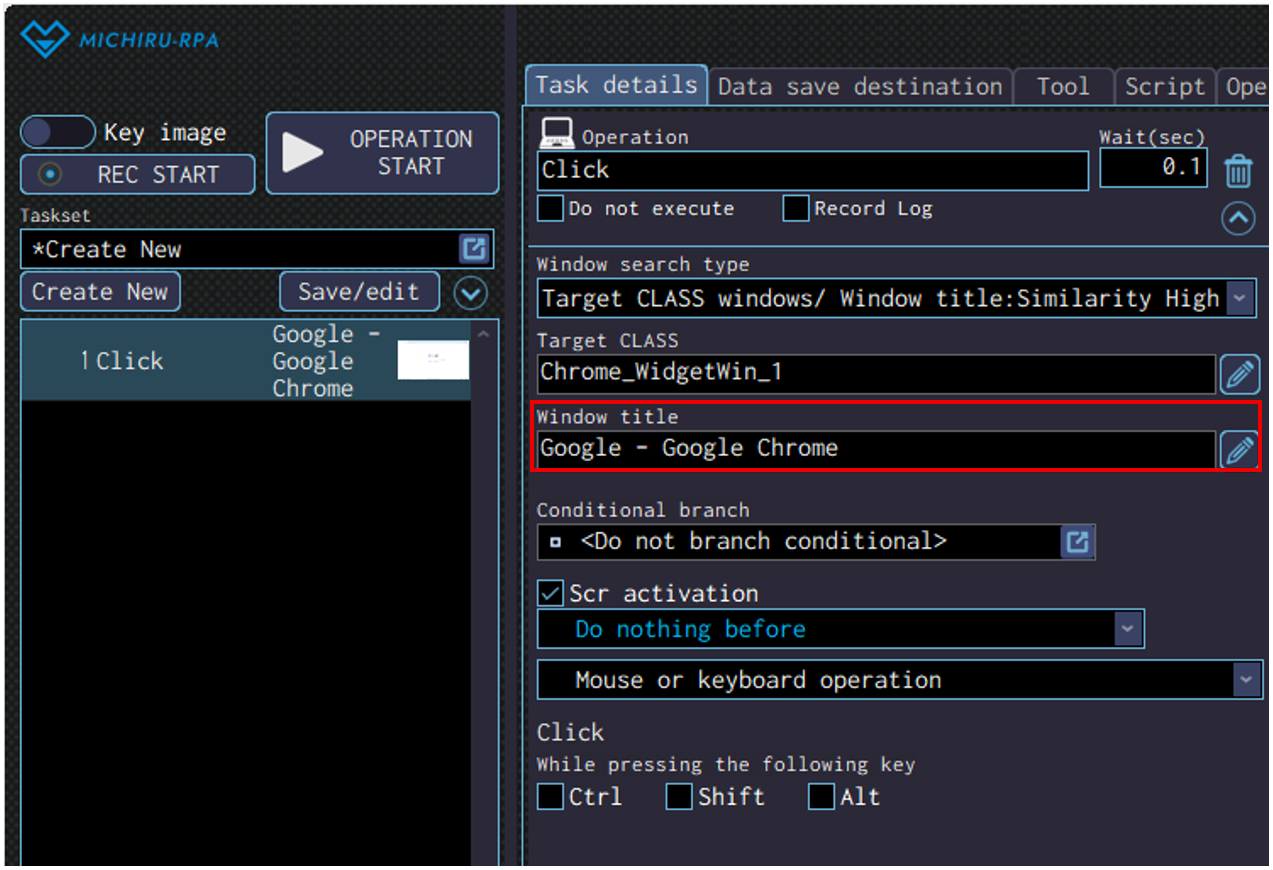
- Window Title
-
If options including “Window title” is selected as the the search method for window title in the “Window search type”, the window with title matching the text entered here will be selected as the target of operation.
The title of a window is automatically collected and entered when capturing image / element for operations that require one.
To use contents saved in the data save destination, click on the pencil icon next to the “Target window” field, and select the relevant data save name from “Insert data save name”.
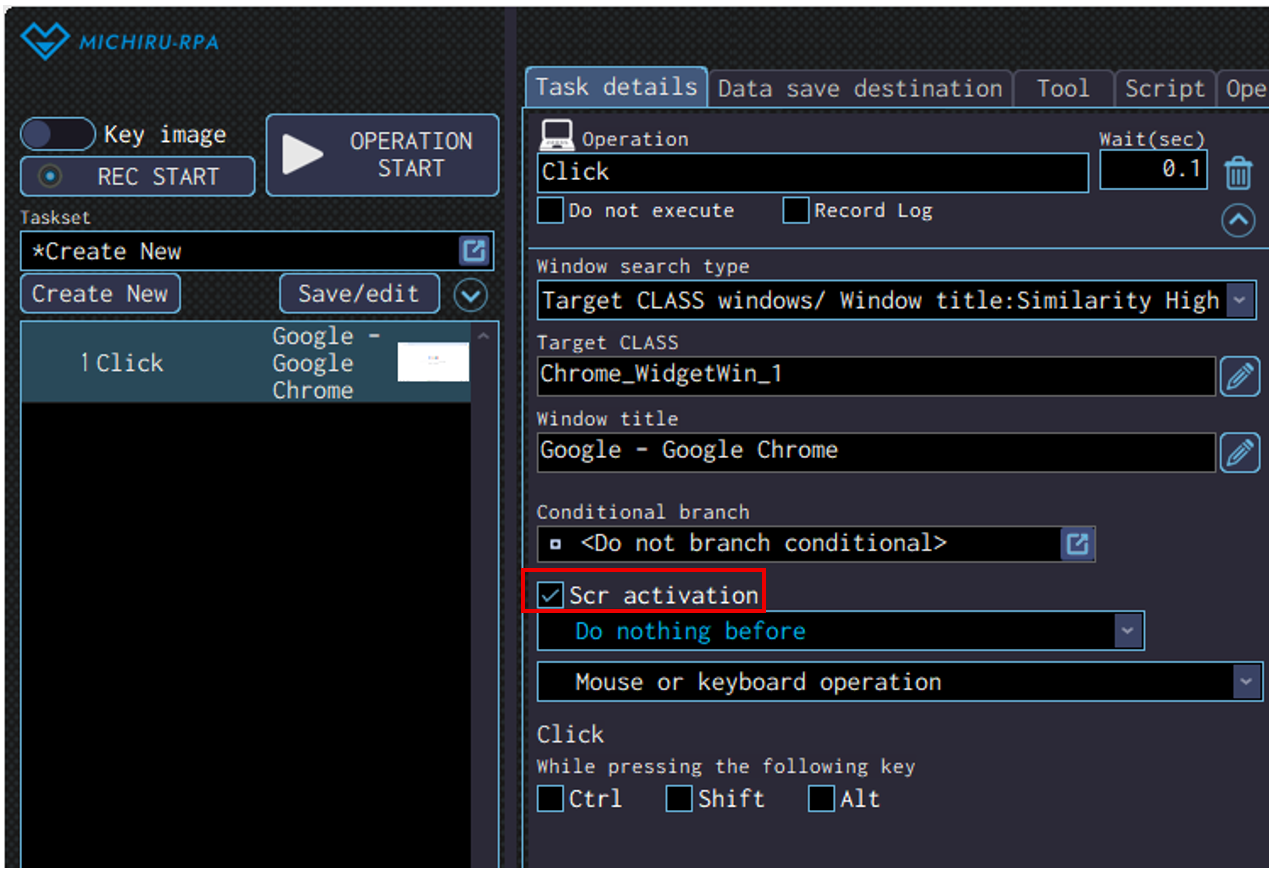
Activating Screen of the Target Window
Check on this option If you want the window that is the target of operation to be activated.
Operations with the Option to Activate the Screen
Here is the list of operations with the option to activate the screen.
-
Basic Function Search standby Mouse operation Click, Double click, Triple click, Drag, Right click, Double right click, Right drag, Center click, Center double click, Center drag, Scroll mouse wheel, Scroll to find image Text operation Key input, Text input, Password input, Select from list, Select checkbox, Get element information, Get elements count, Copy all selected, Copy selected range, Paste Browser operation Click, Text input, Select from list, Select checkbox, Get element information, Get elements count, JavaScript Execution MICHIRU browser operation Click, Text input, Select from list, Select checkbox, Get element information, Get elements count, JavaScript Execution, Close page, Get page(full text), Get page(snapshot), Get page(full PDF), Print page Operations with the option to activate the screen.
Identifying the Position of Operation (Detection)
There are 2 methods of identifying the position of operation (detection), a method using key image, and a method using element information.
When creating an automation set, you will need to choose between the 2 methods for each operation
*The method using element is only available after version 1.4
Here are the pros and cons for both methods of identifying the position of operation
| Pros | Cons | |
| Key Image | – Allow for more intuitive creation of an operation because you work directly on the screenshot captured. – Can detect the position of operation regardless the structure of the systems, the websites, and the programs. | – Reconfiguration is required when the systems, the websites, and the programs are redesigned. – Operation won’t be correctly executed when the resolution and scaling is different from when the screenshot is taken. |
| Element Information | – Easy to configure an operation. – Work regardless of the difference in the resolution and scaling, allowing the automation set to be easily transferred and used on other computers. | – Reconfiguration is required when changes are made to elements of the systems, the websites, and the programs. – Depending on the structure of the elements, it may be impossible to configure an operation. |
Key Image Search
Configure the settings using an image to locate the position of operation like Click and Text input. The term ” Key Image” refers to the reference image used as a visual marker.
Operations where Key Image Can Be Used
Here is the list of operations where Key image can be used.
*Operations highlighted in red require key image to work.
-
Basic function Search standby Mouse operation Click, Double click, Triple click, Drag, Right click, Double right click, Right drag, Center click, Double center click, Center drag, Scroll mouse wheel, Scroll to find image Text operation Key input, Password input, Text input, Copy all selected, Copy selected range, Paste Browser operation Click, Text input, Select from list, Select checkbox, Get element information, Get elements count, JavaScript execution MICHIRU browser operation Click, Text input, Select from list, Select checkbox, Get element information, Get elements count, JavaScript execution, Close page, Get page (full text), Get page (snapshot), Get page (full PDF), Print page Other OCR reading Operations where setting key image is required.
Method of Capturing Key Image
After version 1.4, select “Key image” in the capture mode switch.
- Way to Select Operation after Capturing Image
-
Activate the screen that you want to capture, then press the shortcut for capturing image (set to “Shift” by default). The operation is usually set to “Click” or “Select from list” in the beginning. If it does not match what you want to do, you can select another operation type from the menu.
- Way to Select Operation before Capturing Image (Including when Recapturing Image)
-
After selecting operation, click “Edit” button in the Task detail screen to open the edit screen for image. Click on “Image capture” button, go to the window you want to capture, adjust the position of your mouse cursor, then press the shortcut for capturing image (set to “Shift” by default).
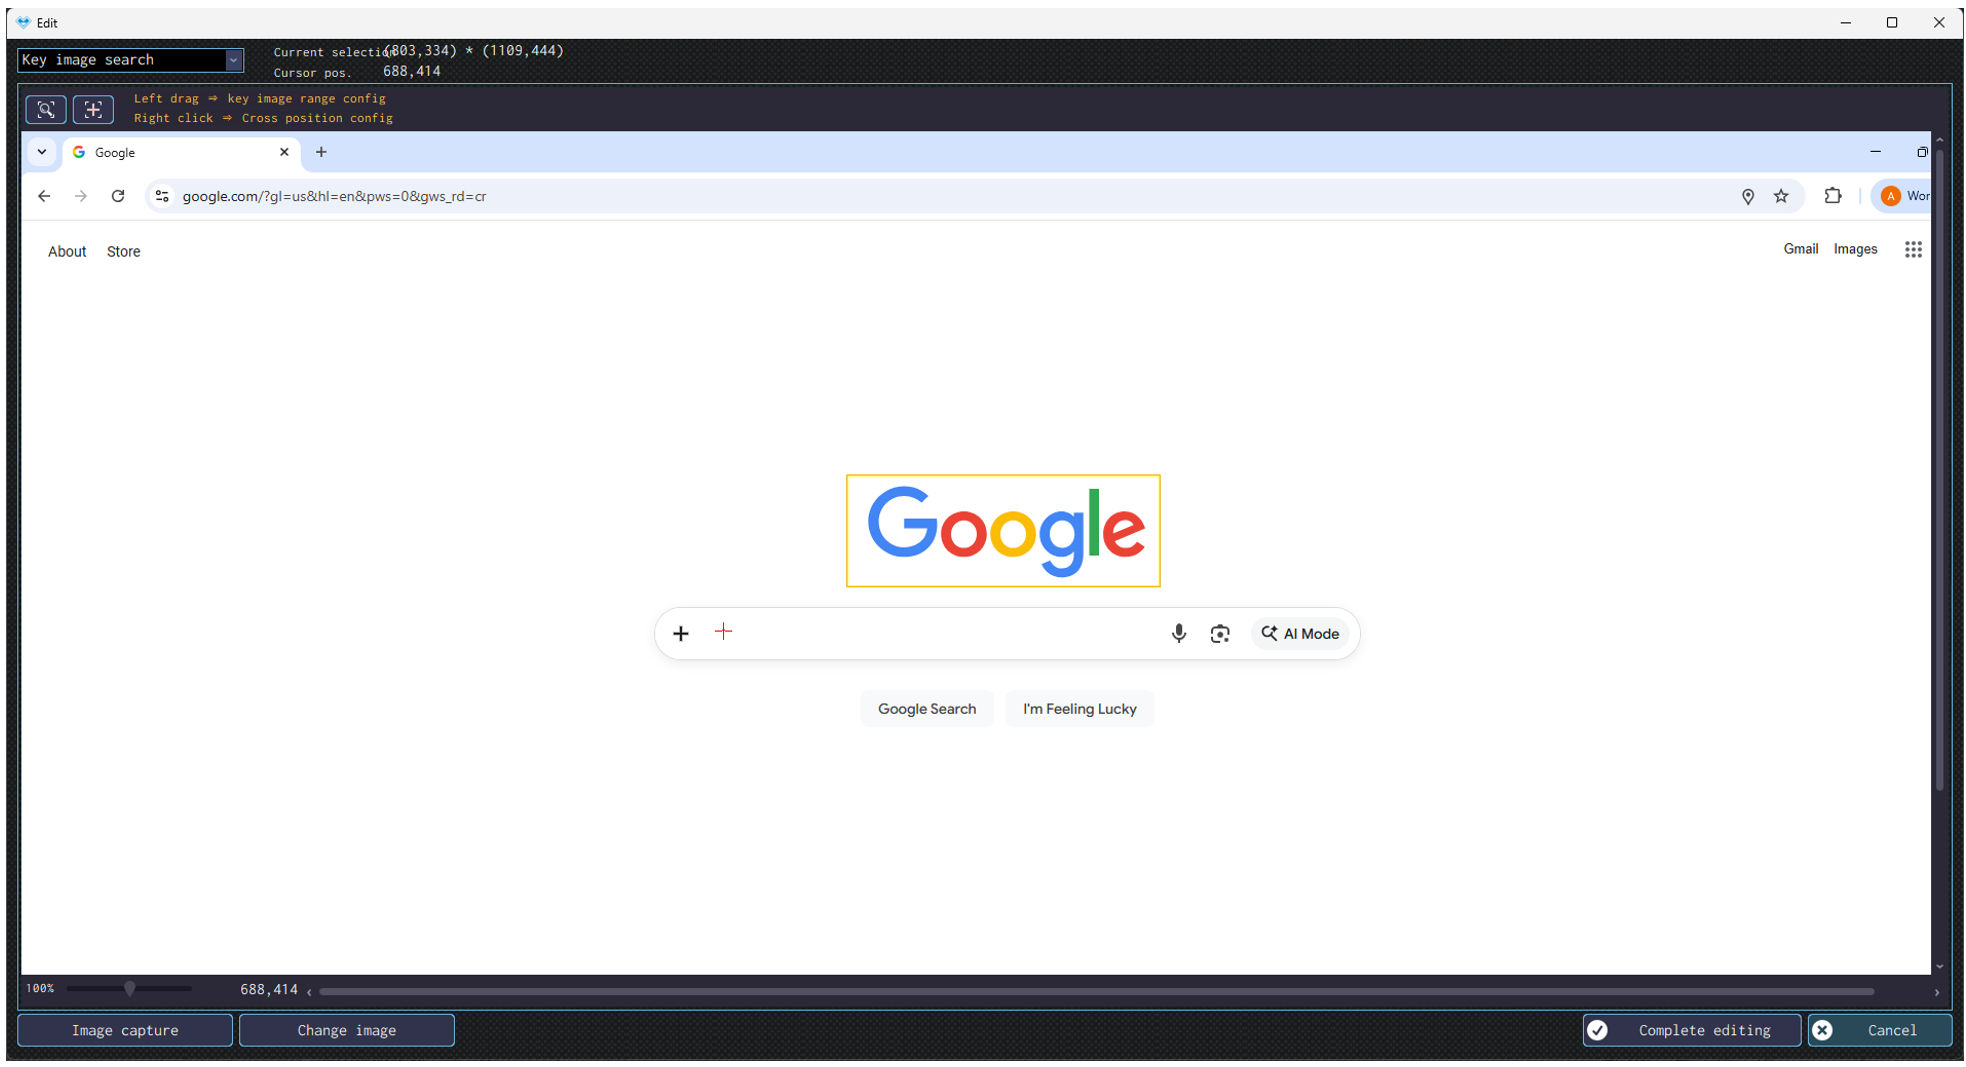
Setting Key Image and Position of Operation.
After capturing an image of the screen, the key image will be set to the whole screenshot, while the position of the operation will be set to the position of the cursor by default.
In the edit image screen (accessed by clicking on “Edit” button, or by double clicking the image), you can set the key image and the position of operation with the method expained in the following section.
| Setting key image | Drag using your left mouse over the area to set as key image. |
|---|---|
| Setting position of operation | Click (or drag for some operation) using your right mouse to set a point as a position of operation. |
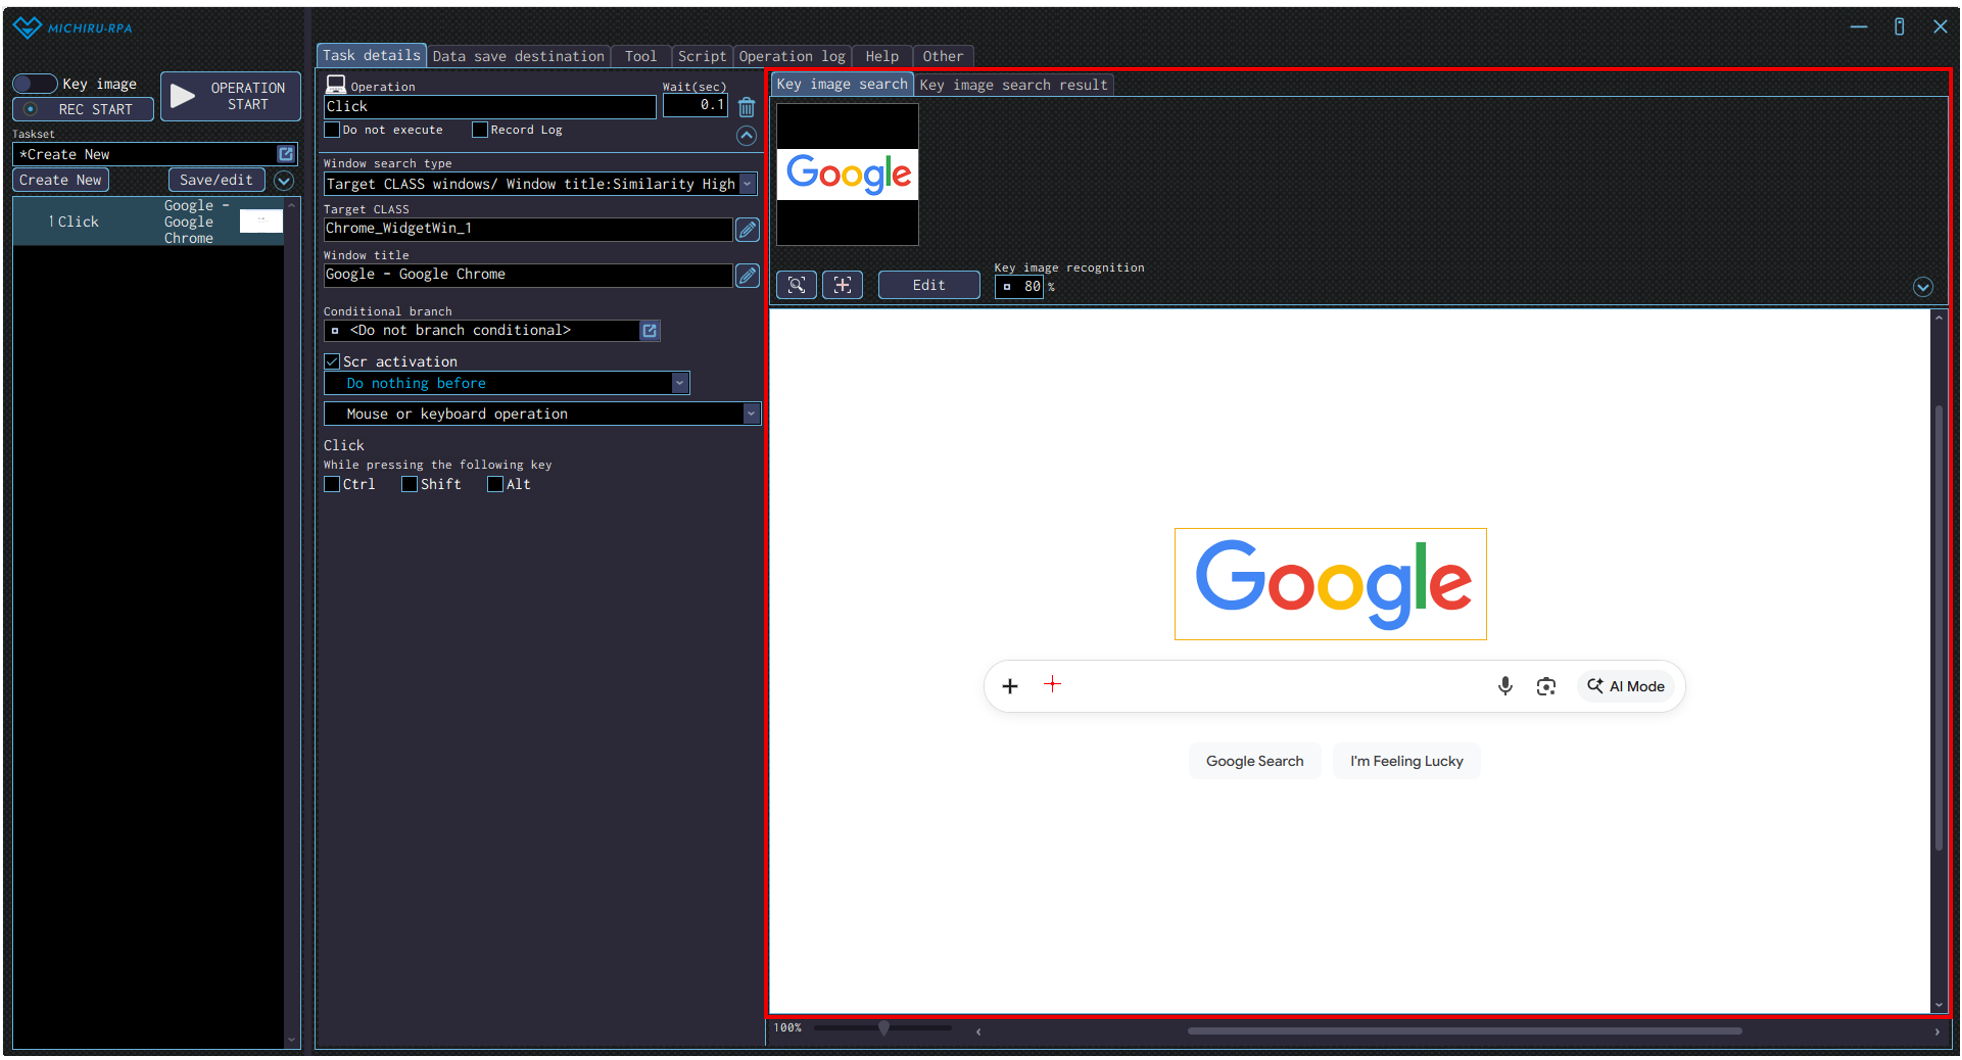
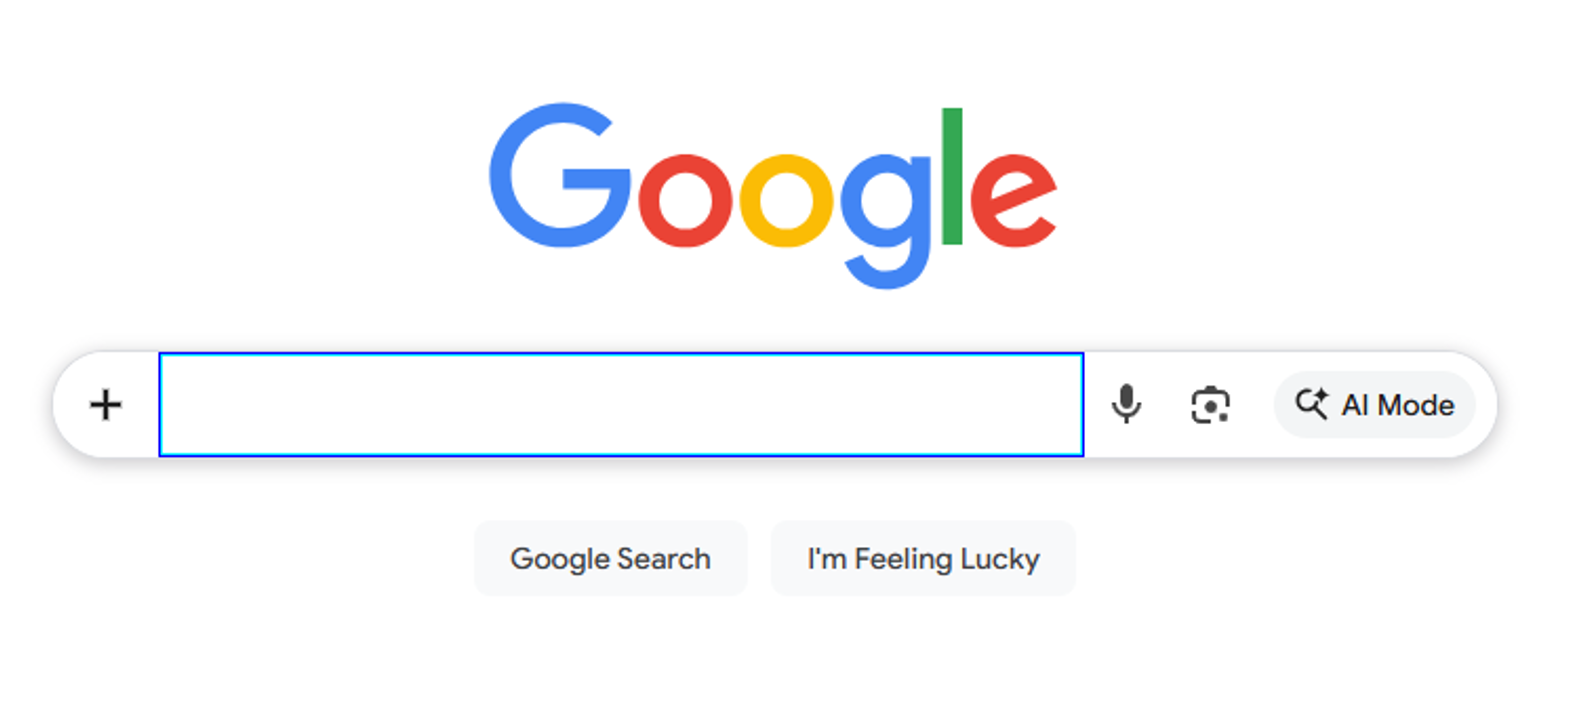
The following image shows the example where the logo of Google is set as the key image to look for (orange frame), and the input field below is set to be clicked on (red cross).
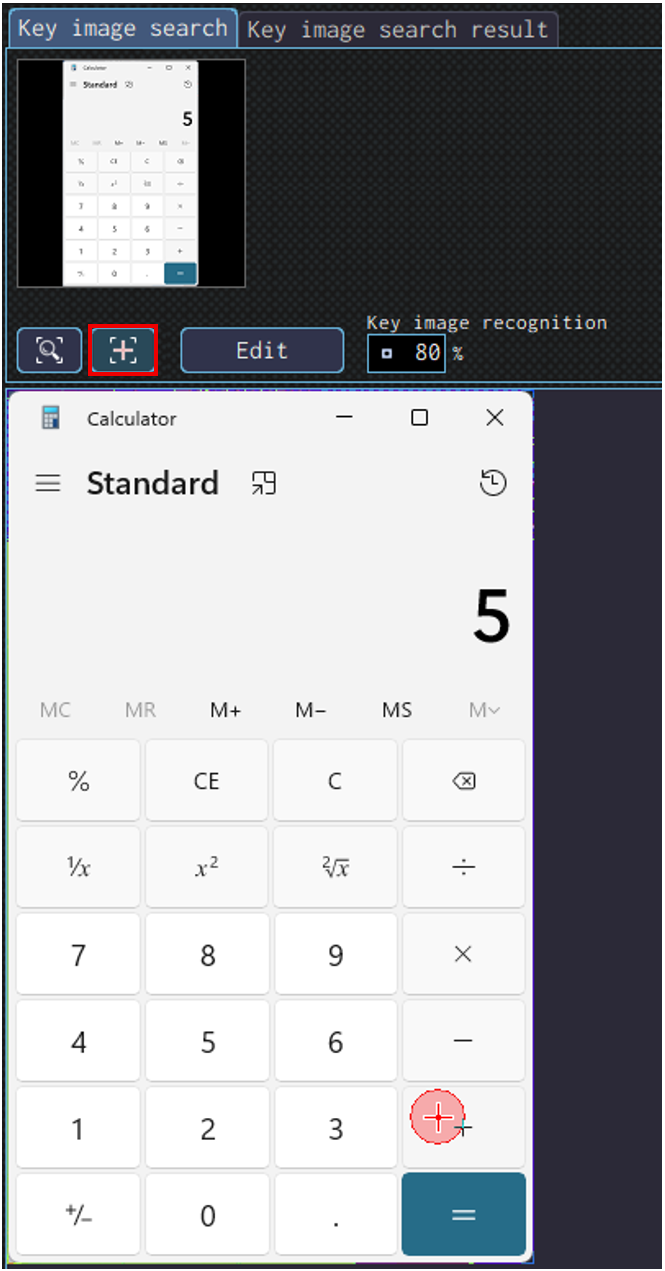
Checking Key Image and the Position of Operation
For operation like “Click” and Text input”, the operation will take place at the cursor position related to the key image, which can be considered as a reference point.
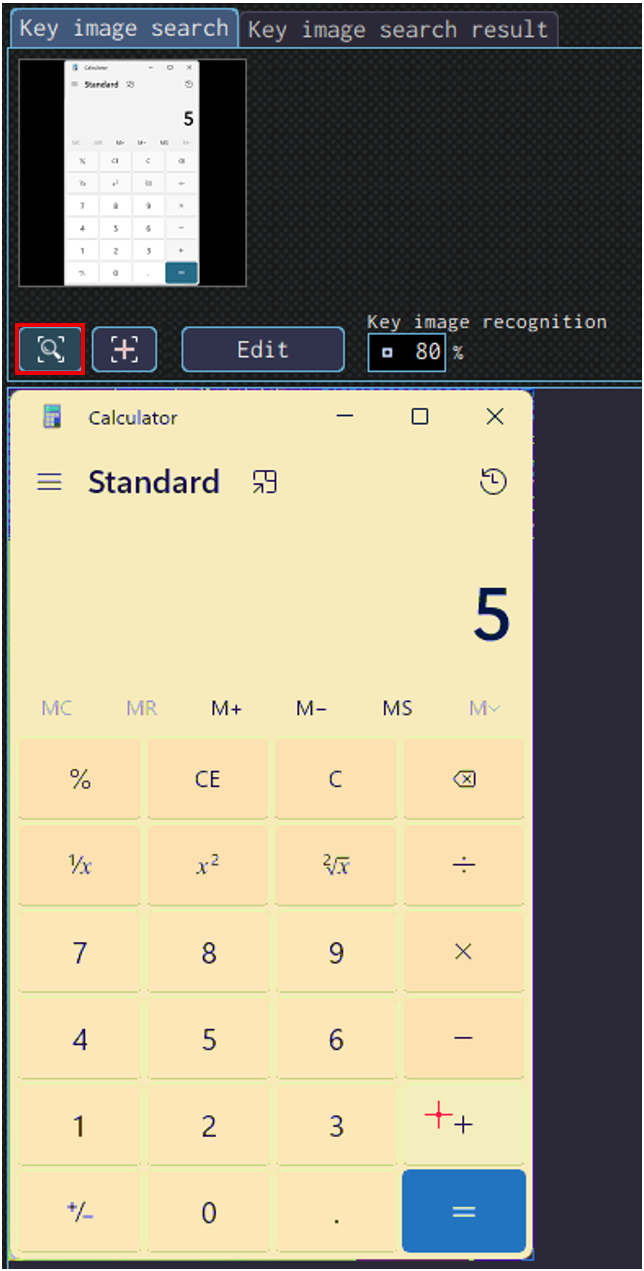
The place selected as key image and position of operation is indicated by a frame and a red cross. You can click on “Check key image”and “Check the cross position” to temporarily highlight and check them.
These buttons are close to the “Edit” button” in the Task detail tab.
Element (Element Information) Search
Configure the settings using element (element information) to locate the position of operation such as Click and Text input.
Method of Capturing Element (Element Information)
Switch to “Element” in the capture mode switch, then configure as the following.
- Capturing the Element Using Shortcut Key
-
Move the mouse cursor to the place you want to operate on, press the shortcut key for capturing element (set to “Shift” key by default) to capture the element (element information).
This will automatically create one new operation. If the operation doesn’t match what you want, change the operation in the operation menu again.When pressing on the element frame display key (set to “Shift” key by default) a frame will be displayed around the elements on the screen to operate on.This is useful when you want to check the element to operate before creating the operation.
The following image shows the example where element capture key is pressed when the cursor is on the search box of Google. A blue frame will be displayed around the search box. - Right-clicking on the Place to Operate, and Select the Operation.
-
Move the cursor to the intended position of operation, right-click and select the operation to use from the menu. Element (element information) will be collected afterwards.

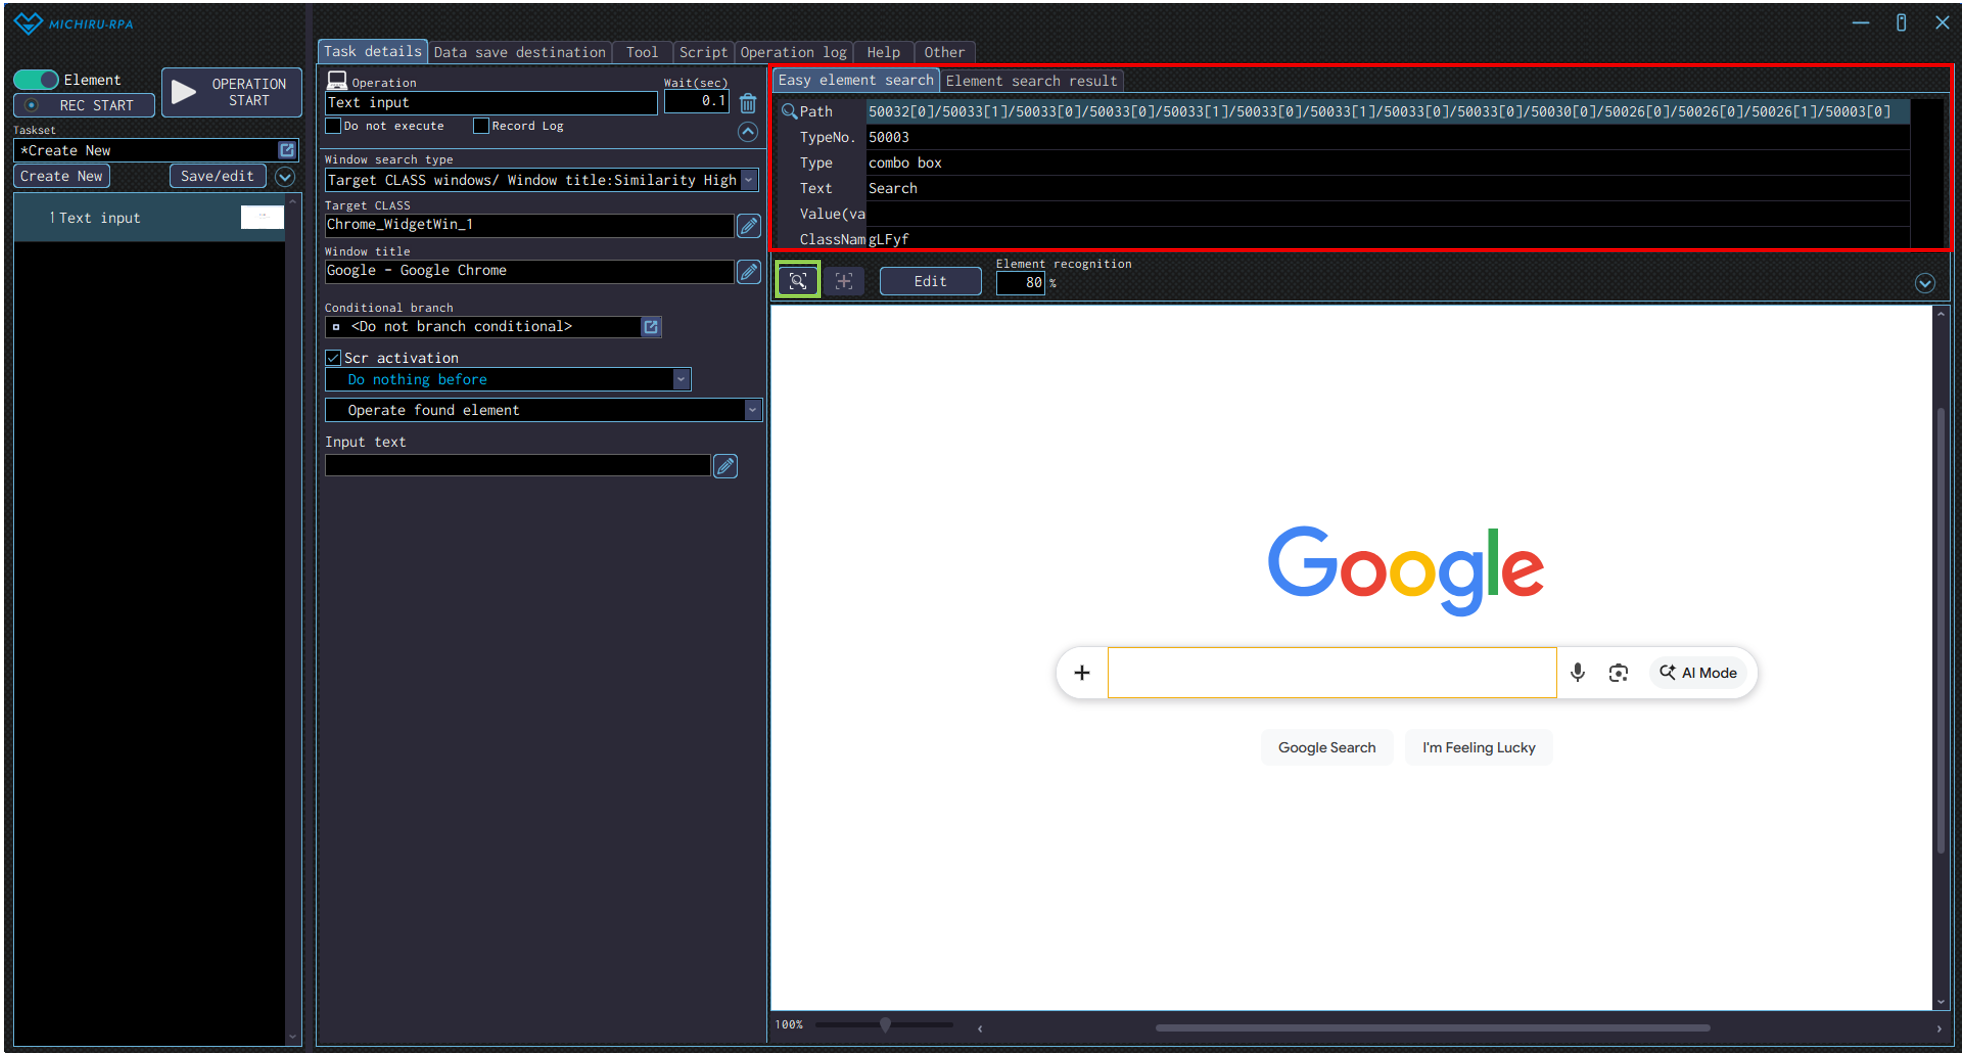
Checking Element (Element Information)
In the top right part of the extended window in MICHIRU RPA, element (element information) that is the target of the operation will be displayed (like the red frame in the image below). Element (element information) contains the following information.
| Path | An address that indicates the structure of an element |
|---|---|
| ID | A unique ID assigned to an element (many elements do not have one assigned) |
| TypeNo. | Type of element (button or text) displayed in numerical format |
| Type | Type of element in text format |
| Text | Text displayed in the element (may be different from what is actually being displayed on the screen) |
| Value | Value of the element |
| ClassName | Class name assigned to the element (blank if none is assigned) |
Click on the magnifying glass icon (green frame) will make the search element flash.
This is useful when you are checking the position of the element.
Changing the Element (Element Information)
In the “Other” tab in MICHIRU RPA, if “get all elements when getting key image” is turned on, you can follow the following method to change the target element.
If the option is turned off, please capture the element again.
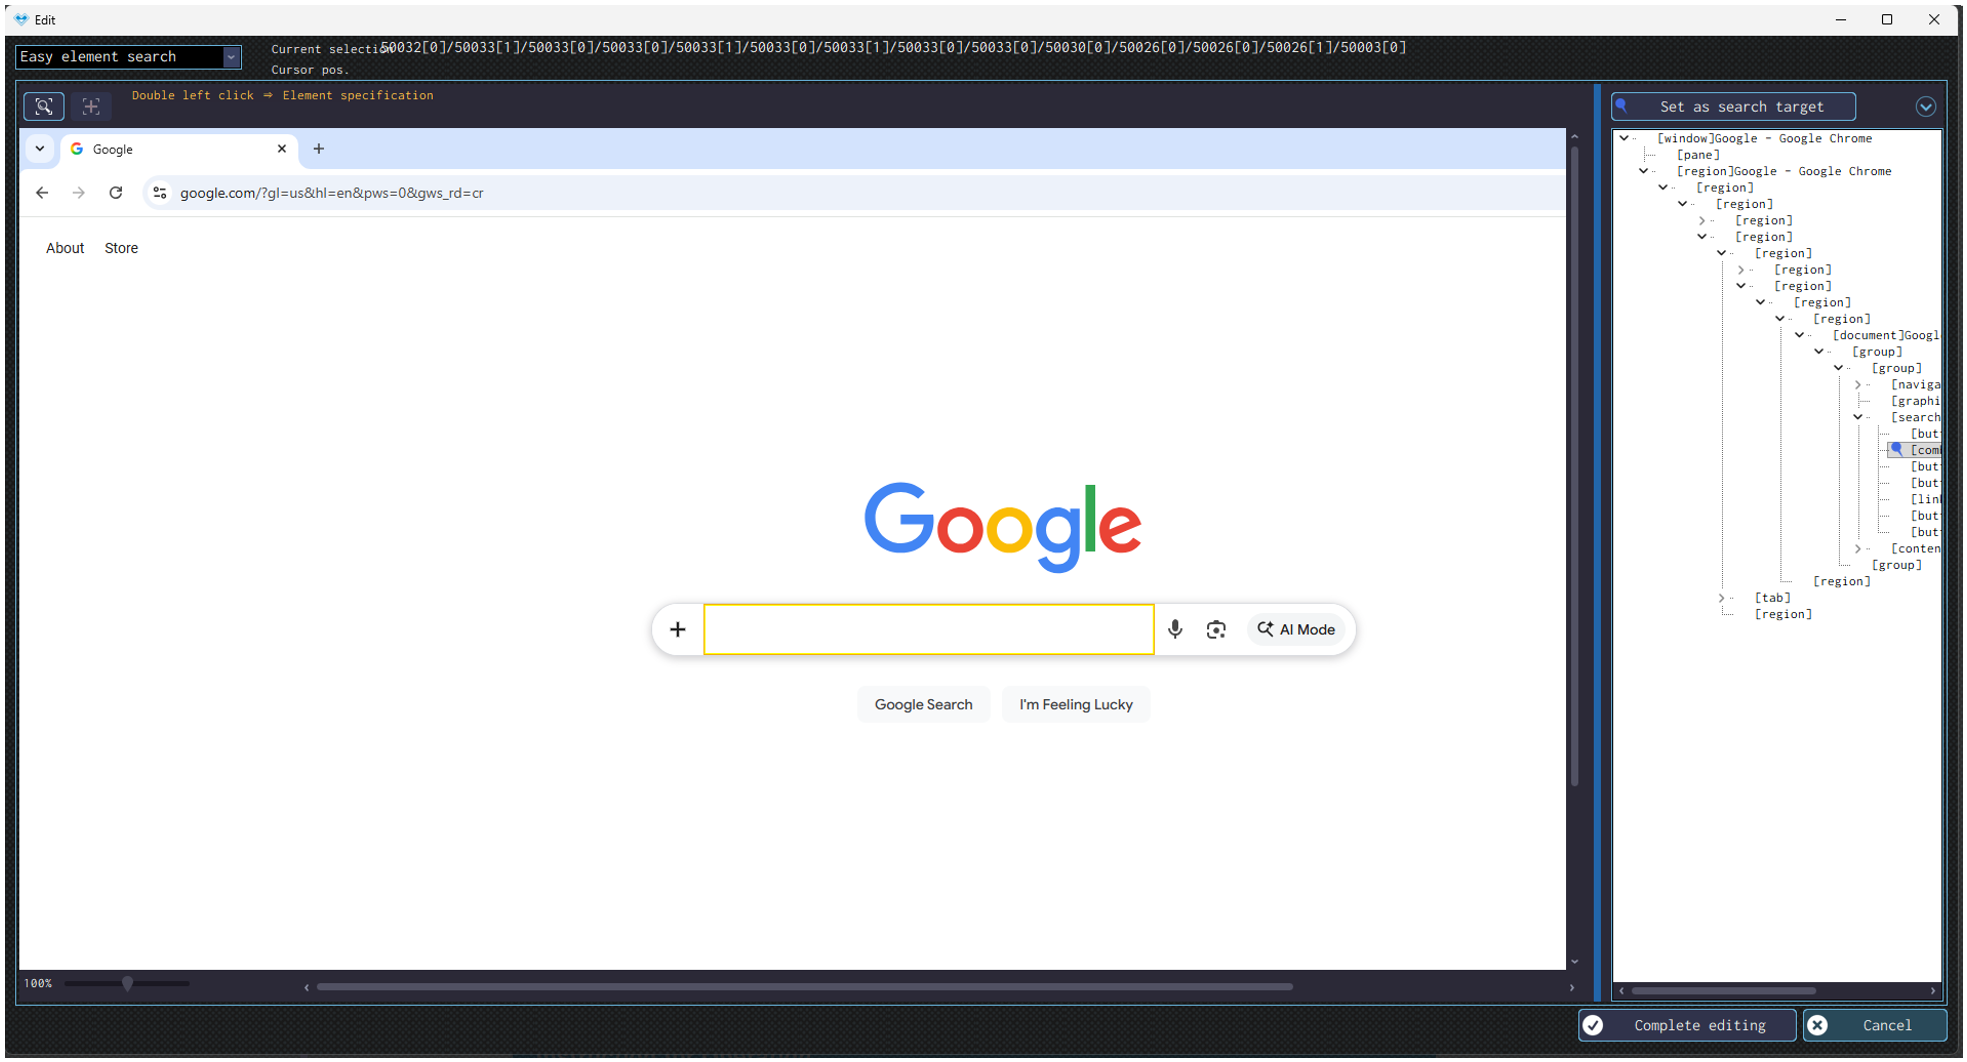
Click on “Edit” to open the edit screen, double click on the position you want to set as the target element.
You can also selected the relevant element from the tree displayed on the right side of the screen. After selecting, click on “Set as search target” at the top right.
Check if the frame showing element has correctly moved to the new target element, then click on “Complete editing” to finish the setting.
Instruction for Operation
You can configure detailed settings, or additional settings for the operations you created.
Settings available are different for each operation. Examples of detailed settings available include conditional branch within an operation, mouse action before an operation, editing formula.
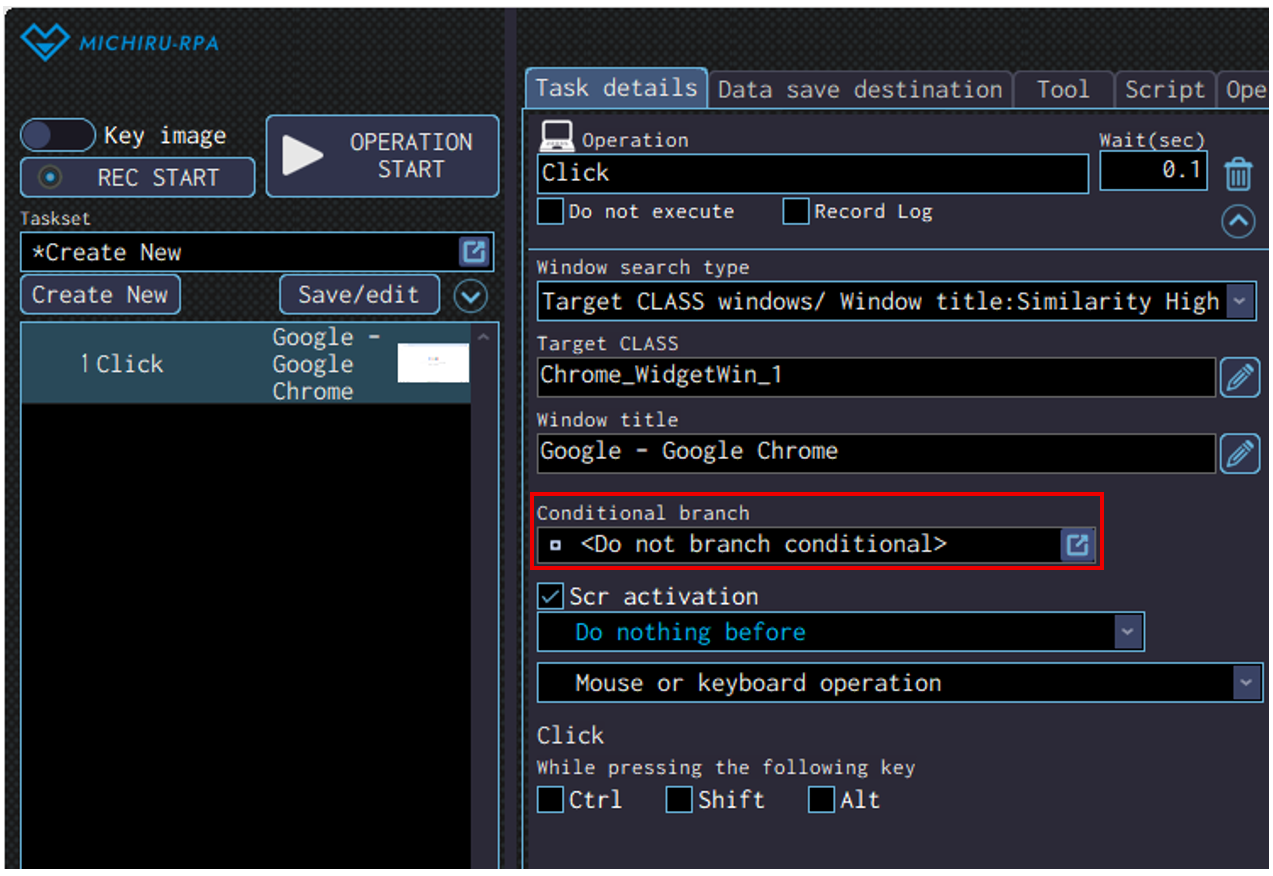
Conditional Branch Within an Operation
You can create a branching condition inside a single operation.
Use this to change the position or area of operation depending on the content saved in the data save destination.
Operations with Conditional Branch Available
Here is the list of operations with conditional branch available.
-
Basic function Search standby Mouse operation Click, Double click, Triple click, Drag, Right click, Double right click, Right drag, Center click, Double center click, Center drag, Scroll mouse wheel, Scroll to find image Text operation Key input, Text input, Password input, Select from list, Select checkbox, Get element information, Get elements count, Copy all selected, Copy selected range, Paste Browser operation Click, Text input, Select from list, Select checkbox, Get element information, Get elements count, JavaScript execution MICHIRU browser operation Click, Text input, Select from list, Select checkbox, Get element information, Get elements count, JavaScript execution, Close page, Get page (full text), Get page (snapshot), Get page (full PDF), Print page Other OCR reading
Available Conditons
The available conditions vary depending on the data type of the data save destination.
Here is the list of the conditions that can be found
| Condition | Explanation | Text | Number | Image |
|---|---|---|---|---|
| <No condition> | If none of the other specified conditions are met, this condition will be treated as matched. | ○ | ○ | ○ |
| Txt: If equal to… (=) | If the specified value matches, the condition is considered met. | ○ | – | – |
| Txt: If not equal to… (≠) | If the specified value does not match, the condition is considered met. | ○ | – | – |
| Txt: If prefix matches with… | If the beginning of the text matches the specified value, the condition is considered met. | ○ | – | – |
| Txt: If suffix matches with… | If the end of the text matches the specified value, the condition is considered met. | ○ | – | – |
| Txt: If includes… | If the specified value is contained in the saved data, the condition is considered met. | ○ | – | – |
| Txt: If does not include… | If the specified value is not contained in the saved data, the condition is considered met. | ○ | – | – |
| Txt: If matches the following regular expression | If the specified regular expression matches, the condition is considered met. | ○ | – | – |
| Txt: If saved data size greater than… (>) | If the size of saved data is greater than the specified value when compared as texts, the condition is considered met. | ○ | – | – |
| Txt: If saved data size less than… (<) | If the size of saved data is less than the specified value when compared as texts, the condition is considered met. | ○ | – | – |
| Num: If equal to… (=) | If the specified value matches, the condition is considered met. | ○ | ○ | – |
| Num: If not equal to… (≠) | If the specified value does not match, the condition is considered met. | ○ | ○ | – |
| Num: If greater than or equal to… (≧) | If the saved data is greater than or equal to the specified value, the condition is considered met. | ○ | ○ | – |
| Num: If less than or equal to… (≦) | If the saved data is less than or equal to the specified value, the condition is considered met. | ○ | ○ | – |
| Num: If greater than… (>) | If the saved data is greater than the specified value, the condition is considered met. | ○ | ○ | – |
| Num: If less than… (<) | If the saved data is less than the specified value, the condition is considered met. | ○ | ○ | – |
| Num: If in the following range | If the saved data falls within the specified value range, the condition is considered met. | ○ | ○ | – |
| Num: If not in the the following range | If the saved data falls within the specified value range, the condition is considered met. | ○ | ○ | – |
| If in the active window | If the saved image data is present on the active window, the condition is considered met. | – | – | ○ |
| If in the front window | If the saved image data is present on the foremost window, the condition is considered met. | – | – | ○ |
| If on the desktop | If the saved image data is present anywhere on the entire desktop, including on other monitors, the condition is considered met | – | – | ○ |
| If not in the active window | If the saved image data is not present on the foremost window, the condition is considered met. | – | – | ○ |
| If not in the front window | If the saved image data is not present on the foremost window, the condition is considered met. | – | – | ○ |
| If not on the desktop | If the saved image data is not present anywhere on the entire desktop, including on other monitors, the condition is considered met | – | – | ○ |
| If the found X coordinate is greater than or equal to | If the saved image data is found on the entire desktop and its detected X-coordinate is greater than or equal to the specified value, the condition is considered met. | – | – | ○ |
| If the found X coordinate is less than or equal to | If the saved image data is found on the entire desktop and its detected X-coordinate is less than or equal to the specified value, the condition is considered met. | – | – | ○ |
| If the found X coordinate is within the following range | If the saved image data is found on the entire desktop and its detected X-coordinate falls within the specified value range, the condition is considered met. | – | – | ○ |
| If the found Y coordinate is greater than or equal to | If the saved image data is found on the entire desktop and its detected Y-coordinate is greater than or equal to the specified value, the condition is considered met. | – | – | ○ |
| If the found Y coordinate is less than or equal to | If the saved image data is found on the entire desktop and its detected Y-coordinate is less than or equal to the specified value, the condition is considered met. | – | – | ○ |
| If the found Y coordinate is within the following range | If the saved image data is found on the entire desktop and its detected Y-coordinate falls within the specified value range, the condition is considered met. | – | – | ○ |
Operation Screen
The image below shows the example where conditions to decide the position of “Click” operation are created using “Data1” from data save destination.
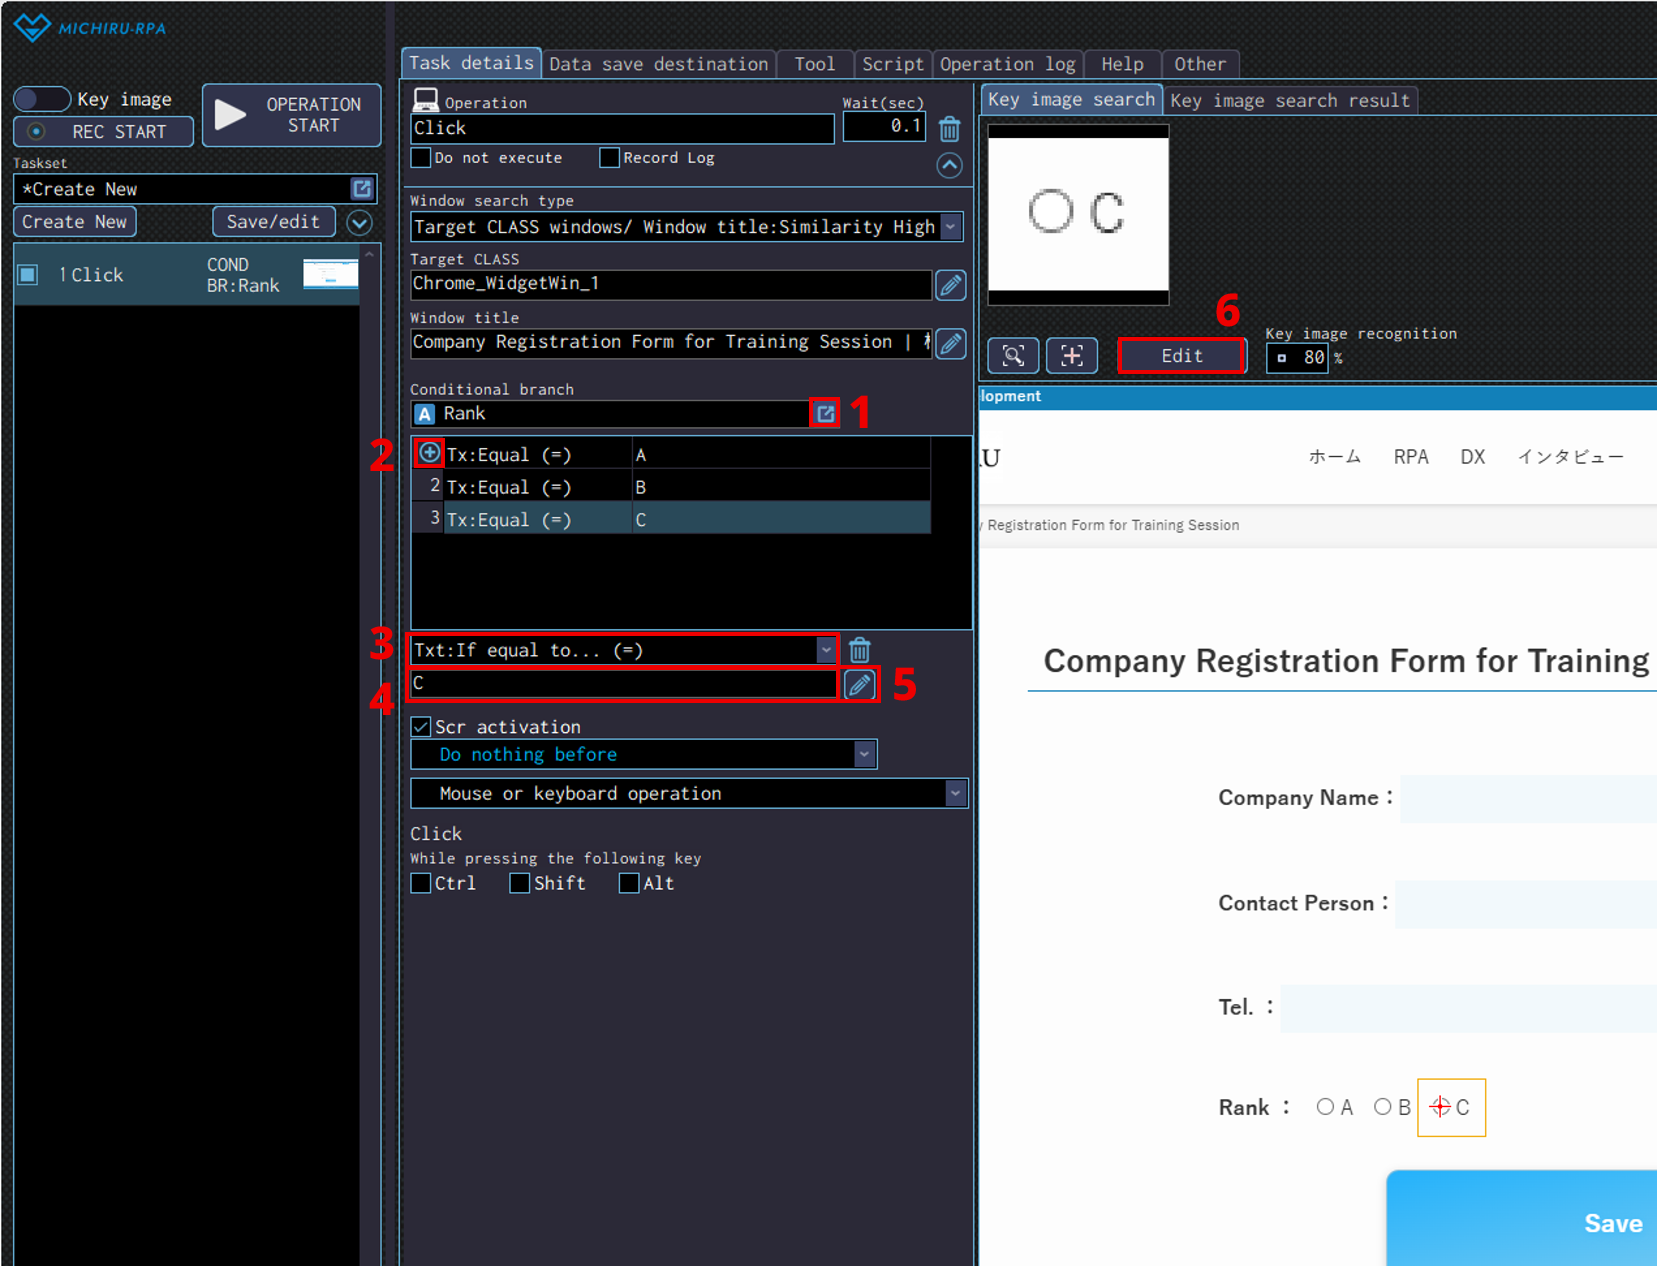
| No. | Explanation |
|---|---|
| 1 | Specify the data save destination to use for the conditions. |
| 2 | Add more condition. |
| 3 | Specify the type of condition. Refer to this section for more information. |
| 4 | Enter the text or number that define the condition. |
| 5 | Click on the pencil mark if you want to define the text or number that define the condition using formula editor. Data stored in data save destination can also be used. |
| 6 | If key image or cursor operation needs to be set, you will have to edit in the edit screen for each available condition. |
Action Before Operation
Use this when you want the mouse cursor to move or click before the selected operation is executed.
Action available varies depending on the selected operation.
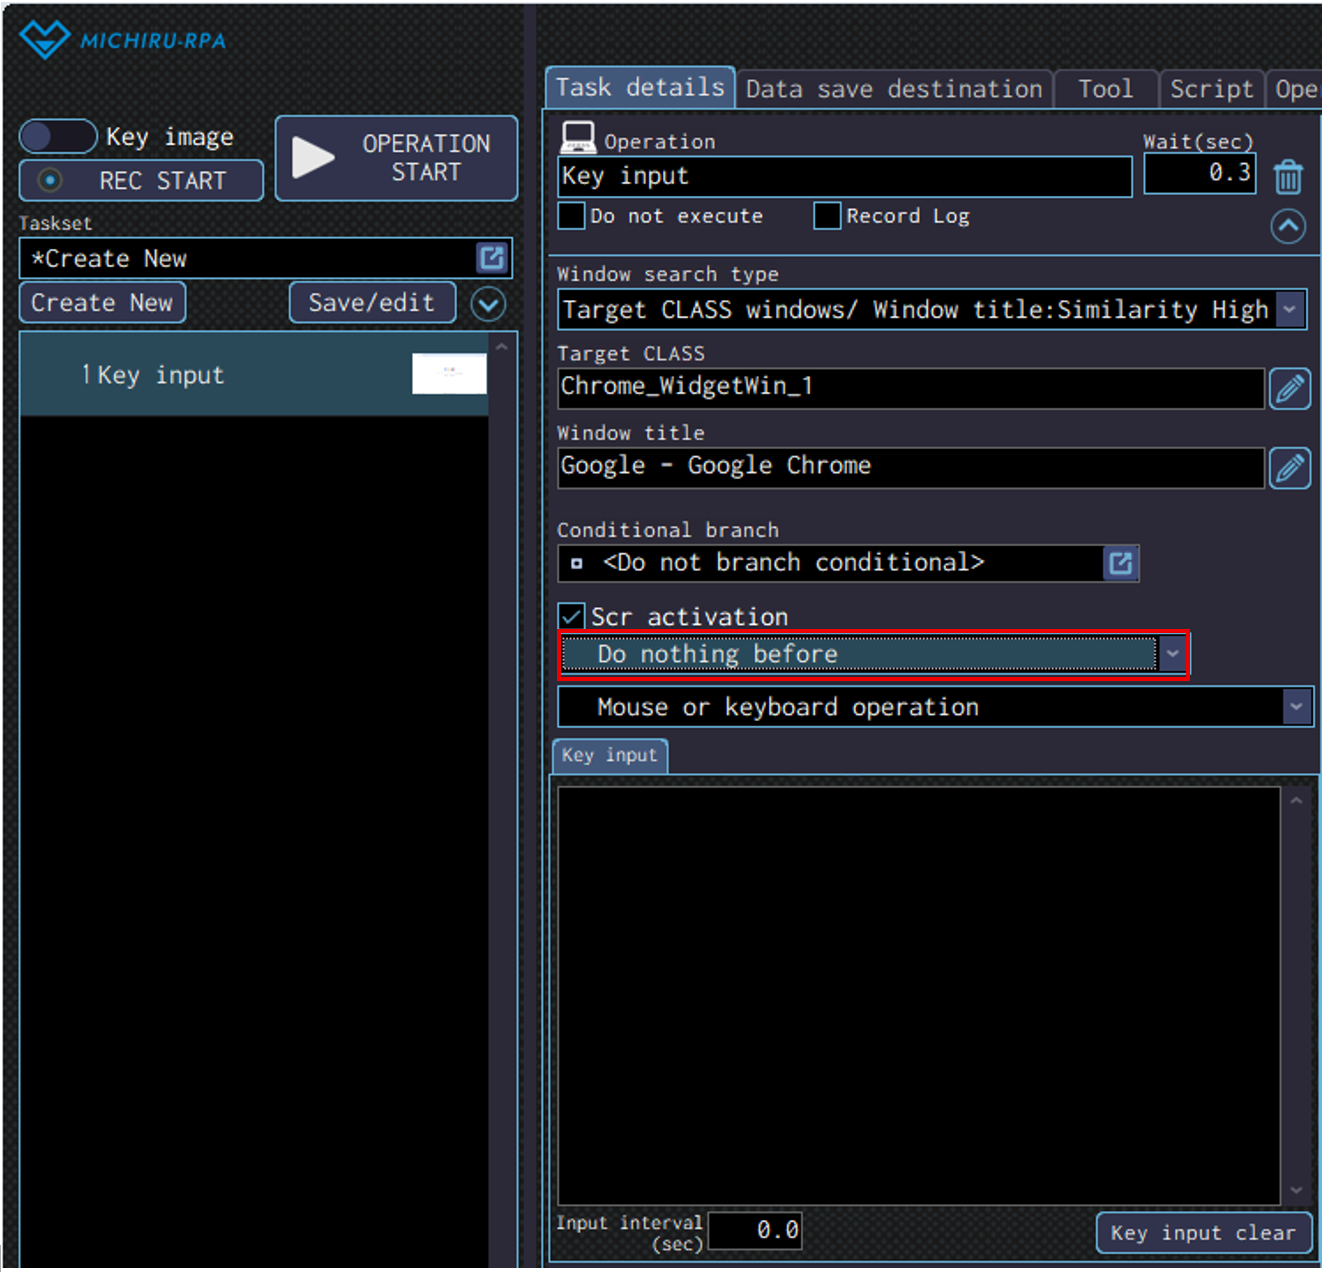
-
Do nothing before No action before the operation. Move cursor to cross before Move cursor to the position of the cross before the operation is executed. Click cross position before Click on the position of the cross before the operation is executed. Focus on found element before Activate the element discovered before the operation is executed . However, this cannot be selected in key image mode. Focus on cross position element before Activate the element at the position specified (cross position) before the operation is executed.
Operations with Action before Operation Available
Here is the list of operations with conditional branch available.
Options available vary depending on the operation selected.
-
Basic function Search standby Mouse operation Click Text operation Key input, Text input, Password input, Select from list, Select checkbox, Get element information, Get elements count, Copy all selected, Paste Browser operation Click, Text input, Select from list, Select checkbox, Get element information, Get elements count, JavaScript execution MICHIRU browser operation Click, Text input, Select from list, Select checkbox, Get element information, Get elements count, JavaScript execution, Close page, Get page (full text), Get page (snapshot), Get page (full PDF), Print page
Specifying Method of Operation
Method of operation can be specified.
Available options vary depending on the selected operation. (Options in the pull-down menu are different for each operation)
| Mouse or keyboard operation | The operation will be executed using mouse and keyboard. |
|---|---|
| Operate found element | The operation will be executed directly using the discovered element. Mouse will not move. |
| Operate the cross position element | The operation will be executed directly using the element at the position of the cross. Mouse will not move. |
| Operate with HTML elements (for browser) | The operation will be executed using HTML information such as XPath or CLASS. For more information regarding Xpath, please refer to this page. This option is only available when operating on a browser. |
Edit Formula
When clicking on pencil icon displayed on the setting of operation like “Text input” and “Save data”, “Edit formula” window will appear.
In this window, you can input formula, insert data save destination, specify a directory, and etc.
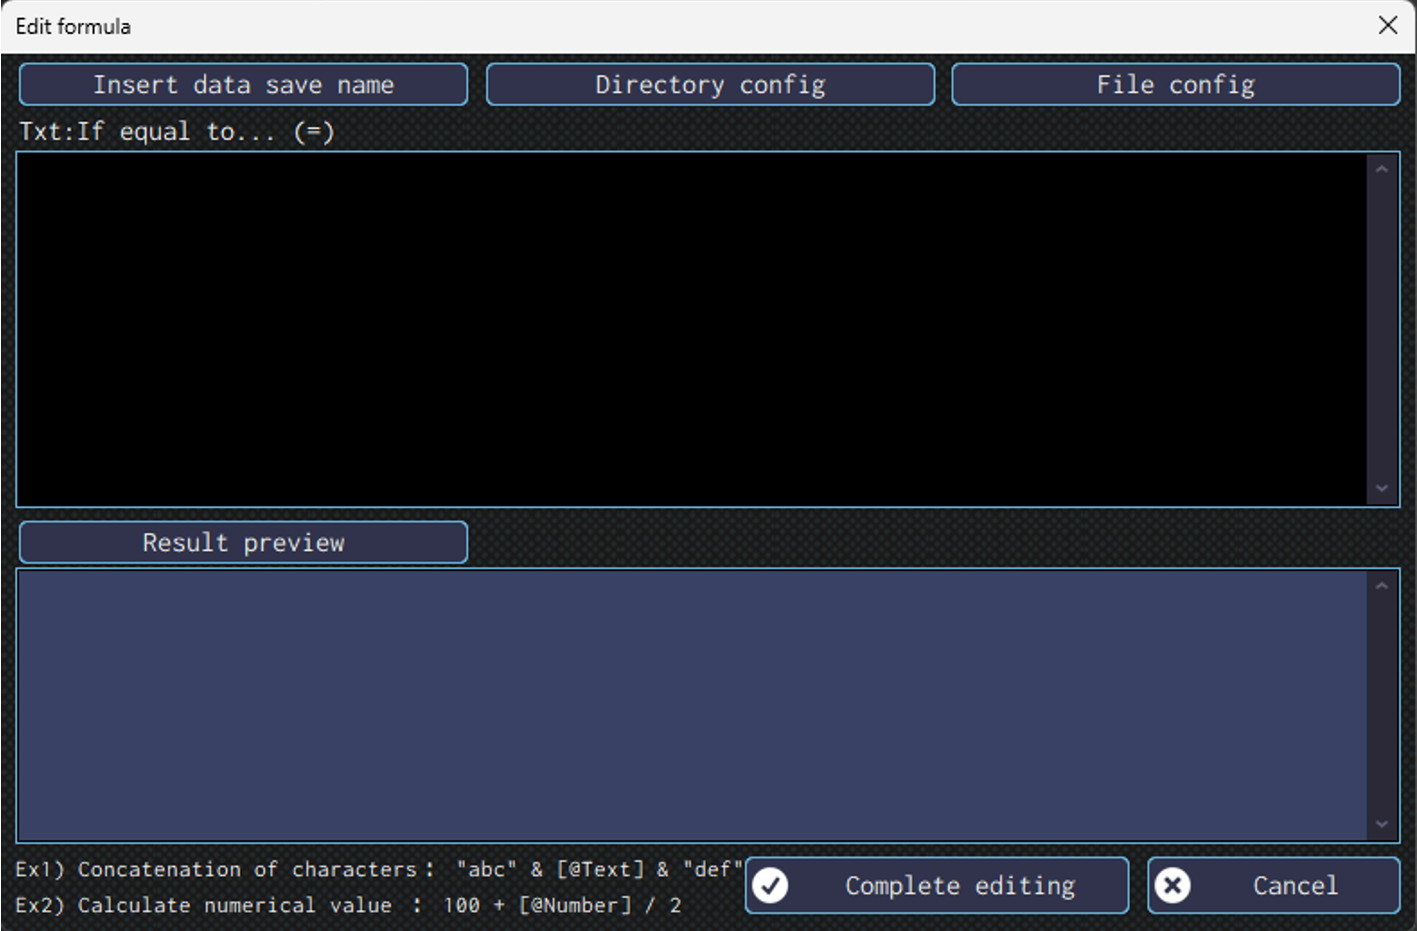
Usage of Buttons in “Edit formula” Window
- Insert data save name
-
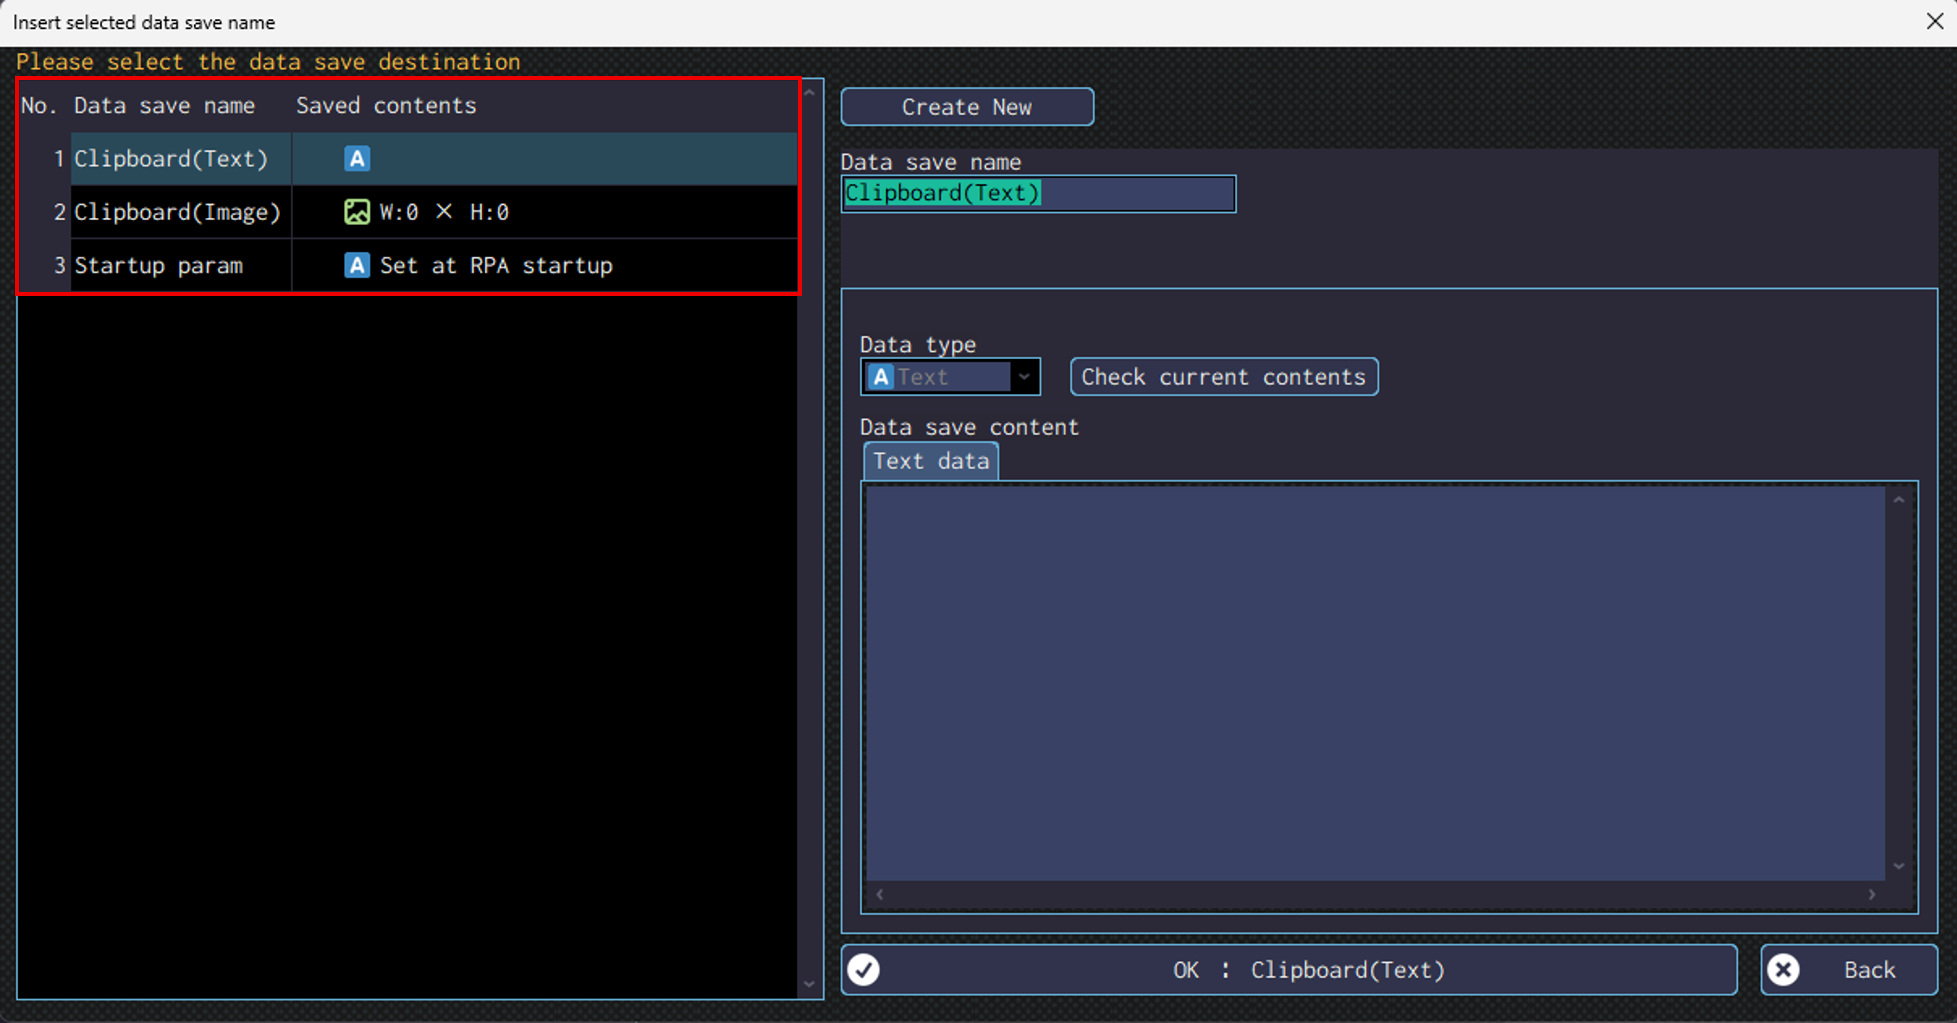
Clicking on “Insert data save name” will make a window like the one shown in the following image appears.
You can select from one of the usable data save names, or create a new one to use.The data save name selected will now shown in the “Edit formula” window in [@DataSaveName] format. If you are directly typing to refer to a data save name, please enter using the same format. You can use the data stored in the data save name to concatenate strings, or do calculation.
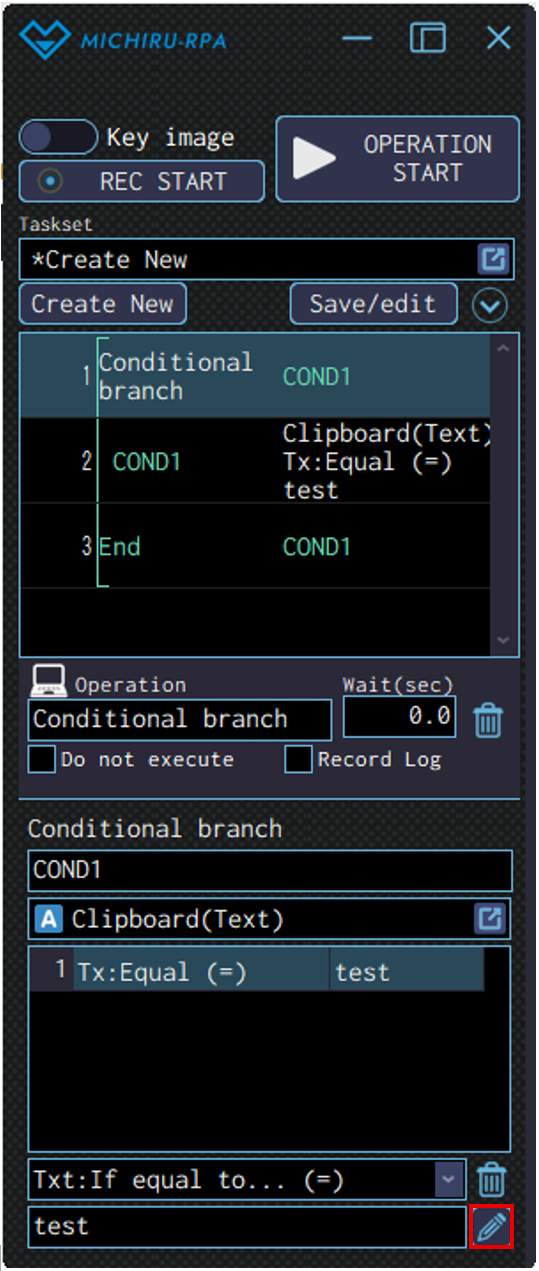
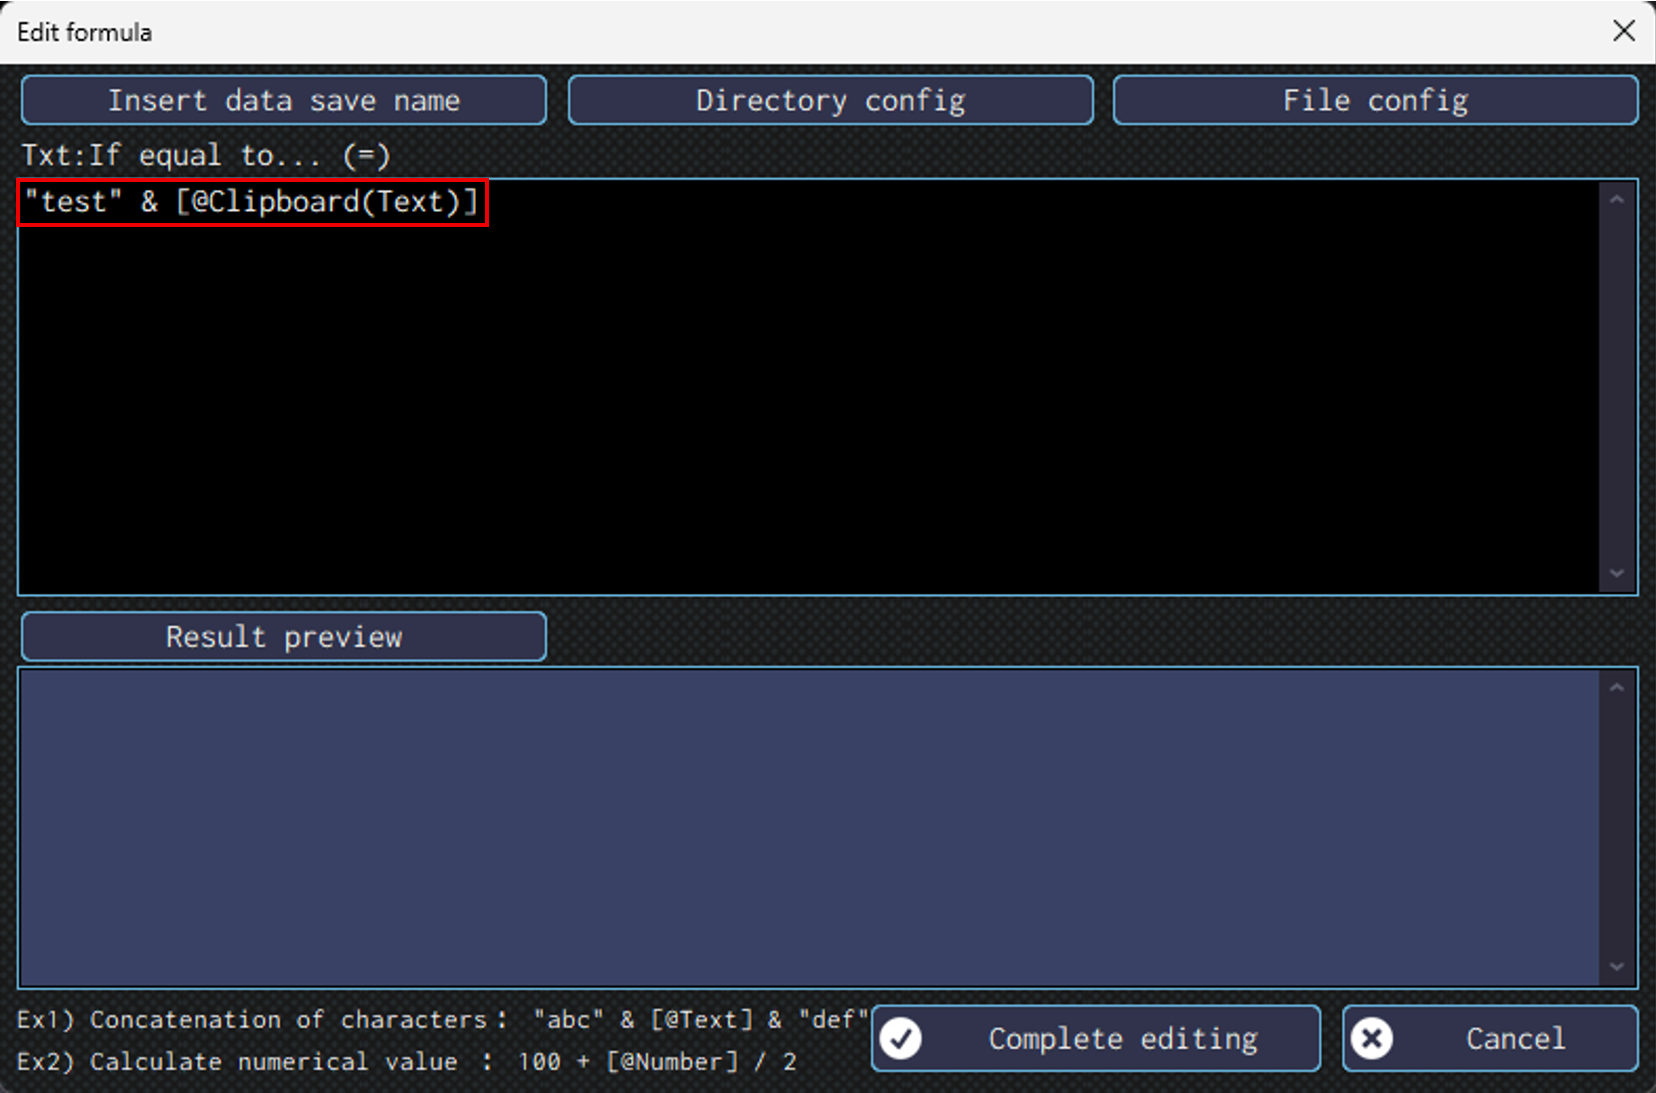
The following image demonstrate the case where “test” and the content stored in [@Clipboard(text)] is concatenated.
Click on ✔ mark to confirm the change and close the “Edit formula” window.
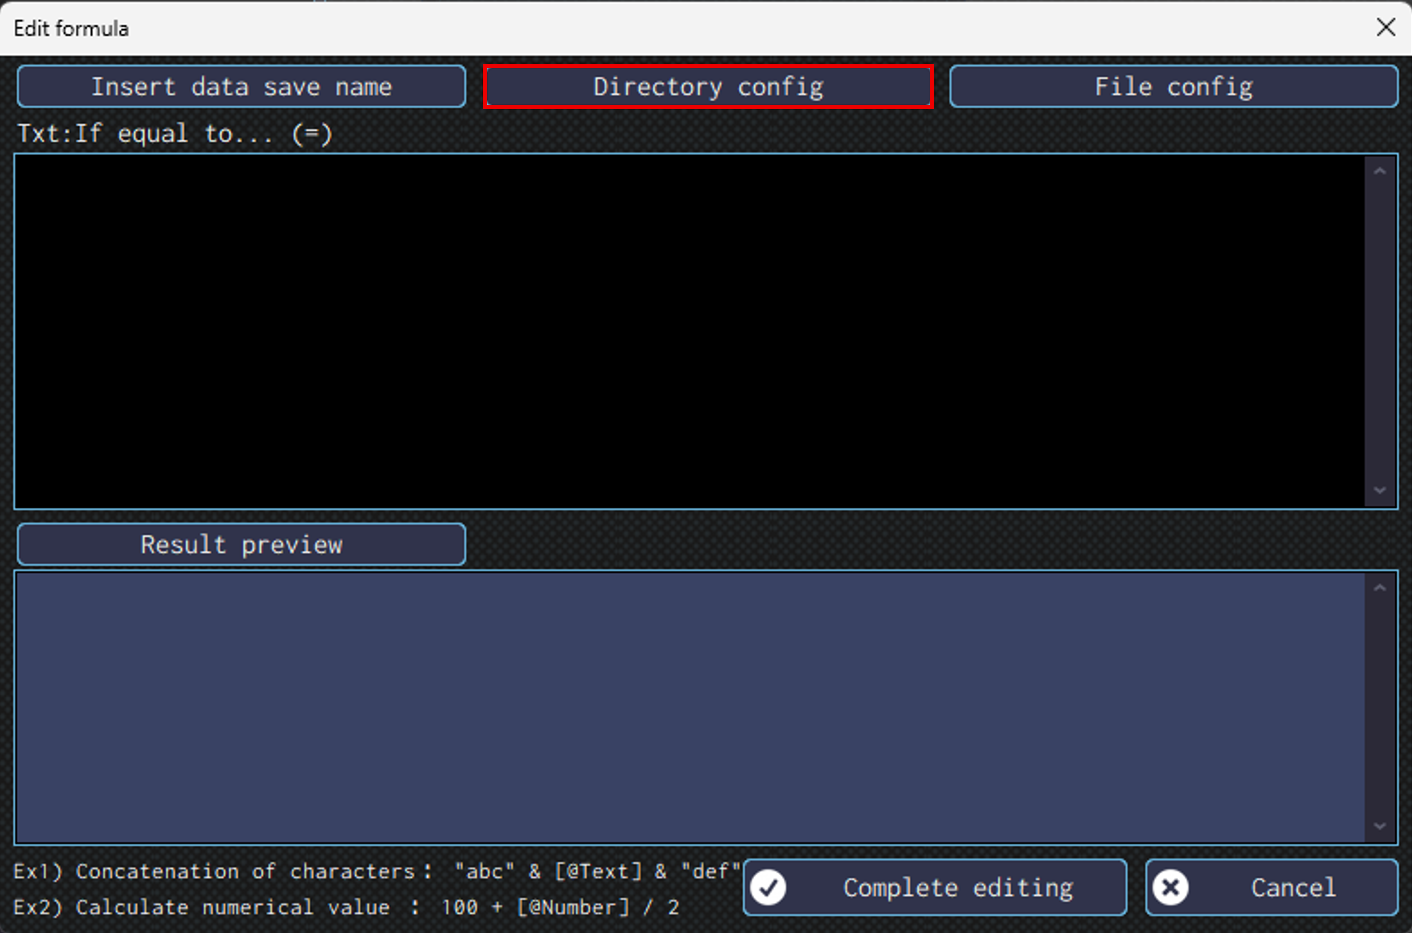
- Directory config
-
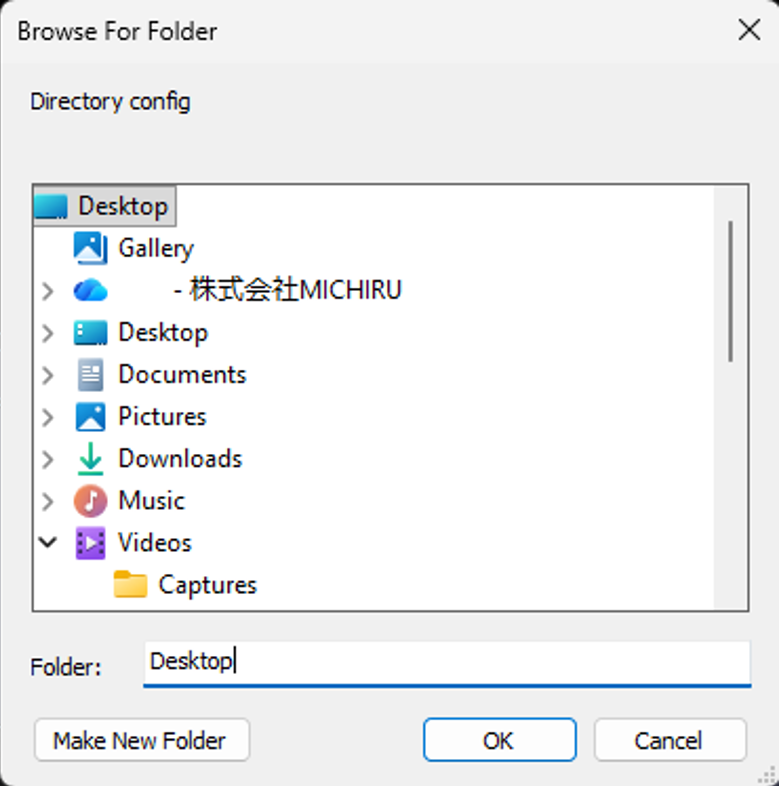
This is useful when you need to specify a directory (folder) for operation like “File launch”, or “Directory Creation”. Clicking on the button will show you a window where you will be selecting the directory to use.
After selecting, folder path for the specified directory will appear in the “Edit formula” screen.
Click on ✔ mark to confirm the change and close the “Edit formula” window.
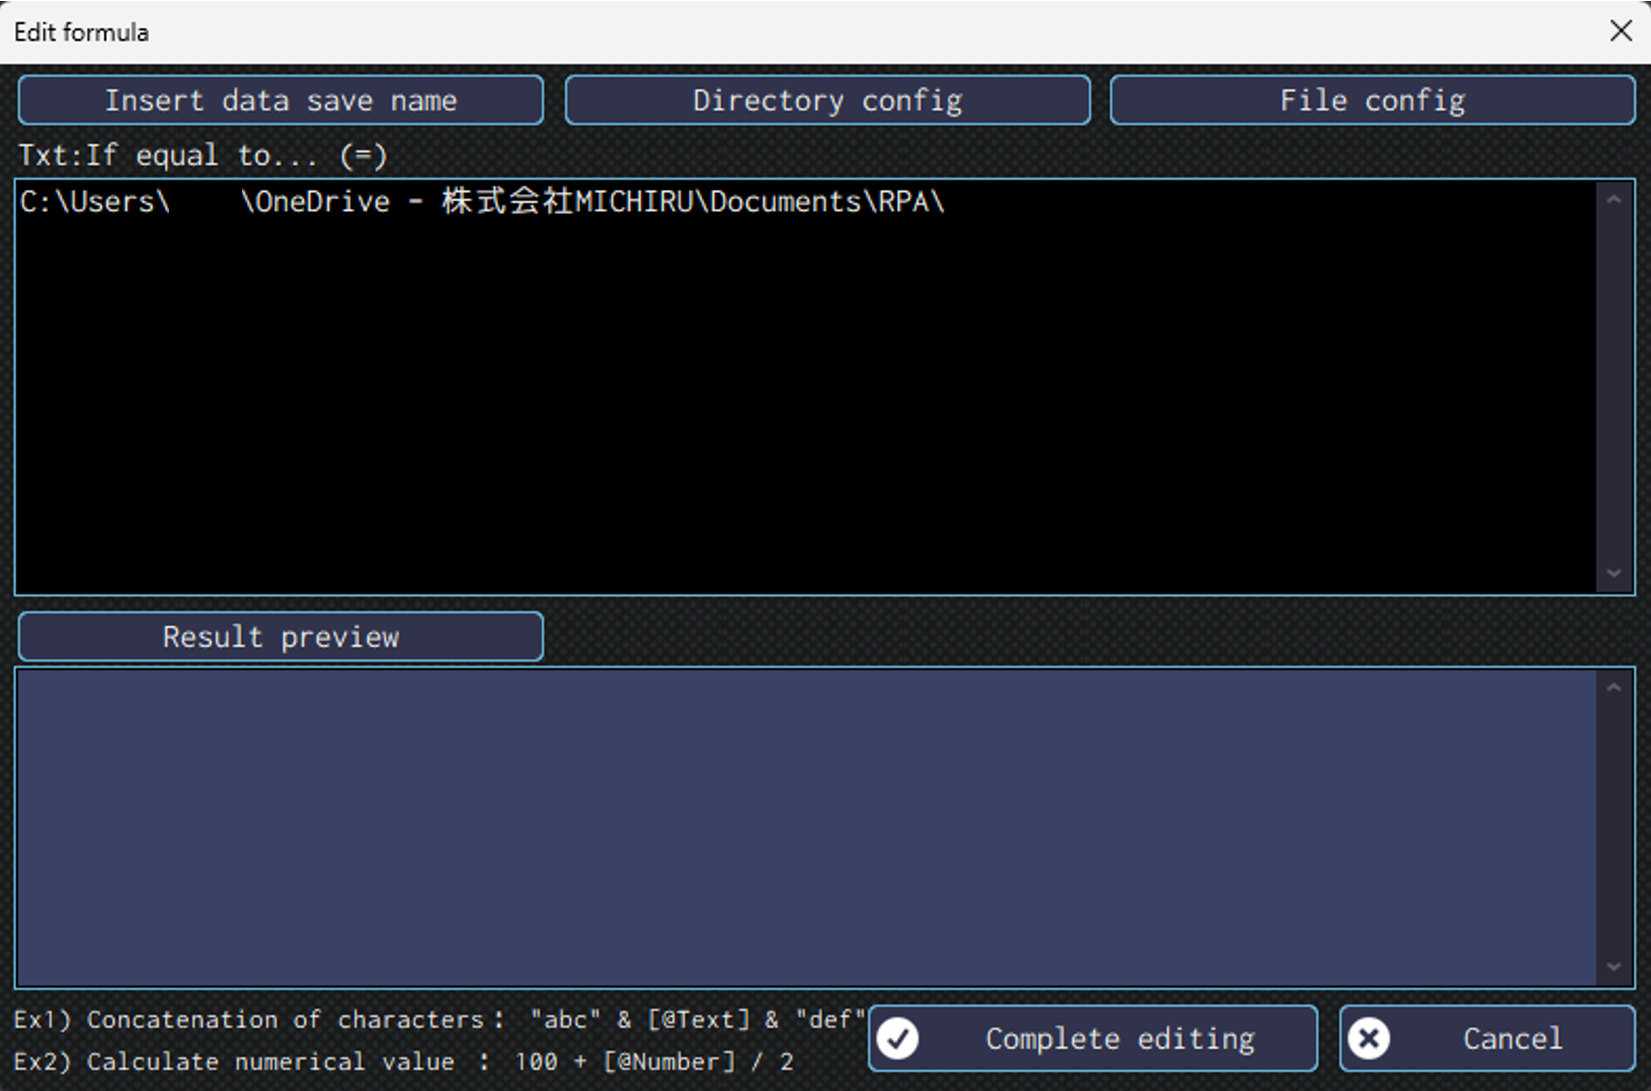
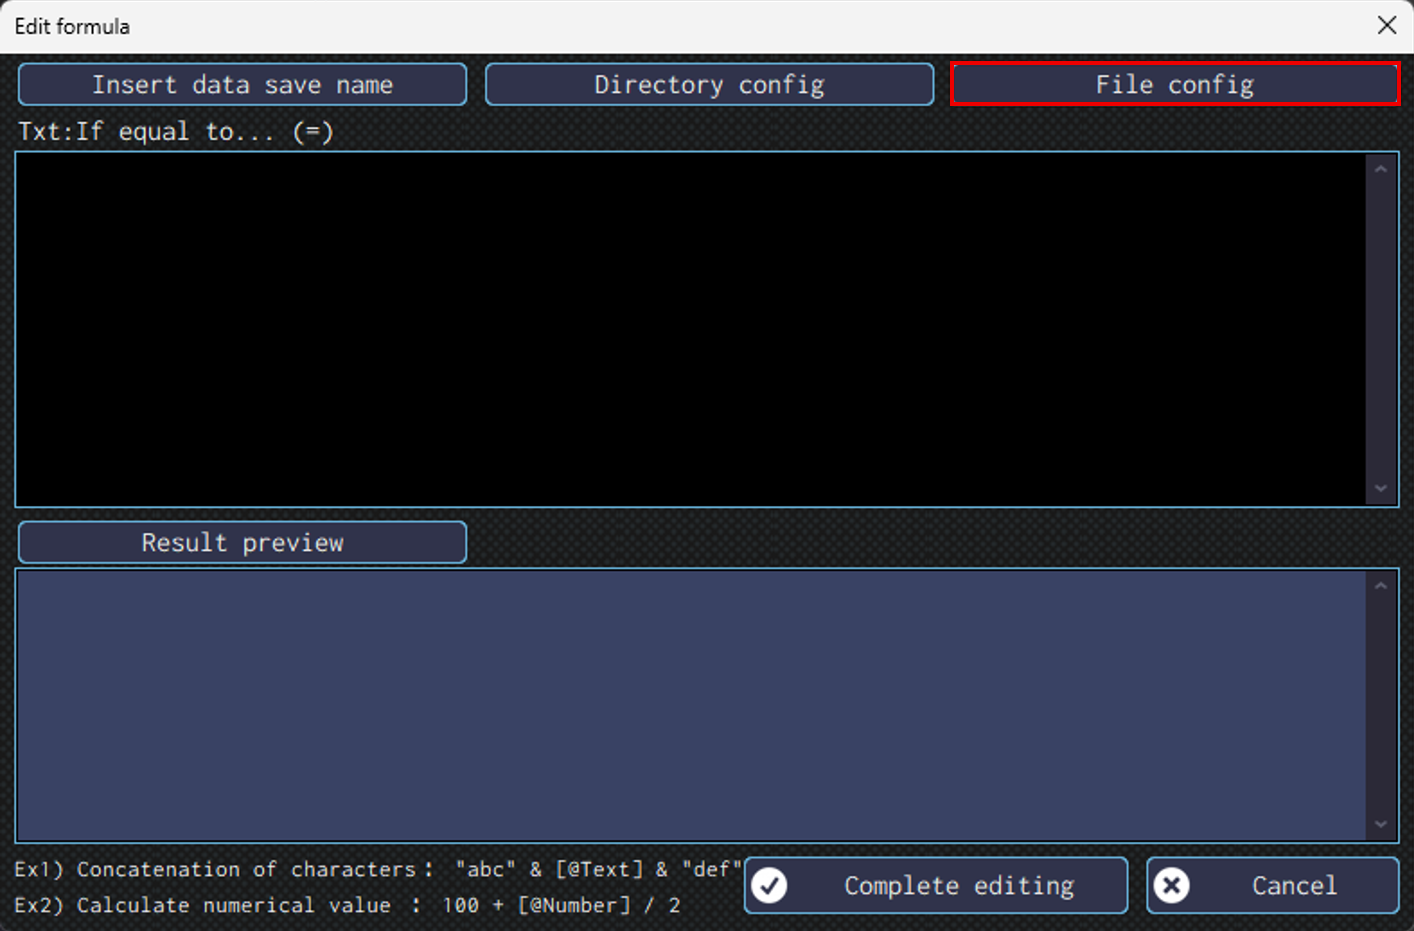
- File config
-
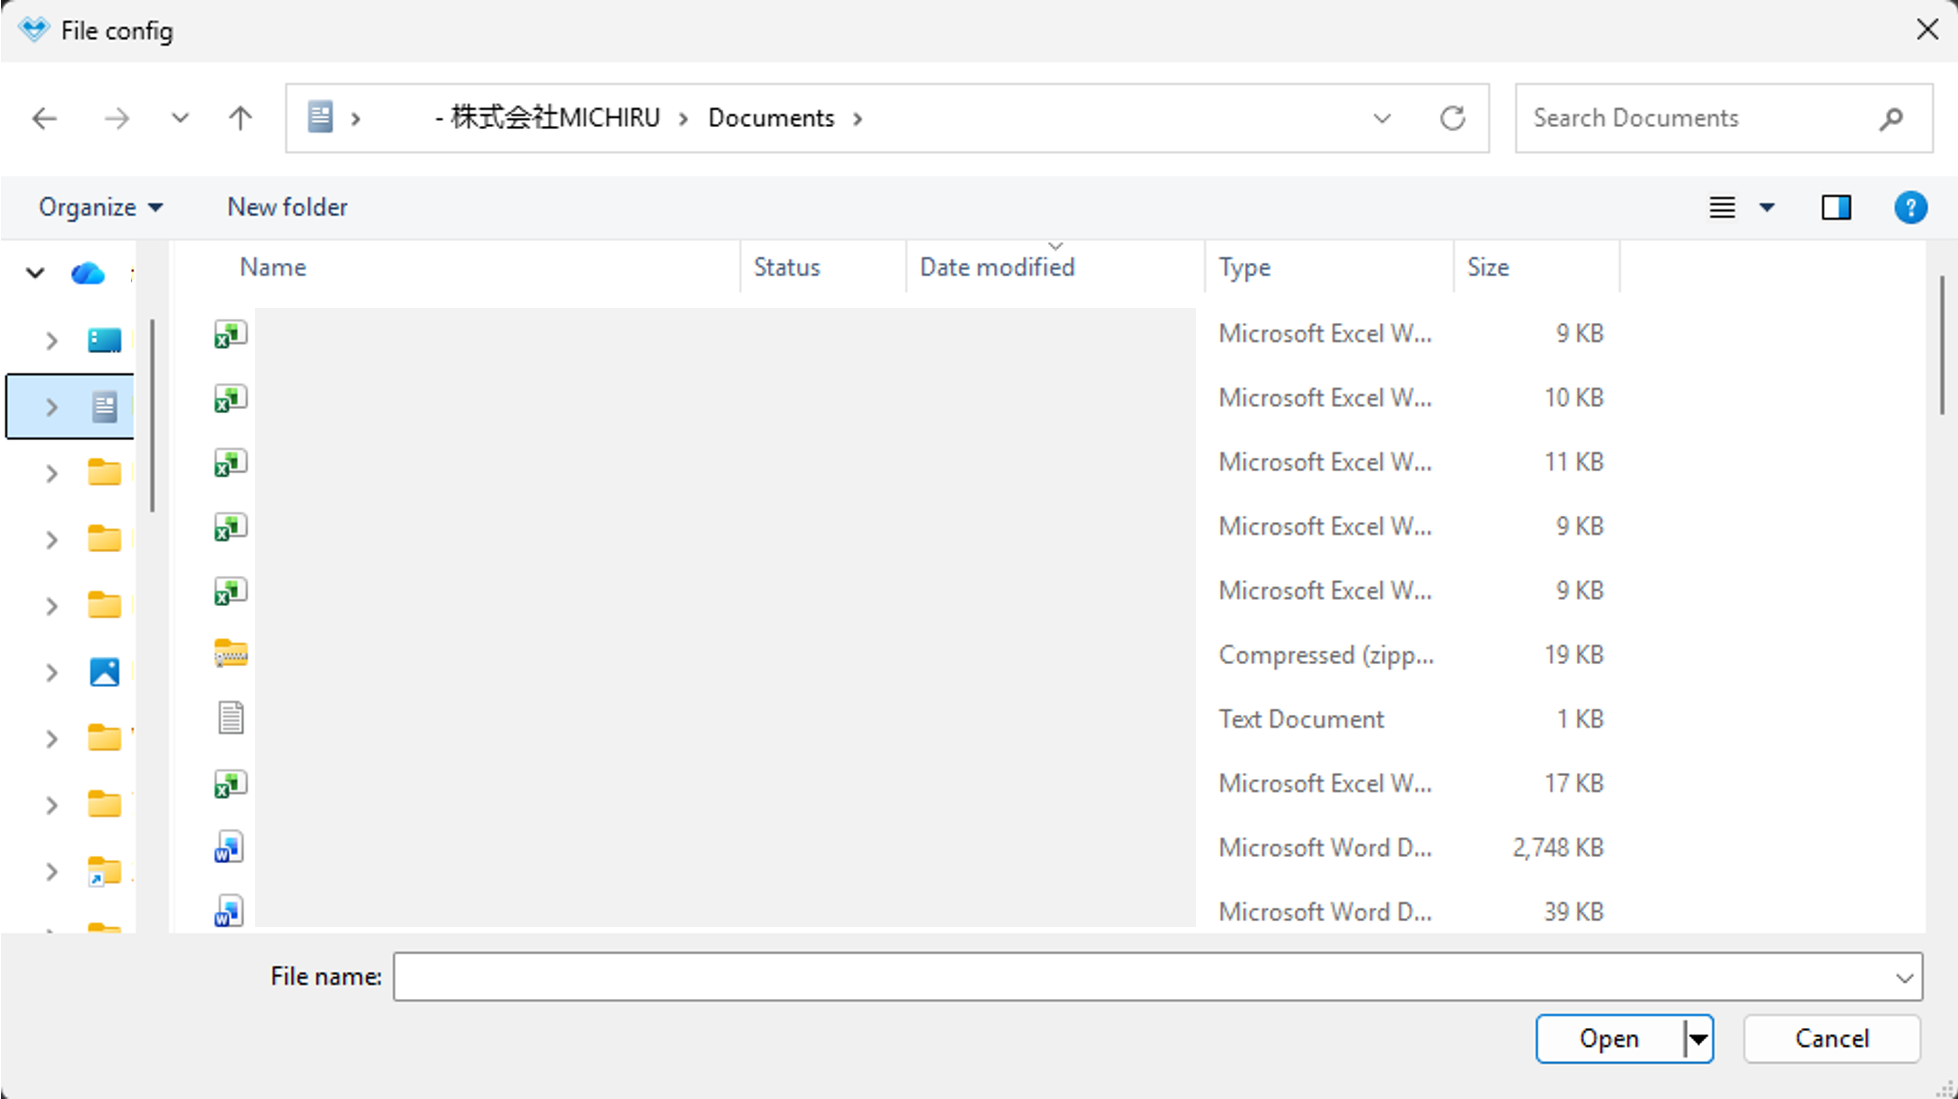
This is useful when you need to specify a file for operation like “File launch”, or “Directory Creation”.
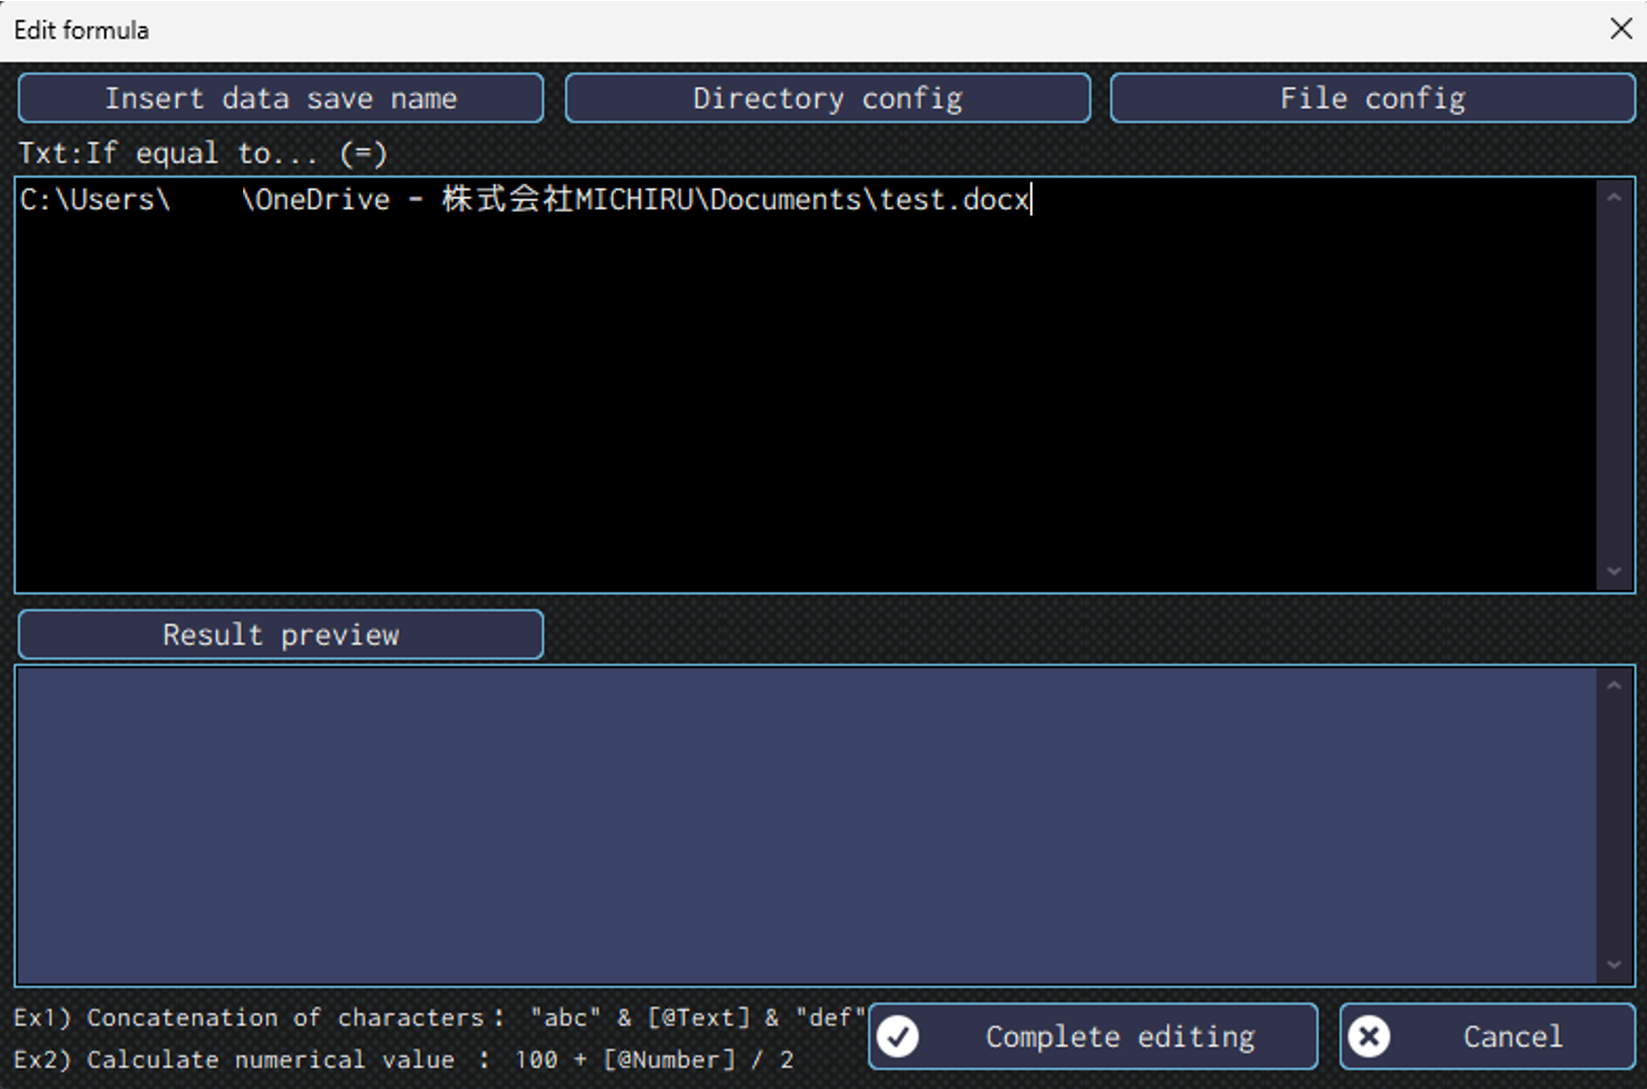
Clicking on the button will show you a window where you will be selecting the file to use.After selecting, file path for the specified file will appear in the “Edit formula” screen.
Click on ✔ mark to confirm the change and close the “Edit formula” window.

String Concatenation and Calculation
In the “Edit formula” window, you can concatenate strings and do calculation.
You can do both at the same time.
- String Concatenation
-
To concatenate text, enclose it in double qoutation marks and connect using “&”.
When concatenating numbers and data save destination, quotation marks are not required.Example: “abc” & [@text] & “def”
- Calculation
-
The following operators can be used.
Be cautious when using data save destination with “text” as data type.
If the stored value is numeric calculation will be performed. However, if it contains text, the “+” operator will concatenate the strings instead. Other operators will result in an error.+ Addition – Subtraction * Multiplication / Division () Nesting (Priority Calculation) mod Remainder of Division ^ Exponentiation
Available Functions
The following functions can be used in the “Edit formula” window.
- String Manipulation
-
Left Partially extract string frome the left. Right Partially extract string frome the right. - Processing Date
-
Now Get current date and time. Date Get current date. DateAdd Get the date calculated from the base date DateDiff Get the difference between 2 dates. Weekday Get the day of the week as a number from the specified date.
1 (Sunday) ~ 7 (Saturday) - Numeric Calculation
-
Round Round a decimal number. Int Discard the decimal part and return only the integer.
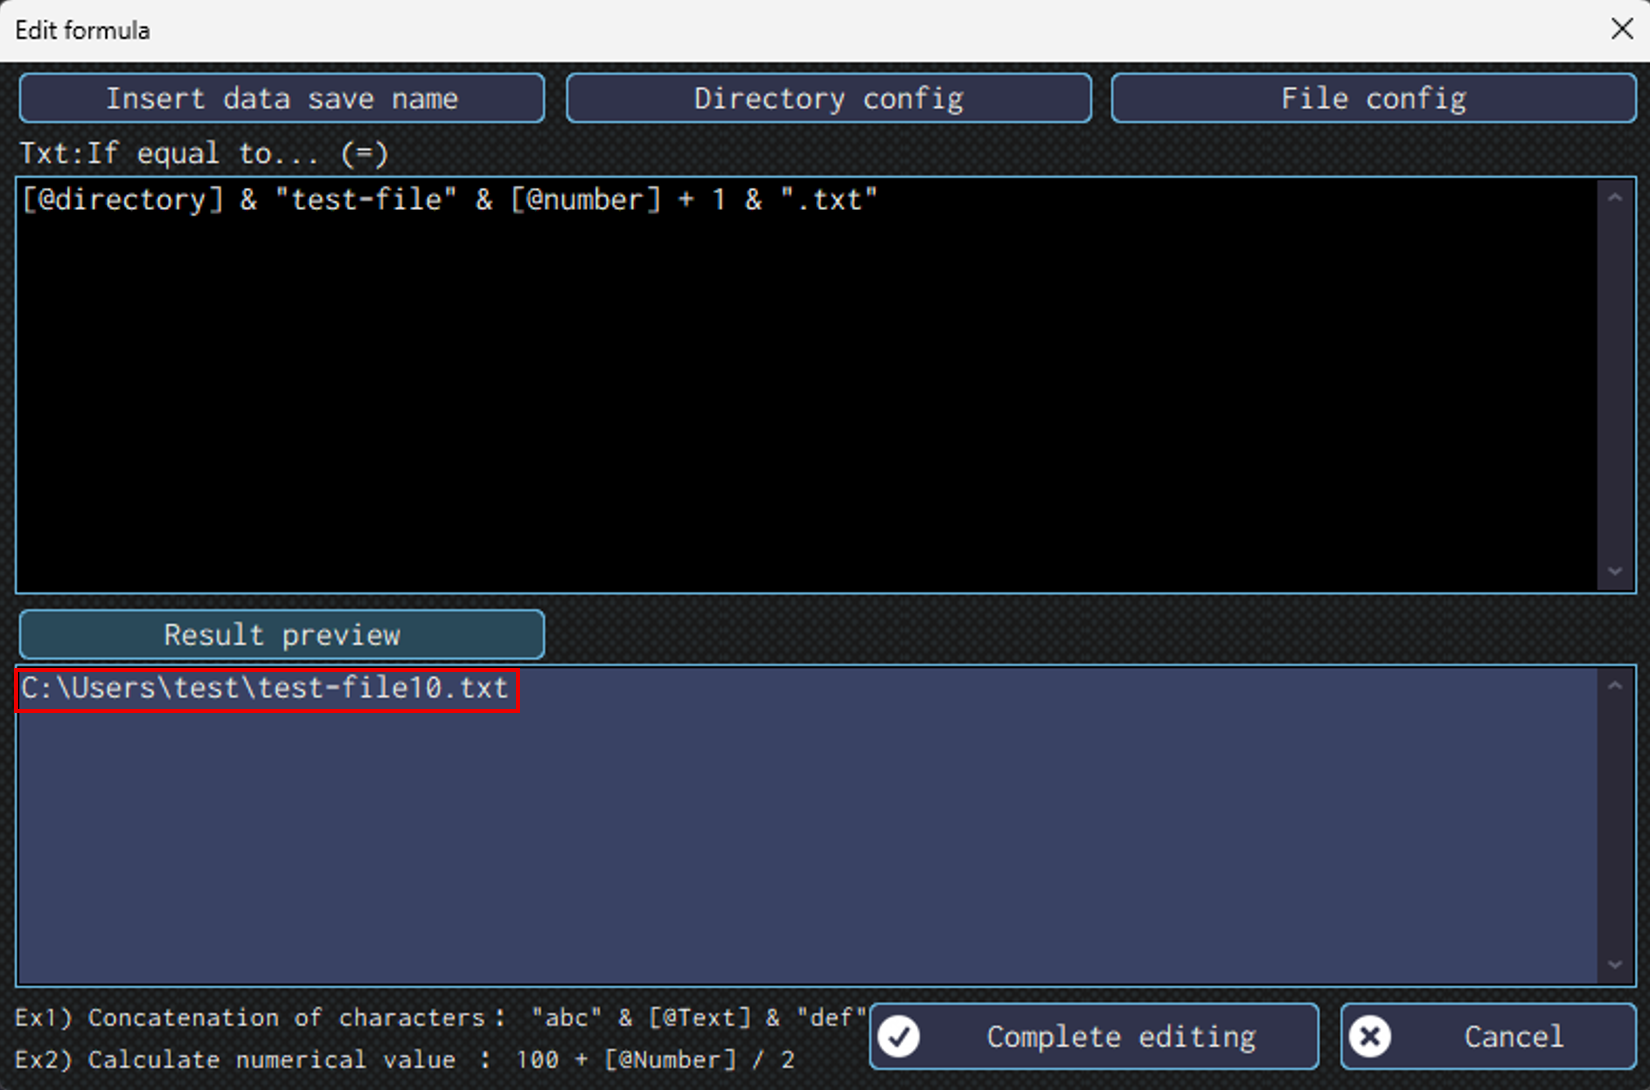
Checking the Result of the Calculation
Clicking the “Result preview” in the “Edit formula” screen will display the result if the formula specified in the editor.
The image below show a case where a directory path is put in [@directory] data save destination, and “9” is put in [@number] data save destination.
In the preview, you can see the result of the concatenation, with the number being “10” as a result of calculation, since 9 + 1 = 10.
Combination of the Method of Specifiying (Detecting) Position of Operation and the Method of Operation *After version 1.4
Here are the typical combinations of operations such as clicks and text input.
The available methods of operation vary depending on the action. Valid options are automatically shown in the dropdown menu.
| Method of specifying (detecting) position of operation → Method of operation ↓ | Key image | Element (element information) |
| Mouse or keyboard operation | ○ | ○ |
| Operate found element | ✖ | ○ |
| Operate the cross position element | ○ | ○ |
| Operate with HTML elements (for browser) | ○ | ○ |
