When an Error Occurs at Startup
An error occurred during the license check.
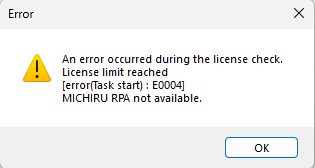
When launching , editing, or executingthe automation set, if a message box shows up saying that an error occurred during the license check, and that the number of license has reached the limit, it means that you have exceeded your contracted license limit of users.
Please try again after quitting the program on other computers.
When an Error Occurs during Execution
Steps to Checking and Adjusting Automation Set
If an error popup appears during RPA execution, please follow the steps below to adjust the automation set.
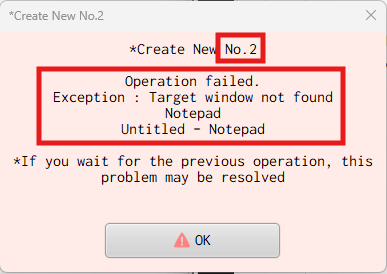
First, check which operation caused the error.
You can do this by looking at the pop-up window, or by checking the operation log.
- Check in the popup window.
-
At the top of the popup window, the number of operation where the error occurred will be displayed.
Click “OK” to close and check the operation with the corresponding number in the automation set.
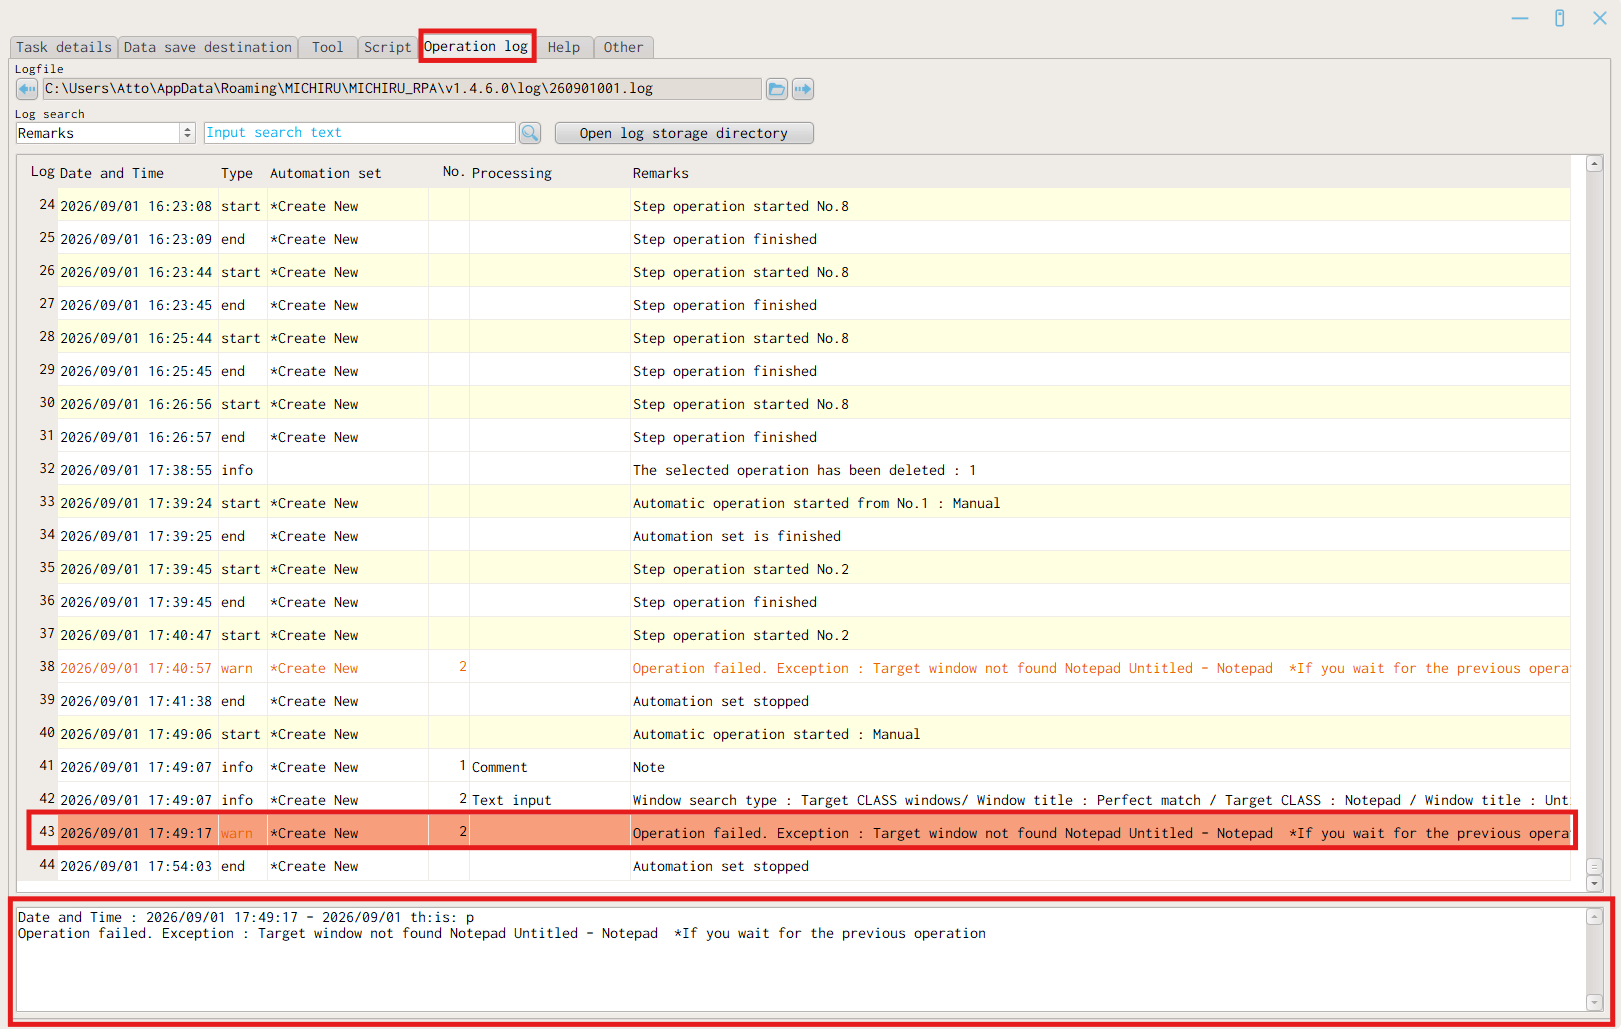
- Check the “Operation log” tab in MICHIRU RPA.
-
Inside the “Operation log” tab, you will find log data such as the date & time of execution and the name of the automation set displayed in table format.
For log with error, you will find “warn” or “error” in the “Type” column, and the number of the operation in the “No.” column.
When selecting a log with error, more detailed explanation will be displayed at the bottom of the screen.In order to be able to check the operation log, you need to enable “Record log” option for each operation first.
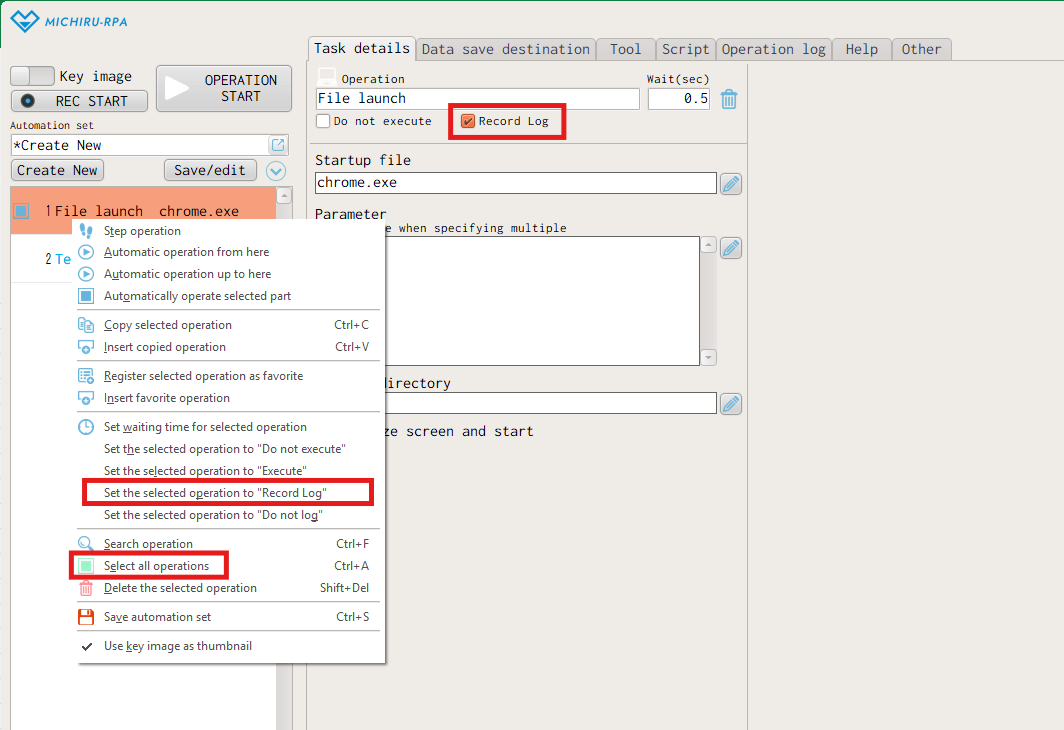
You can use the following method to enable the “Record log” option for all operations with ease.
1. Right-click on any of the operation in the operation list to open the menu.
2. Select the “Select all operations” option.
3. Repeat no. 1 to open the menu again.
4. Select the “Set the selected operation to Record log” option.
-
Click on the operation in which the error occurred and check the details.
Please note that depending to the automation set, the operation that requires adjustment might not the operation where the error is detected.
The section that needs adjustment differs depending on the content of the error.
Please try making adjustment by following the examples provided in the following section.
After you are done adjusting the operation, try running it again.
You can determine the part you want to start the automation by using the following method.
| If executing every operation from the beginning | Click the “OPERATION START” button. |
|---|---|
| If executing only 1 operation | Right-click on the operation to execute, and select the “Step operation” option. |
| If executing the selected operation and every operations after | Right-click on the operation to execute, and select the “Automatic operation from here” option. |
| If executing selected multiple operations | After selecting multiple operations (check on the checkbox in front of each operation), right-click on the operation to execute, and select the “Automatically operate selected part” option. |
Click on the “Save/edit” and save the automation set.
Common Errors and How to Fix Them
In this section, we will take a look at some of the most common errors and how to fix them.
Key Image Not Found
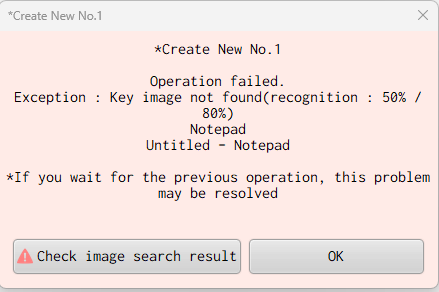
If the image set as the reference point (key image) is not found in th screen, this above message will appear.
Here are the some of the main reasons why this error screen appear.
- The operation is executed before the key image appears, because the system or the screens in the preceding operation was taking time to load.
- The design of a system or a web page was altered due to update, making the image set as key image unusable.
- The resolution or the scaling of the display screen is not the same as when you created the operation.
- The key image was set to a location that appears after scrolling but the mouse did not scroll far enough.
When an error like the image above occurs, please check and determine the cause using the cases above as the reference.
Check the “Key image search result”
After clicking “OK” button in the error pop-up message, you will be redirected to the operation where the error occured within the MICHIR RPA application.
While in the “Task details” tab, check the key image configured and the percentage in the “Key image recognition” option, which is located in the “Key image search” subtab.
The image below shows the case where the screen was captured from the Notepad application and the “Untitled” text was configured as the key image, with the percentage of “Key image recognition” set to “80%”.
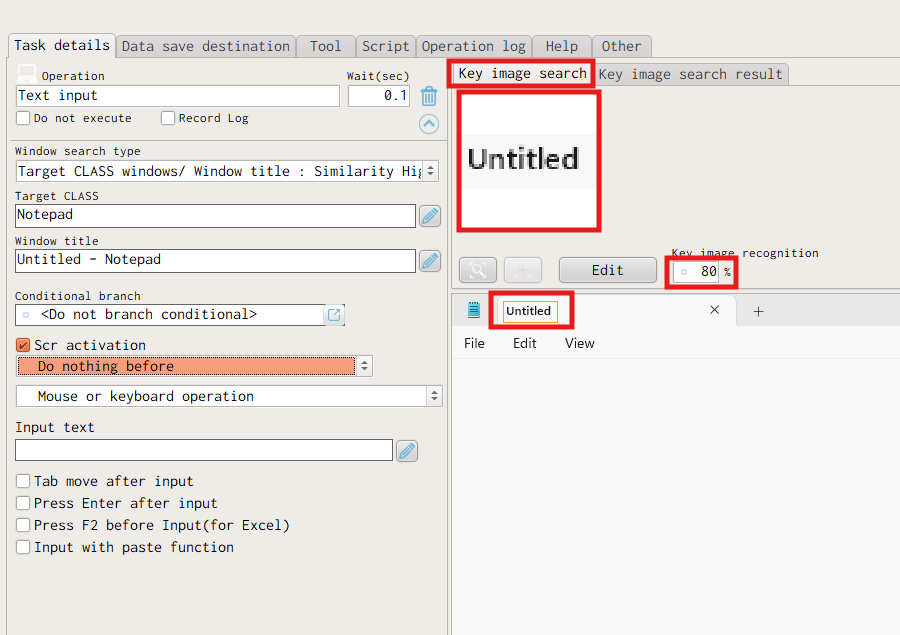
When you click the “Key image search result” subtab, you can check the result of the key image search when the error occured.
In the result section of the image below, we can see that percentage of the recognition is only 50%, which is lower than 80%, making the search fail and resulting in error.
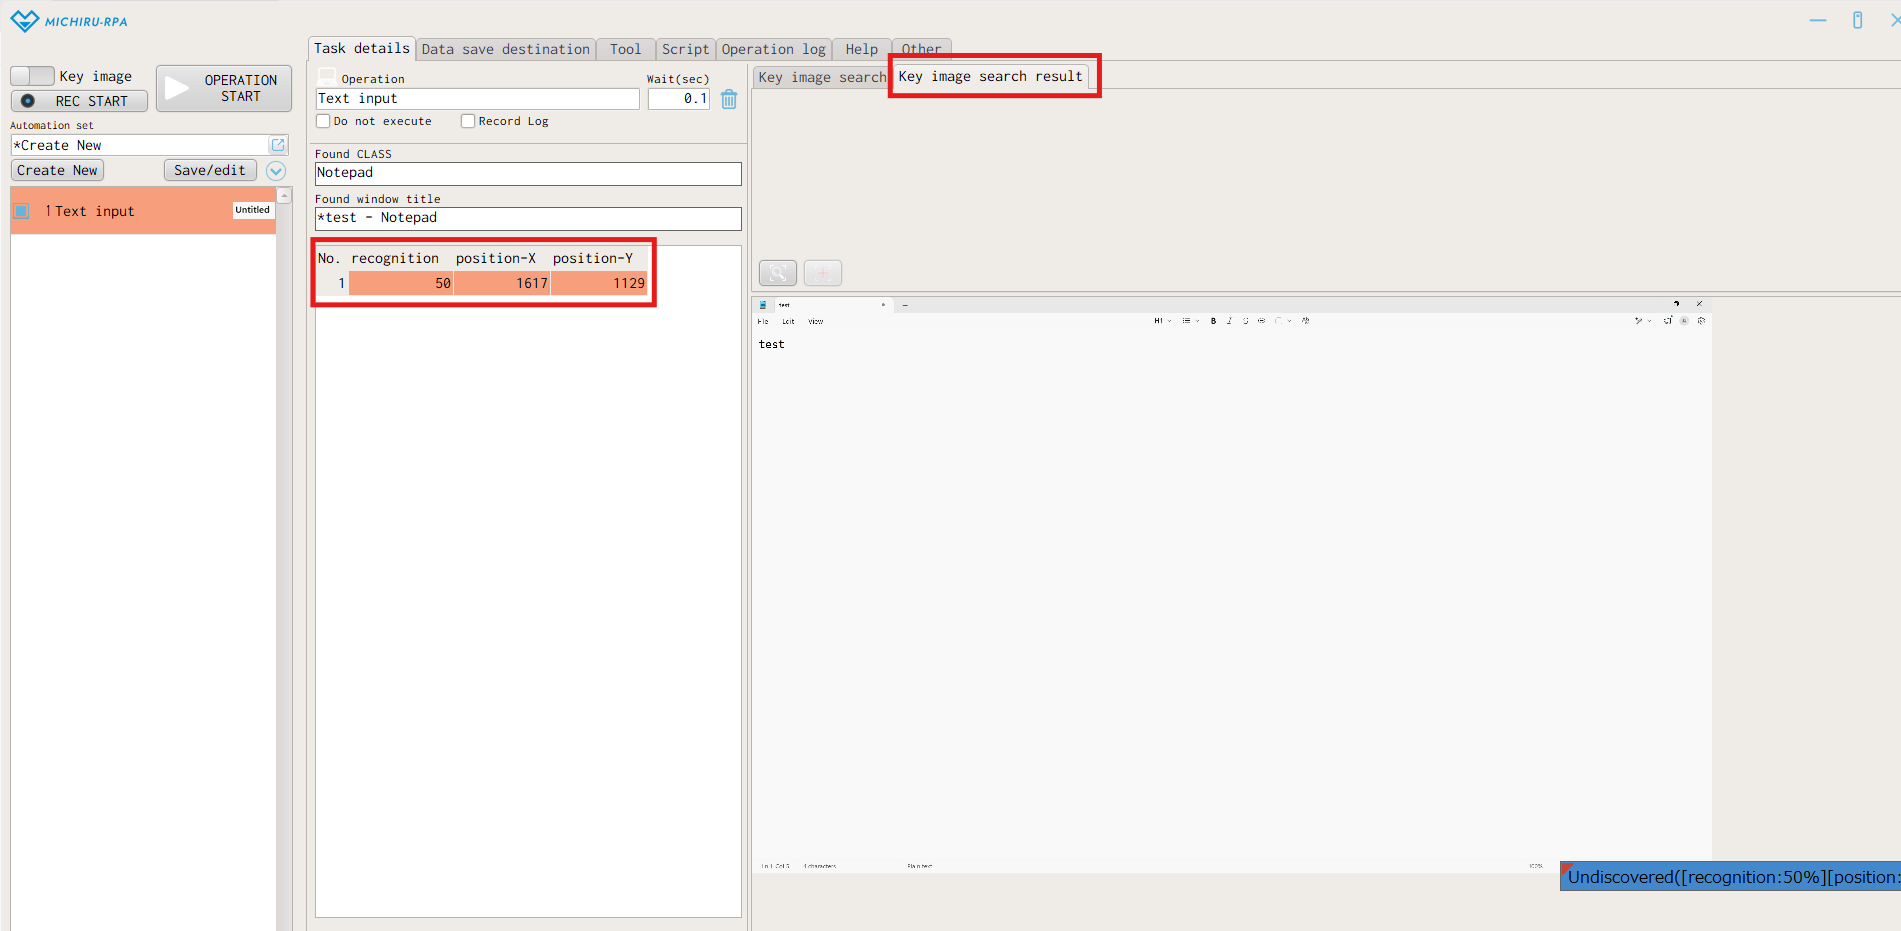
By moving the mouse cursor to the blue label with the text “Undiscovered”, you can see that since the program could not detect the key image, and was searching for other text instead (it’s “Windows” surrounded by orange frame in this case.

From the observation, we can infer that, the key image coulf not be found because the Notepad heading “Untitled”, which had been set as the key image, had changed to “test”.
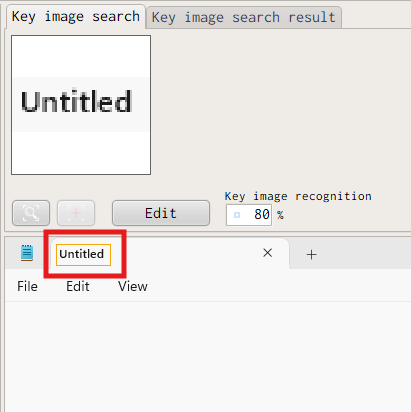
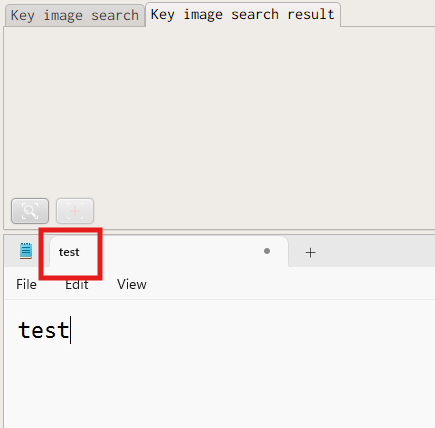
Comparing the key image search settings and the actual result like the is, is one of the way to determine the cause of the error, which can help with adjusting the automation set.
Clicking “Check image search result” button in the error window will lead you directly to the “Key image search result” subtab of the operation where the error occurs. 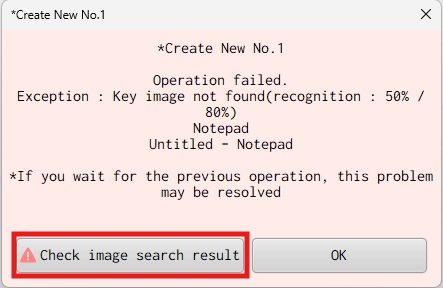
Example case 1: Operation takes place before the key image appears on the screen.
- Solution: Adjust the waiting time of the preceding operation.
-
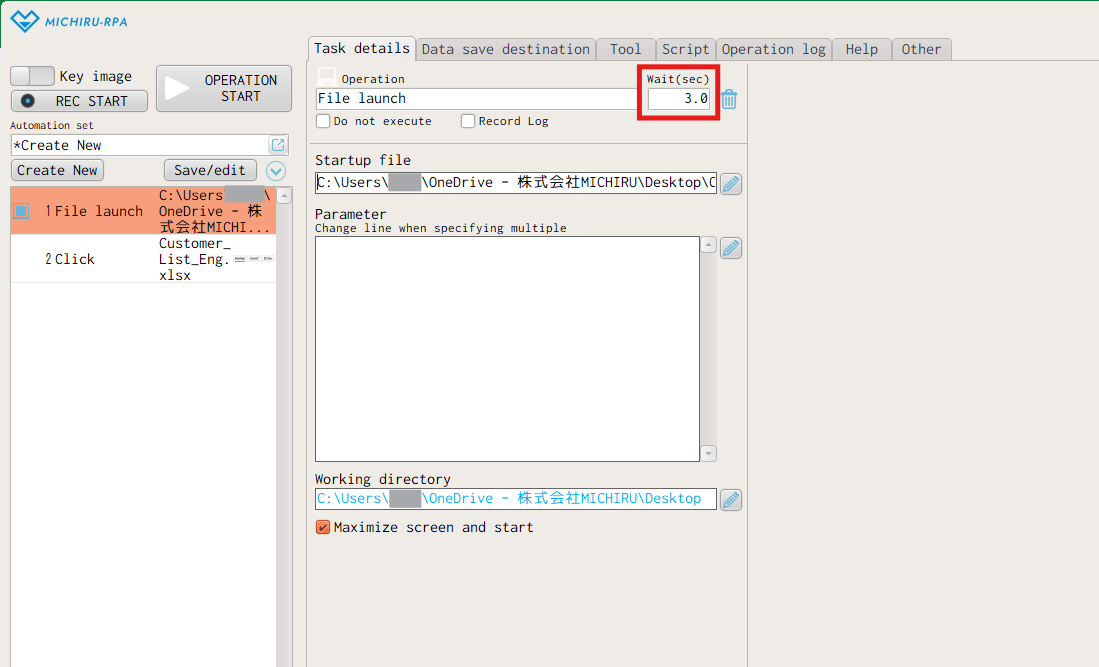
If system startup or screen transition triggered by operations like “Click” or “File launch” takes time to load, making the program unable to detect the key image properly, increasing the waiting time of the operations where the system startup, or screen transitions is performed can potentially resolve the issue.
The image below shows the case where the RPA could not detect the key image during the second operation resulting in error popup.
Since the action in the first operation was taking relatively longer time, we change the waiting time from 0.5 to 3.0 seconds. With this setup, the second operation will be executed 3 seconds after the first operation.Example case 2: Design for the part set as the key image was changed.
- Solution: Change key image
-
If the screen you used to configure the key image undergoes any design or text changes, please capture the image again to reconfigure the key image.
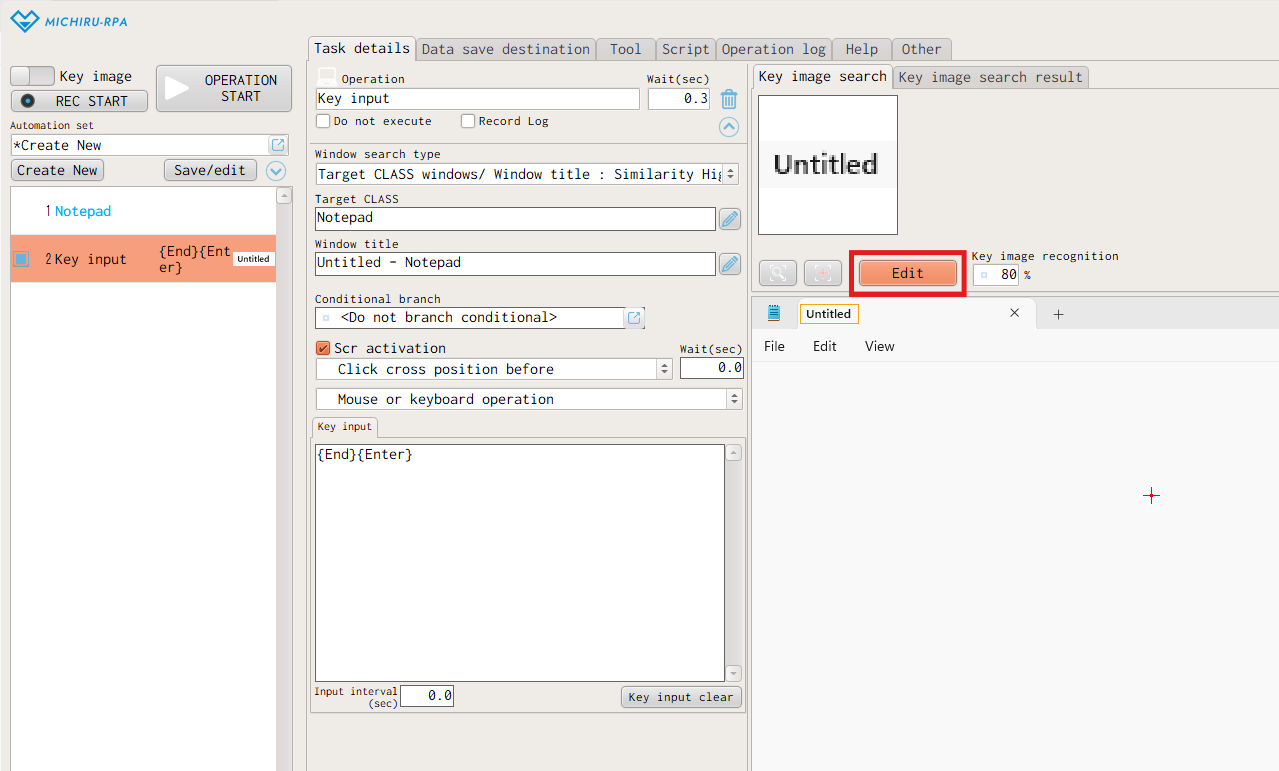
- Click on the “Edit” button above image display section. The image editing screen will appear. (1st image)
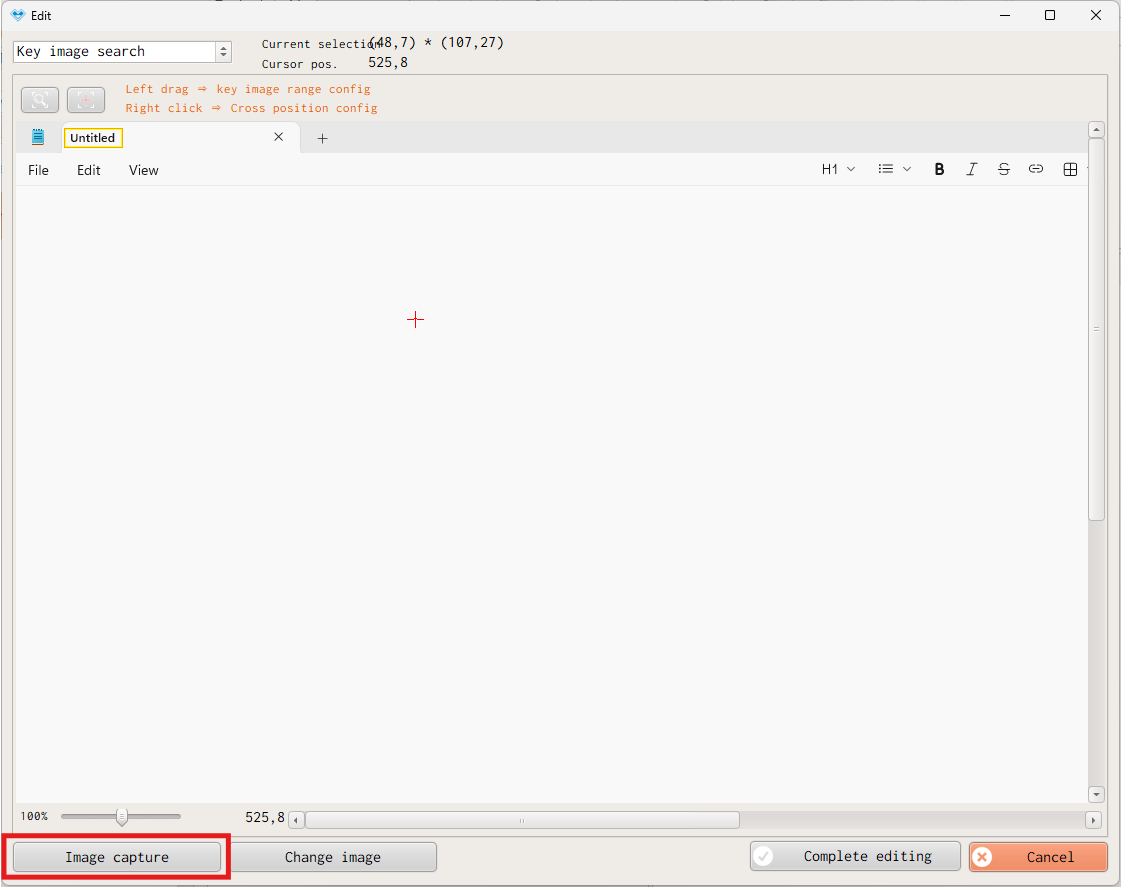
- Click on the “Image capture” button in the bottom left of the editing window. (2nd image)
- Go the the screen that you want to capture and press the image capture shortcut key (Shift key by default) to capture the new screen.
- Left-drag over the part of the screen you want to set as the key image. Right-click on the position of the operation.
- Click on “Complete editing” button to complete the process.
Example case 3: When the resolution or the scaling of the display is different
- Solution: Reconfigure the resolution or the scaling of the display to match the one you originally used for creation
-
Windowsのディスプレイの解像度や拡大/縮小の設定を、操作を設定した時と同じ設定に戻します。Please return the rsolution and scaling configuration of the display to what you previously used when creating the automation set.
Example case 4: When the amount of mouse scroll wasn’t enough or too much
- Solution: Change scroll amount
-
In case that the scroll amount wasn’t the correct amount to display the key image on the screen, please adjust the scroll amount accordingly.
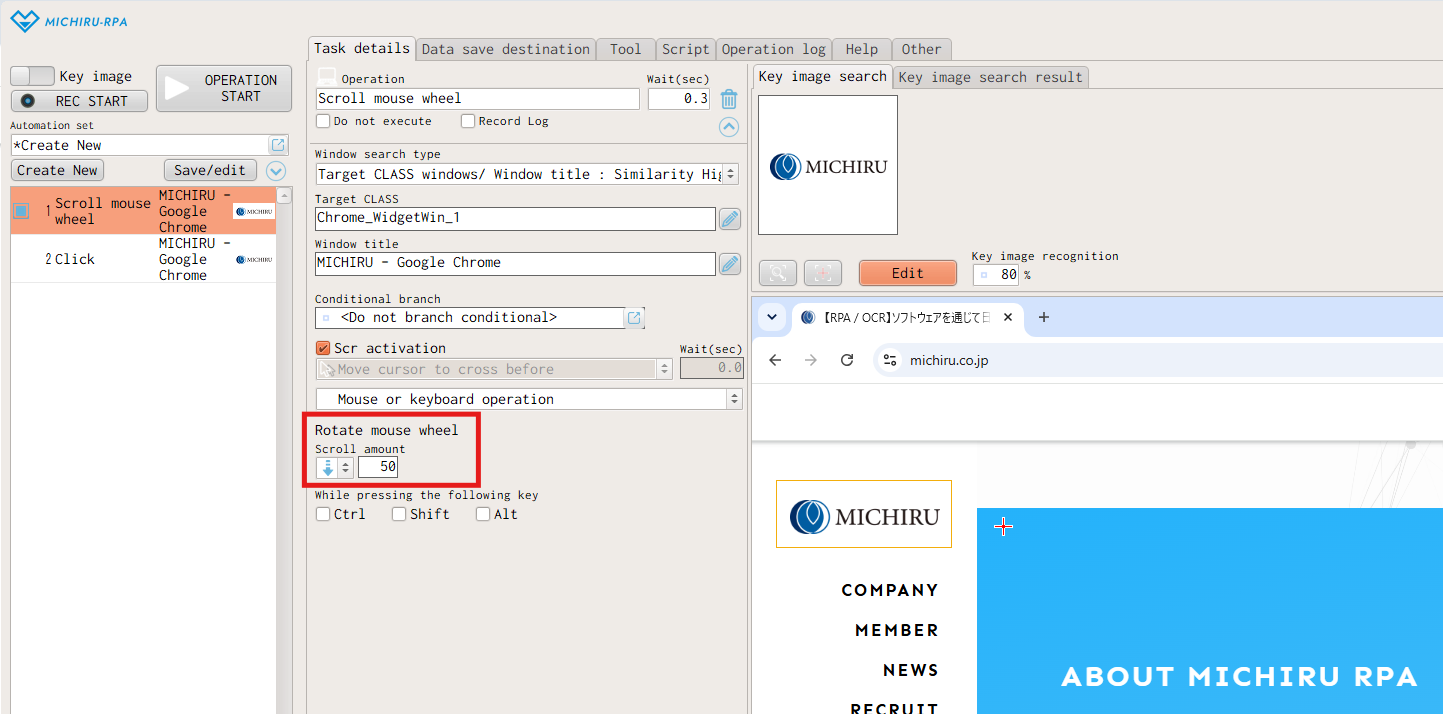
The image below shows the case where the RPA could not detect the key image during the second operation resulting in error popup.
Changing the the scroll amount of the first operation will fix this issue.Since the scroll amount may vary depending on your PC environment, please adjust it by using “Step operation” (executing the operations one-by-one) to test the action of the operations related to mouse scrolling.
You can access ” Step operation” by right-clicking on the operation on the operation list.
Target WINDOW cannot be found
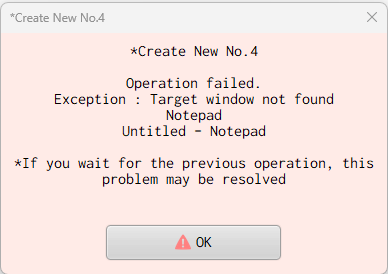
If the RPA could not detect the window with the specified target CLASS or title, an error popup saying that the target WINDOW cannot be found will appear. Here is the common possible cause of this error.
- The system that is the target of the system has not launched yet. (the window is currently not available)
- The target CLASS or title changes everytime you operate on it.
Here are how you can handle these issues.
Example case 1: Target window (system) has not launched
- Solution: Check whether if the system is running
-
If your automation set includeds operation that launch a new window, such as “File launch”, please check if the operation is correctly executed or not.
- Solution: Adjust the waiting time of the preceding operation.
-
If system startup or screen transition triggered by operations like “Click” or “File launch” takes time to load, making the program unable to detect the key image properly, increasing the waiting time of the operations where the system startup, or screen transitions is performed can potentially resolve the issue.
-
Example case 2: Matching “Target CLASS” or “Window title” could not be found resulting in Error
- Solution: Check whether if the “Target CLASS” or the “Window title” in the configuration section matches the actual window.
-
In the case that the “Target CLASS” or the “Window title” in the configuration section, which are automatically configured when capturing the screen, doesn’t match with the actual window being operated on, these kinds of error can occur.
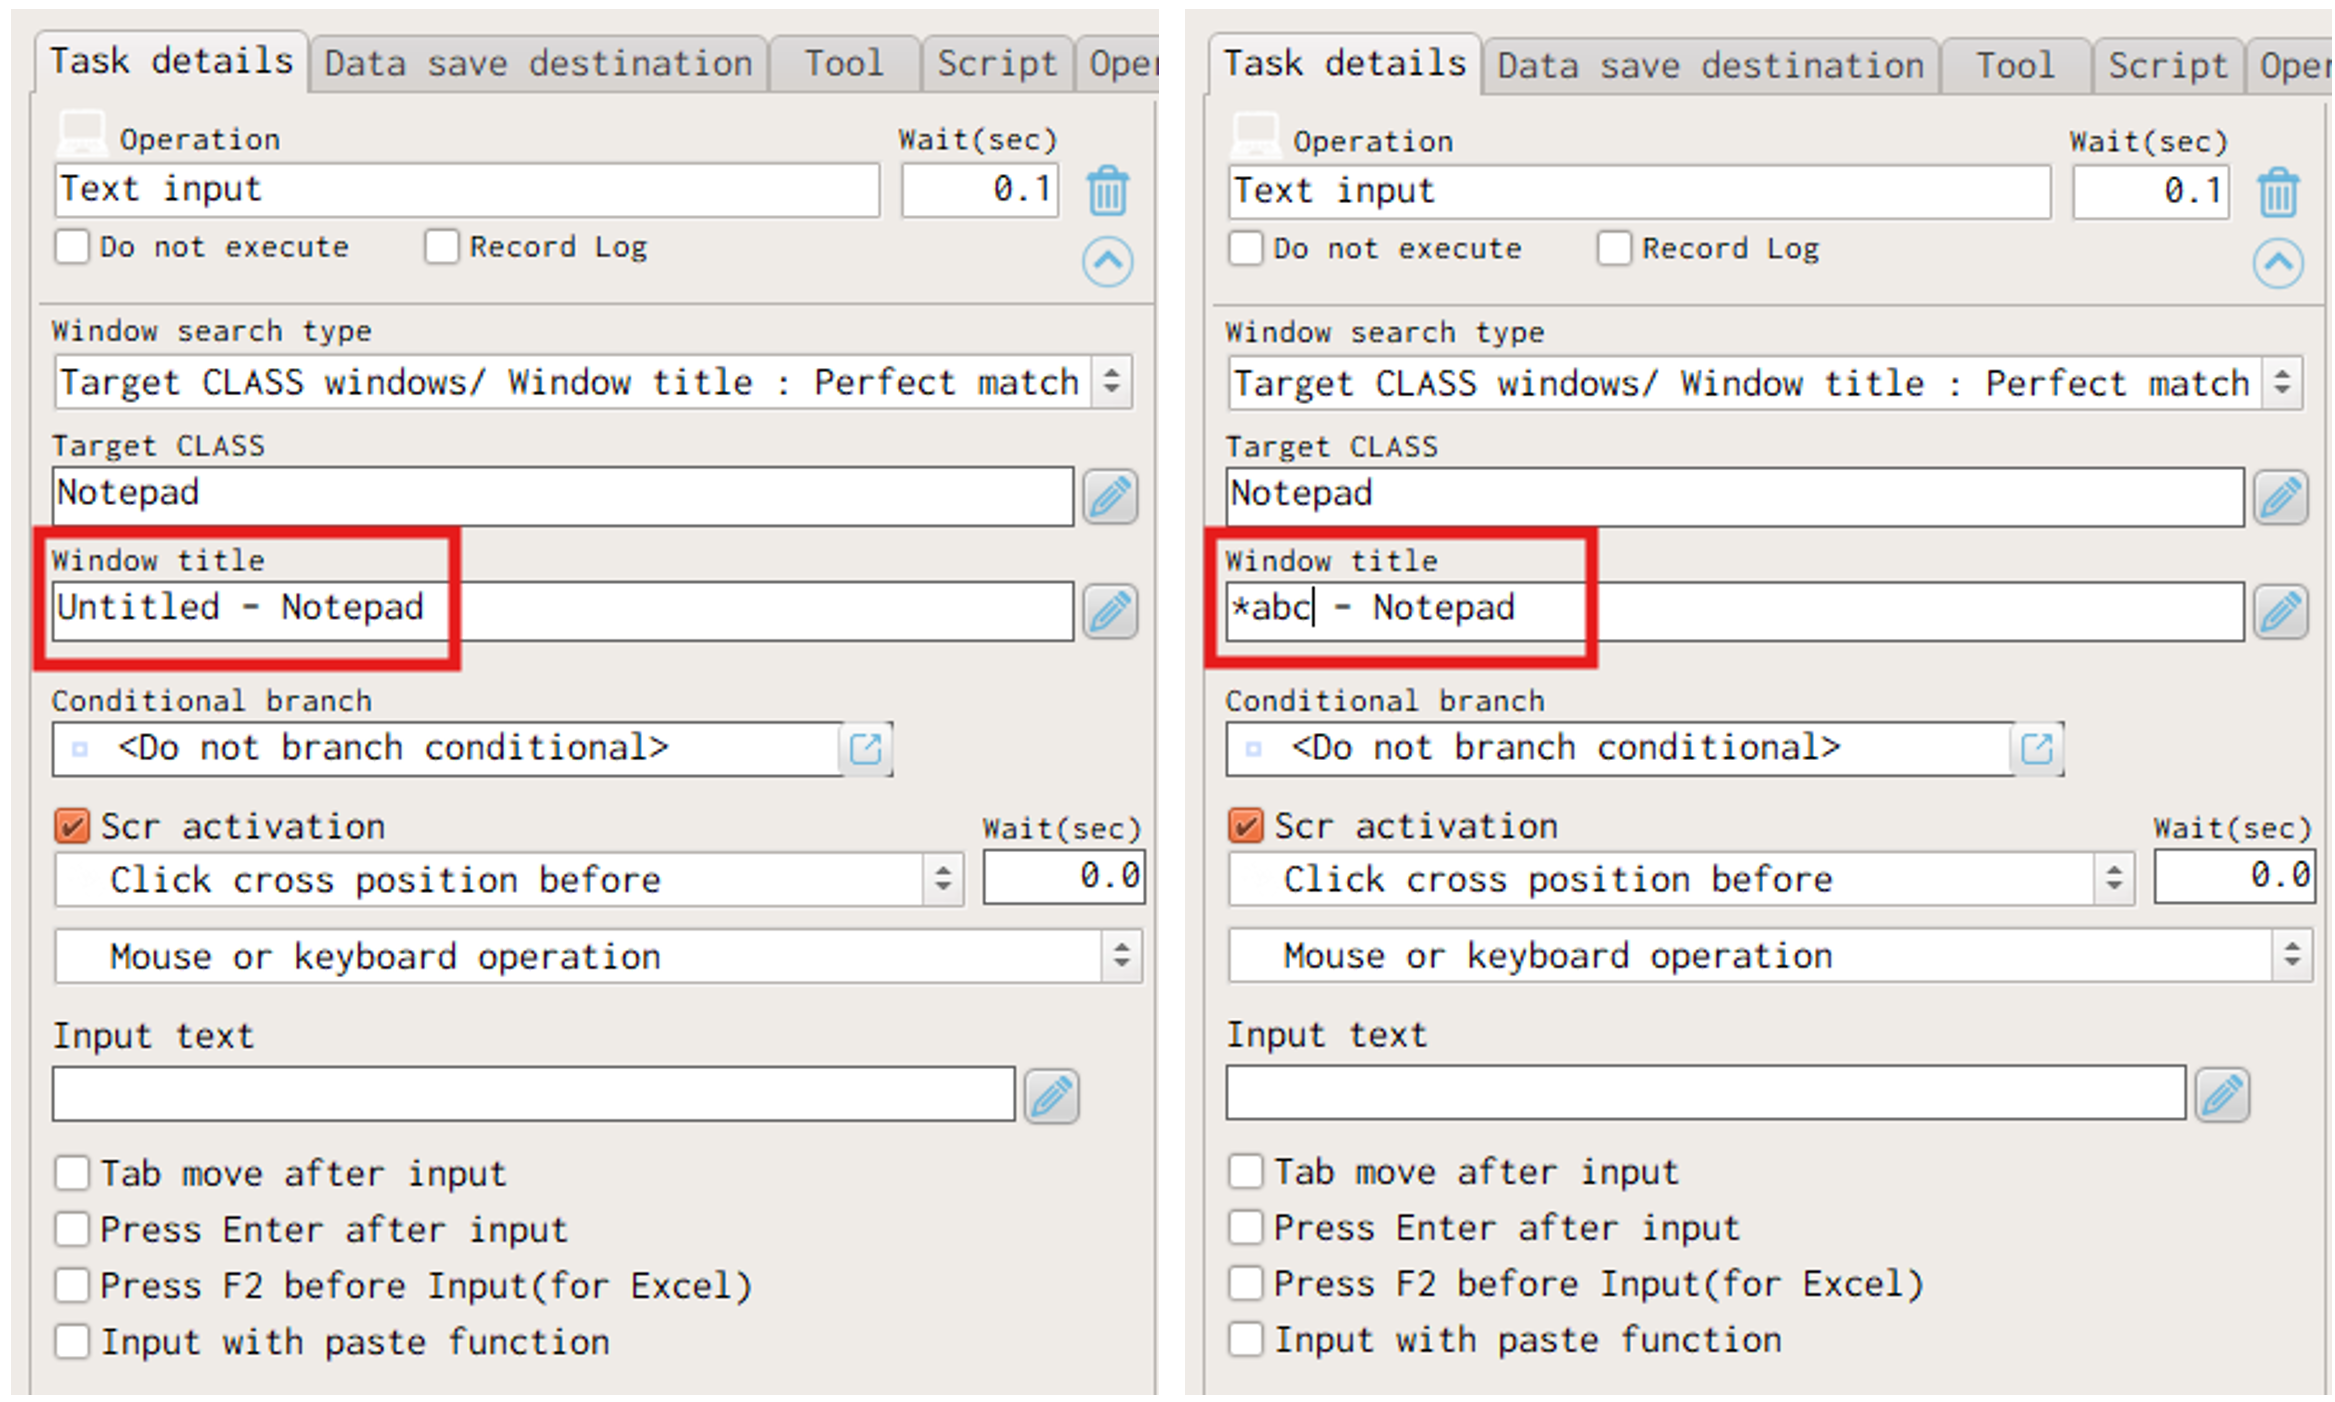
For some applications, the “Target CLASS” or the “Window title”, which are displayed in the “Task details” tab, may change everytime they are launched. For example, the “Target CLASS” of some system, or the “Window title” of a window which is repeatedly operated on multiple times may partially change.
To check if these changes are the cause of the error, try capturing the screen to retrieve the “Target CLASS” and the “Window title” again.
Immediately after the error occurs, select the window which is the target of the operation, and press the the screen capturing shortcut key to capture the screen (“Shift” key as the default setting).
The image below shows the case where the “Window title” when initially creating the operation, and when actually operating are different. - Solution: Change the “Window search type” setting
-
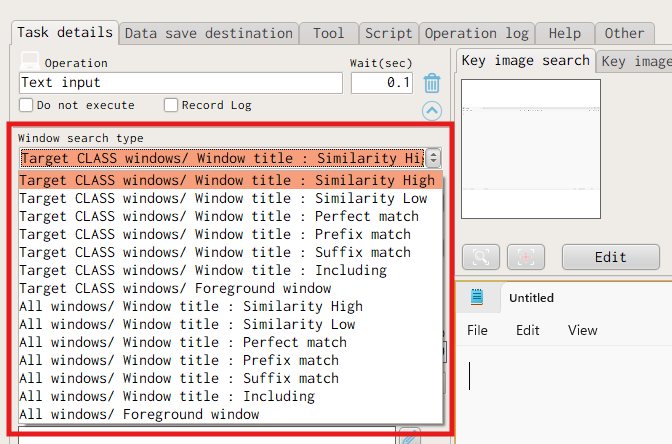
If an error occurs because of the changing “Target CLASS” or “Window title”, adjusting the “Window search type” can potentially help fixing the problem.
The adjustment should be made depending on what could not be match successfully.
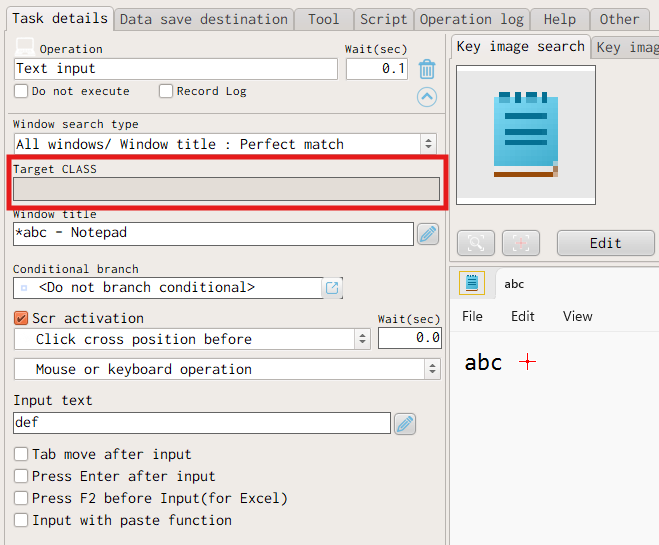
Here are the examples of the possible adjustments.“Target CLASS” doesn’t match. Change to options with “All windows/…”, and delete all the text inside the “Target CLASS” field. “Window title” doesn’t match. *Delete all the text inside the “Window title” field. Part of “Window title” doesn’t match. *Change to “Target CLASS windows/ Window title : Includng” option, and partially delete the text inside the “Window title” field so that only text that matches left. Beginning of “Window title” doesn’t match. *Change to “Target CLASS windows/ Window title : Suffix match” option, and partially delete the begining of text inside the “Window title” field so that only text that matches left. Ending of “Window title” doesn’t match. *Change to “Target CLASS windows/ Window title : Prefix match” option, and partially delete the ending of text inside the “Window title” field so that only text that matches left.
*If errors occur when using “All windows/ Window title : Perfect match”, try switching to “All windows/ Window title : Similarity High” can potentially fix the problem.
For the options available in “Window search type”, those that begin with “Target CLASS windows…” will search for the currently available windows which has a title that matches with the text in the “Target CLASS” field.
While those that begin with “All windows…” will search all windows currently available.
For both types, the windows will be filtered down further by factors such as the similarity of the window title, or if the window is at the forefront or not.When selecting “All windows…” as the “Window search type”, the “Target CLASS” will be automatically cleared.
If you manually clear the “Target CLASS” field, the “Window search type” will automatically be changed to “All windows…”.
If MICHIRU RPA Got Automatically Deleted
- MICHIRU RPA icon disappeared from the desktop.
- MICHIRU RPA cannot be found when searched in the Windows menu.
If you run into these kind of problems, there are the possibilities that MICHIRU RPA might have been removed by a firewall or antivirus software. Depending on the antivirus program, it may be possible to restore the software, so please check the settings of the program you are using.
Also, before using MICHIRU RPA again, please add “MICHIRU RPA” to the whitelist or exclusion settings of your firewall or antivirus software.
Example: Changing firewall settings for Windows Defender.
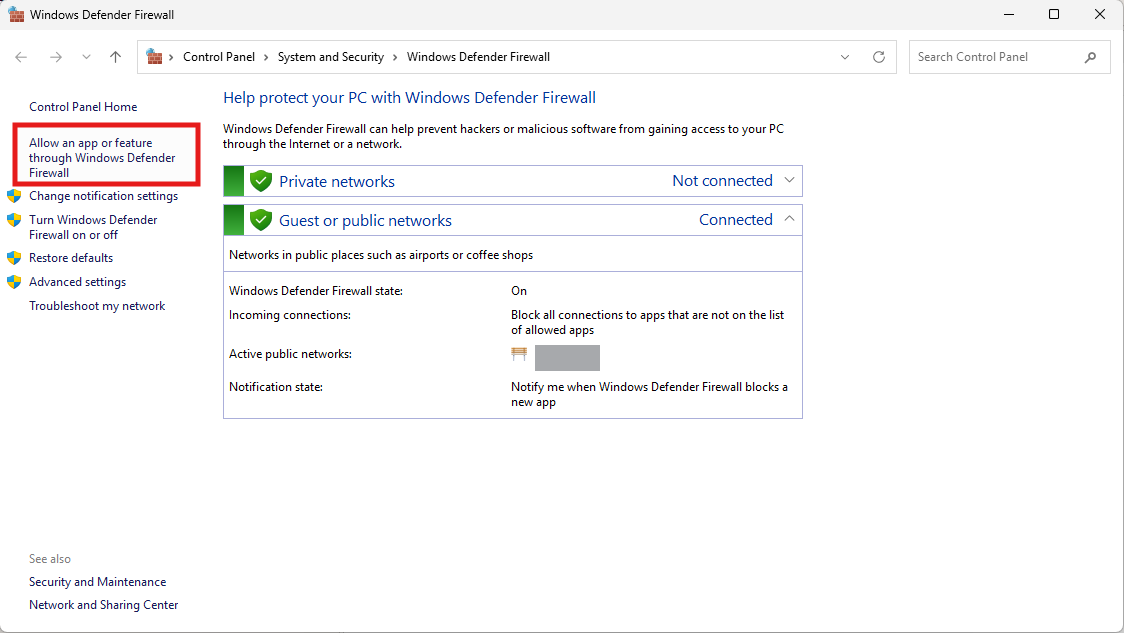
Type “Defender” in the search box on the Windows menu bar to open the Windows Defender Firewall settings.
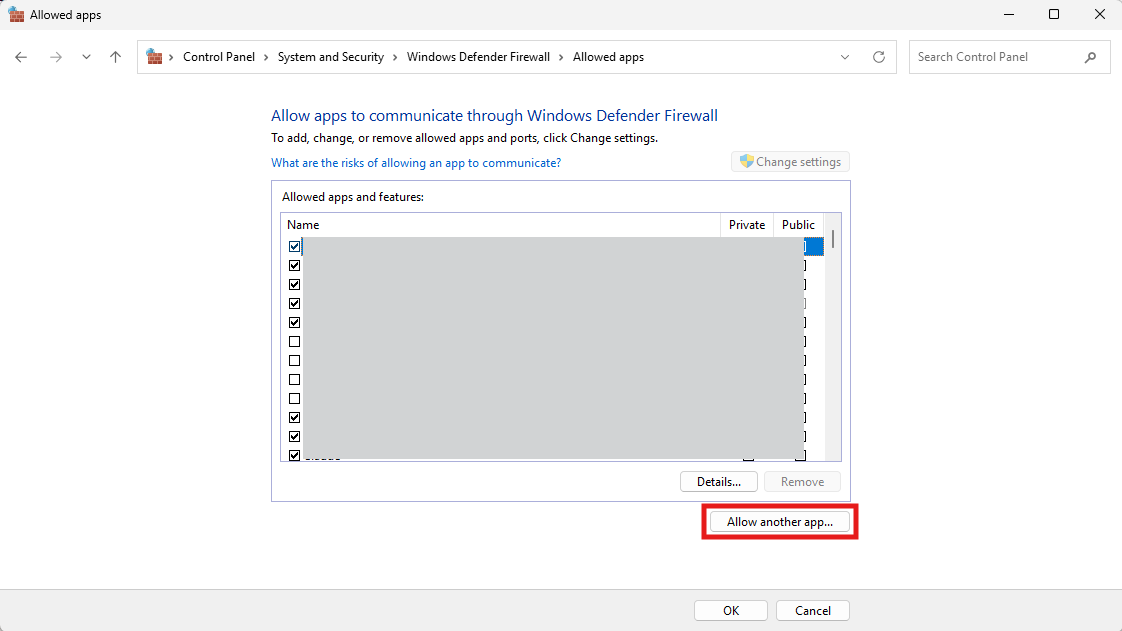
Click “Allow an app or feature through Windows Defender Firewall” from the left sidebar.
Click “Allow another app”.
Click “Browse”.
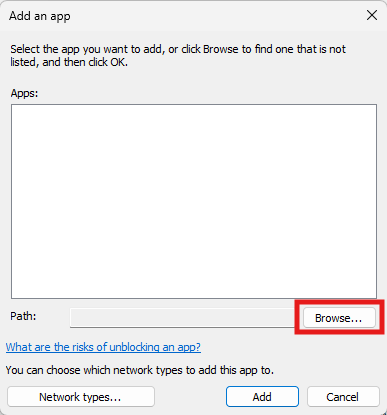
Select the MICHIRU RPA executable file and click “Open”.
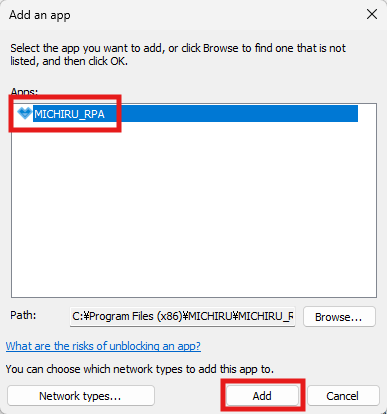
If you have not chnaged the default installation settings, select:
C:\Program Files (x86)\MICHIRU\MICHIRU_RPA\MICHIRU_RPA.exe
After confirming that MICHIRU RPA appears in the list of apps, click the “Add” button.
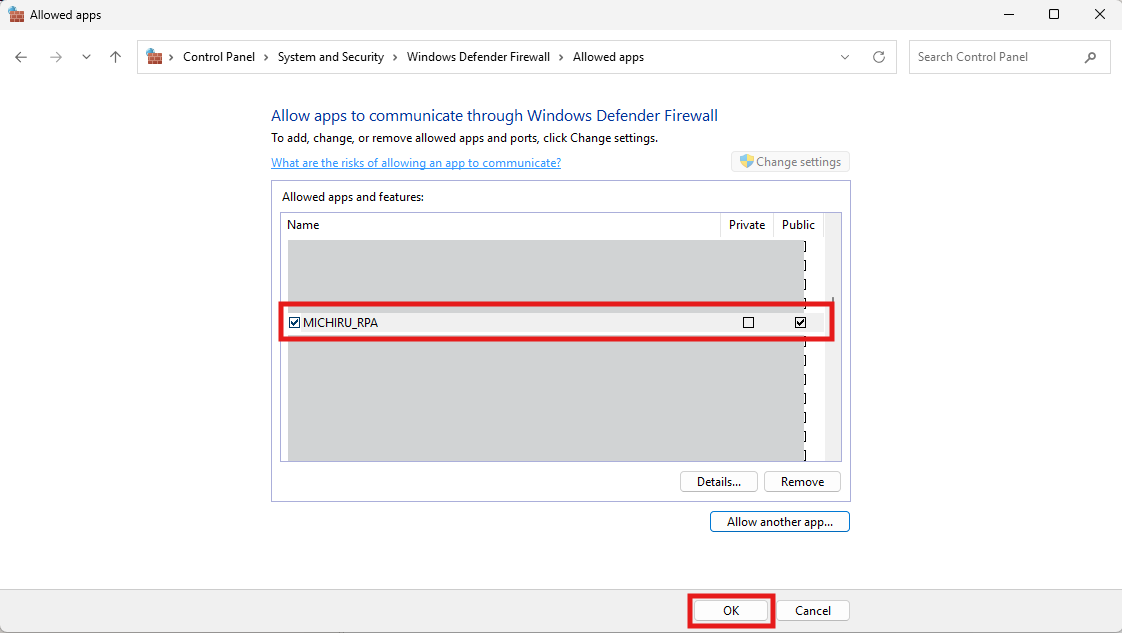
Turn on the checkboxes for both Private and Public for MICHIRU RPA, then click “OK”
This completes the configuration.