Detailed settings for each operation are to be done in the extension screen. For more information regarding commons settings across all operations, such as various settings in the targeted screen operation, how to specify points of operations, please refer to ‘MICHIRU RPA Mechanism and Detailed Settings‘.
Basic function
Comment
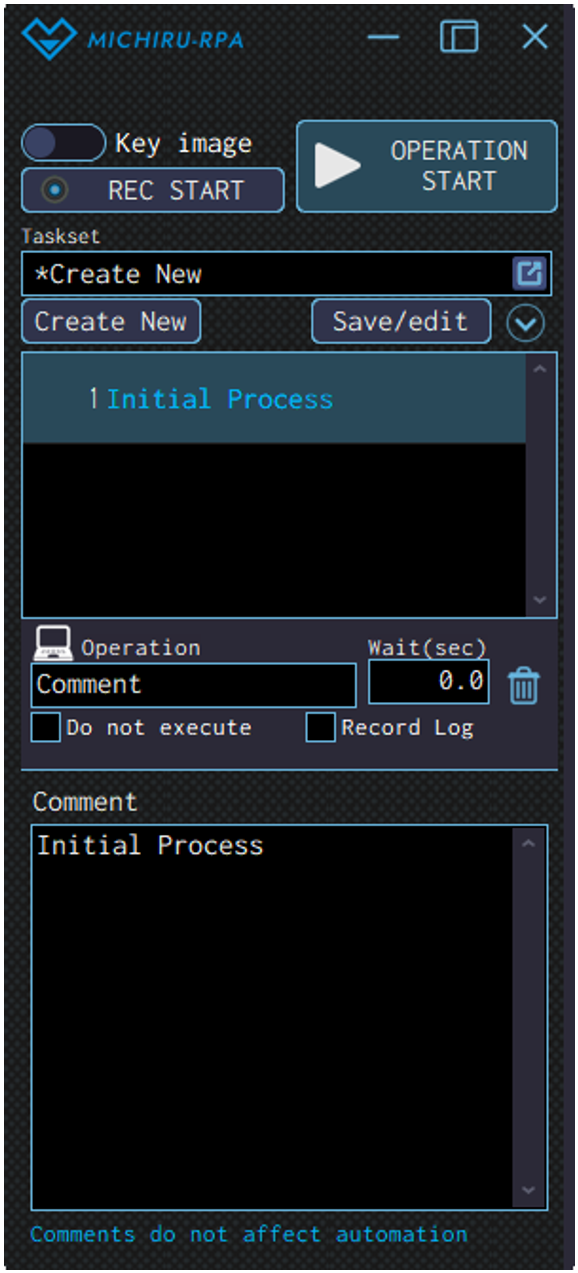
Use this operation to display comments as titles, explain the processes, or separate operations.
The text entered in the comment field is displayed in blue. The examples below shows a comment labeled ‘Initial Processing”. These comments do not affected with the automation in anyway.
Leaving comments in the operation list can help users understand the workflow and the intention behind the automation set better.
This is especially useful when the automation set is highly complex, and when sharing the automation set with other colleagues.
Search standby
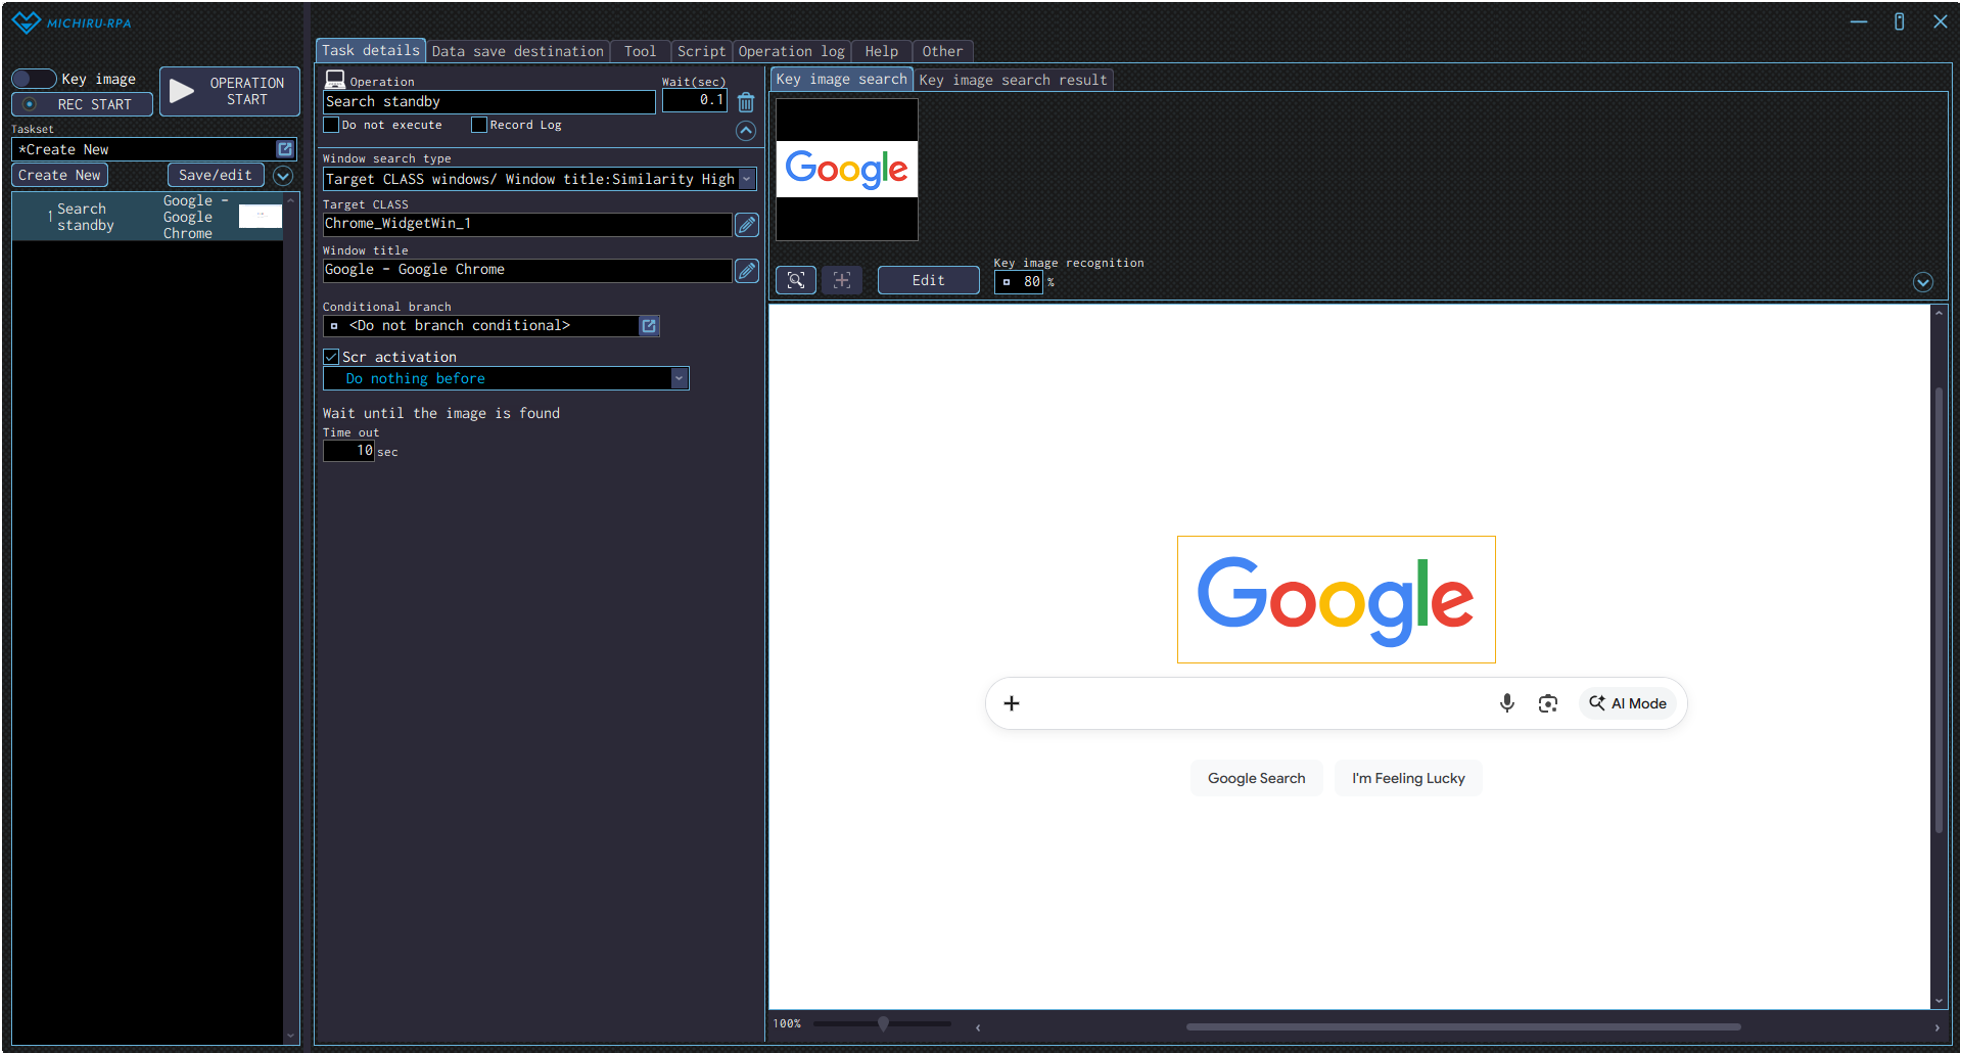
Use this operation to make the RPA wait until the specified image / element is found, before proceeding to the next opeartion.
This operation can be used to wait until loadings and processings are finished.
With this operation, you can make the RPA wait until the buttons and texts finished loading when moving to another page, or wait until the target of operations appears before executing the operation.
Configuring the Operation Position
- When in Key Image Mode
-
Press the shortcut key to capture the image / element.
Open the “Edit” screen, and specify the area of the image you want to locate (key image) by left mouse drag.The example below shows the settings where the RPA waits until until the Google’s logo (in the orange frame) is found.

- When in Element Mode
-
Move the cursor over the target element, press the shortcut to capture the image / element, then change the operation type in the operation box to “Search standby” in the “Basic function” menu.
You can also set to operation to “Search standby” in the “Basic function” from the beginning, by moving the cursor to your target element and right-clicking to display the operation menu.
Mouse operation
Click
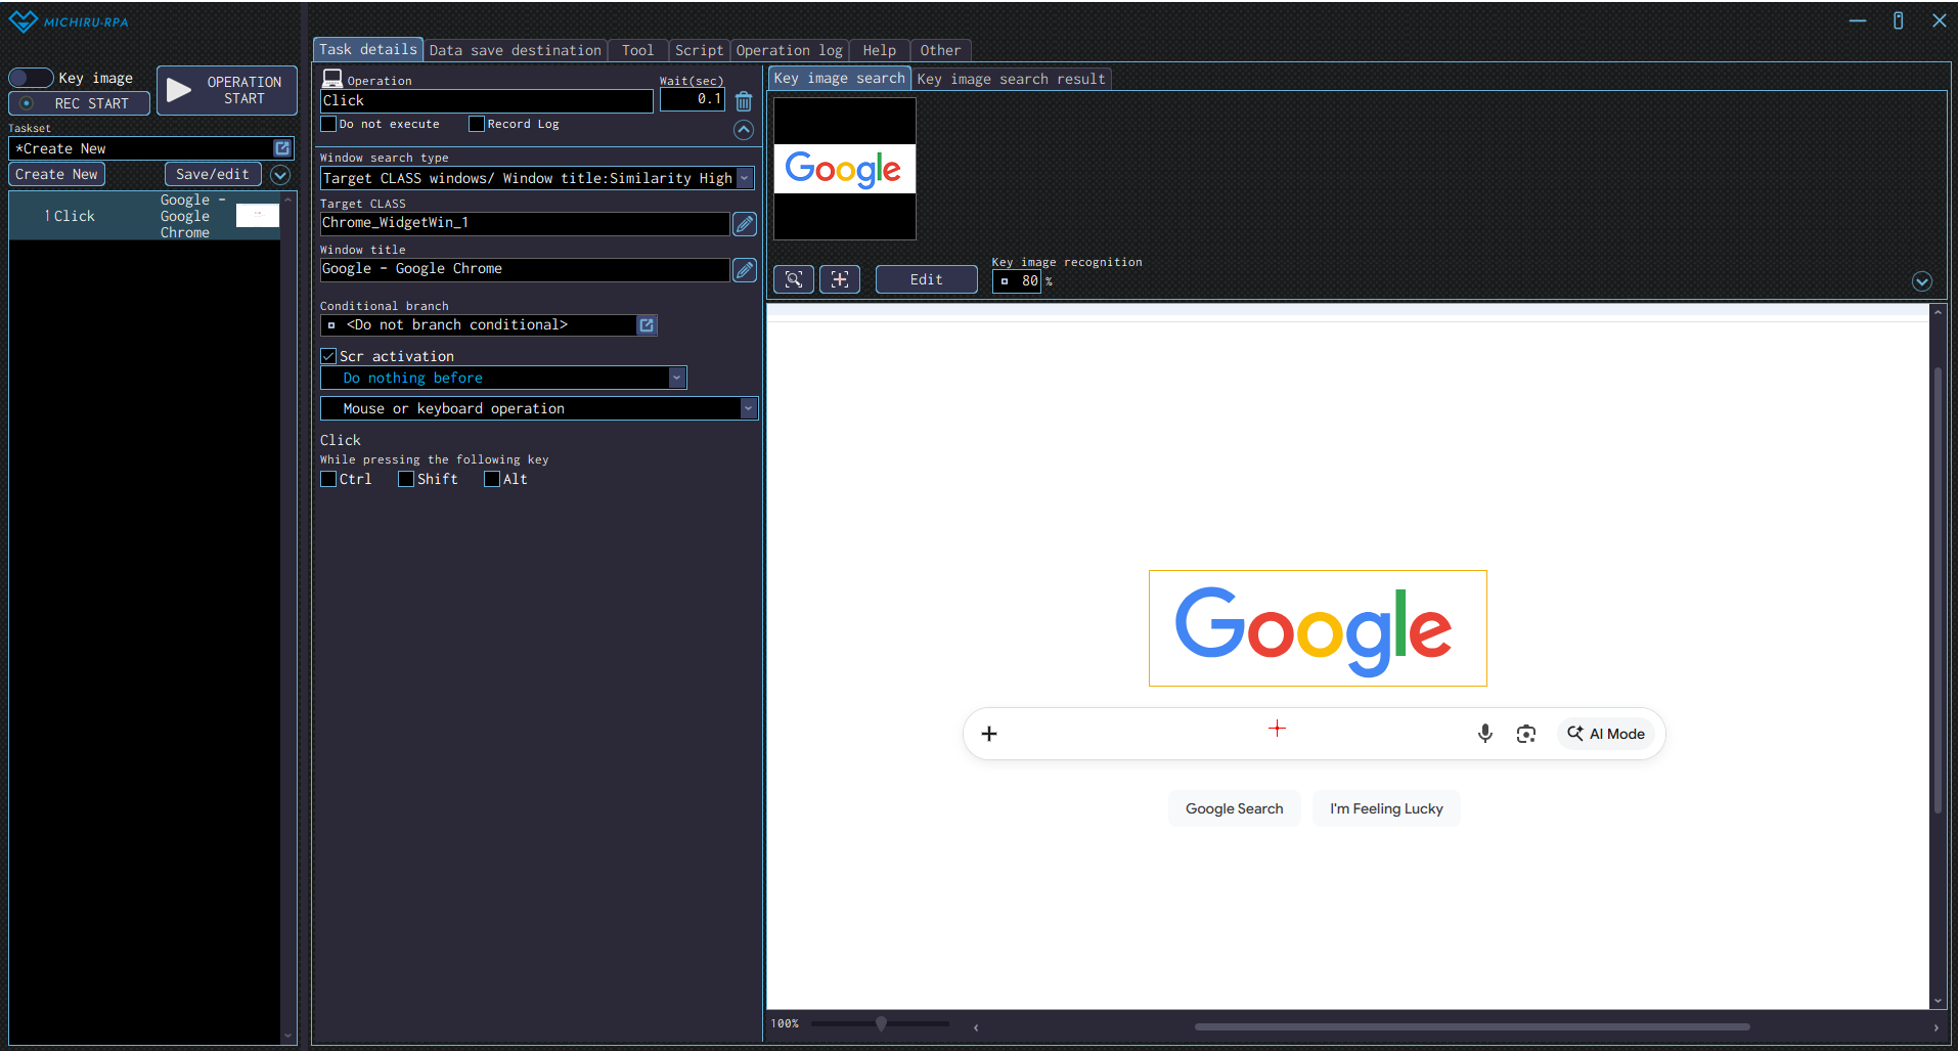
Use this operation to left-click on the specified position.
Configuring the Operation Position
- When in Key Image Mode
-
Move the cursor to the position you want to click, press the shortcut key to capture the image / element. Open the “Edit” screen, and specify the area of the image you want to mark as key image by left mouse drag. You can change the click position by right clicking the position you want (red cross)
The example below shows the settings where the RPA look for the Google’s logo (in the orange frame), then click on the search field (red cross).
- When in Element Mode
-
Move the cursor to the position you want to click, press the shortcut key to capture the image / element. If the operation that appears is not automatically set to “Click”, change the operation type in the operation box to “Click” in the “Mouse operation” menu. You can also set to operation to “Click” in the “Mouse operation” from the beginning, by moving the cursor to your target element and right-clicking to display the operation menu.
Double click
Use this operation to double left-click on the specified position.
Please refer to “Click ” for information on how to configure the operation.
Note that in the detailed setting for the operation, you can only select “Mouse or keyboard operation” regardless of the capture mode you are in.
Triple click
Use this operation to triple left-click on the specified position. This operation is useful when you need to select a group of sentences.
Please refer to “Click ” for information on how to configure the operation.
Note that in the detailed setting for the operation, you can only select “Mouse or keyboard operation” regardless of the capture mode you are in.
Drag
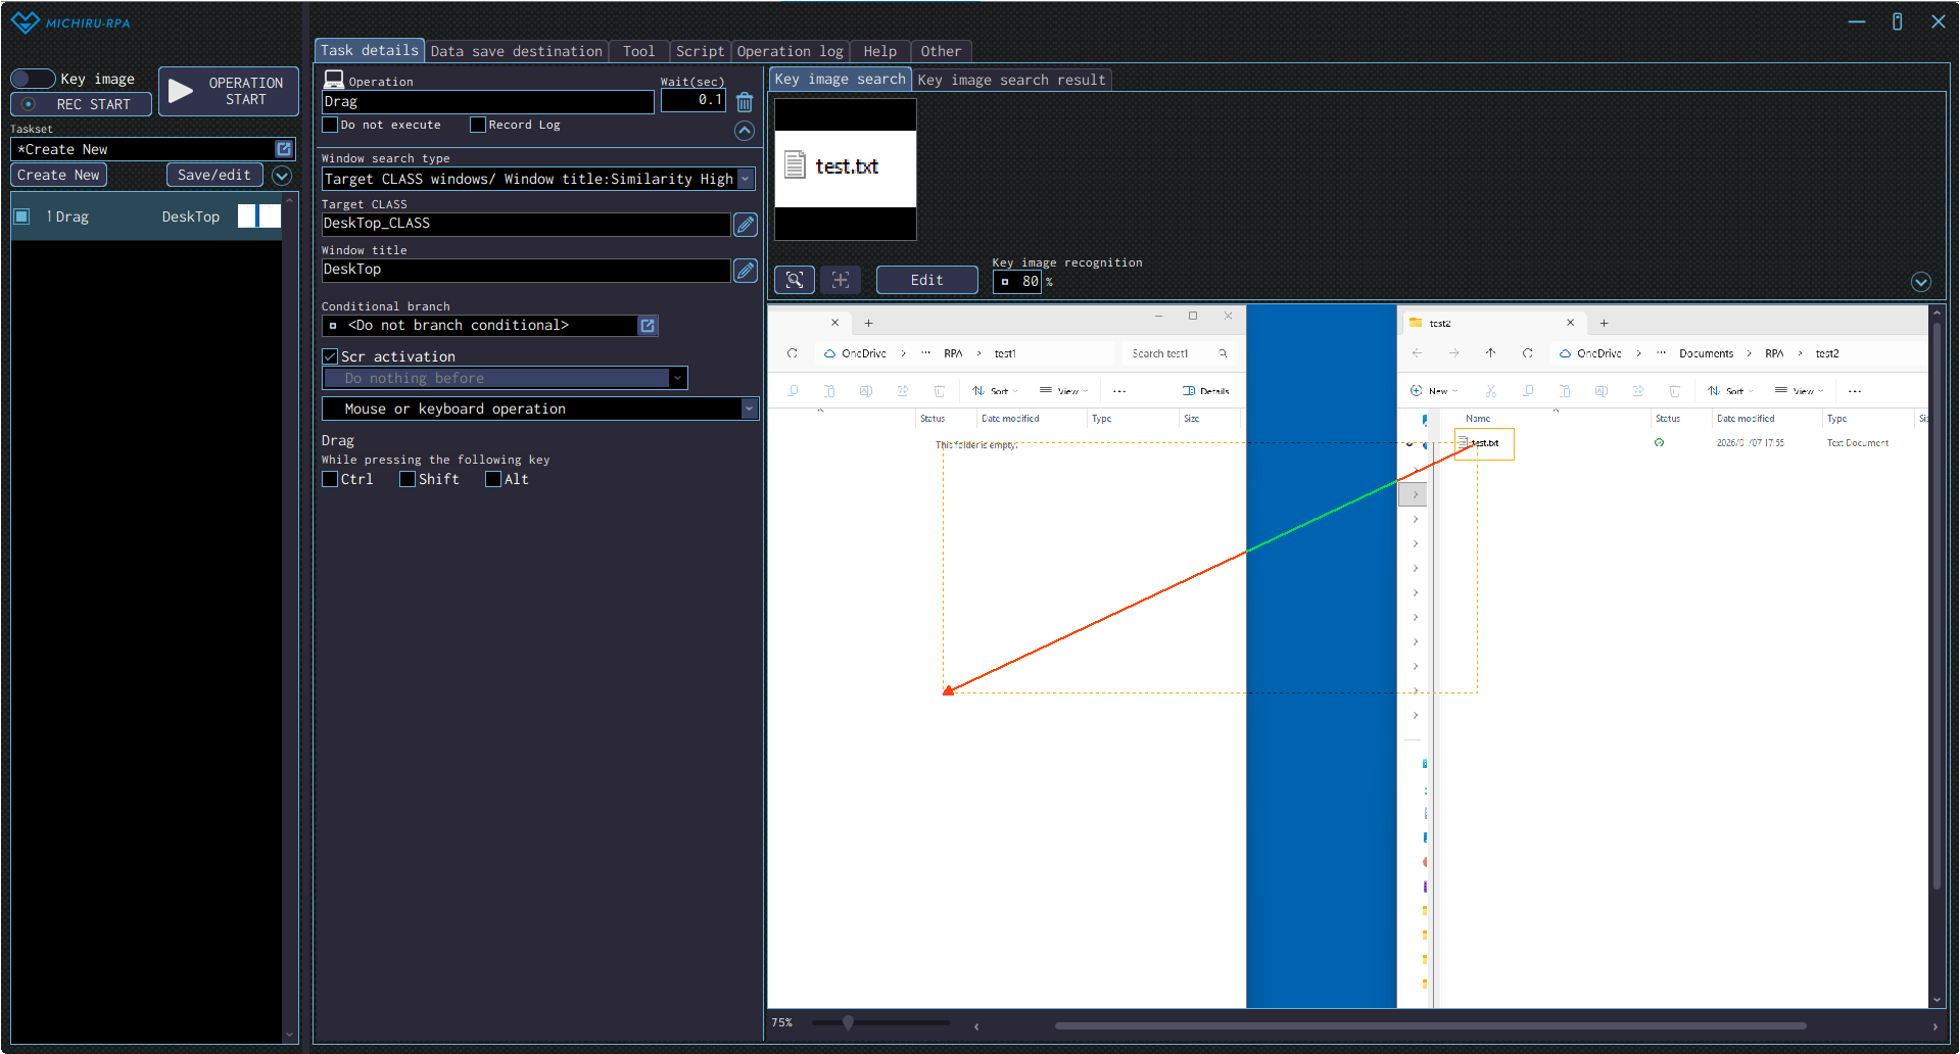
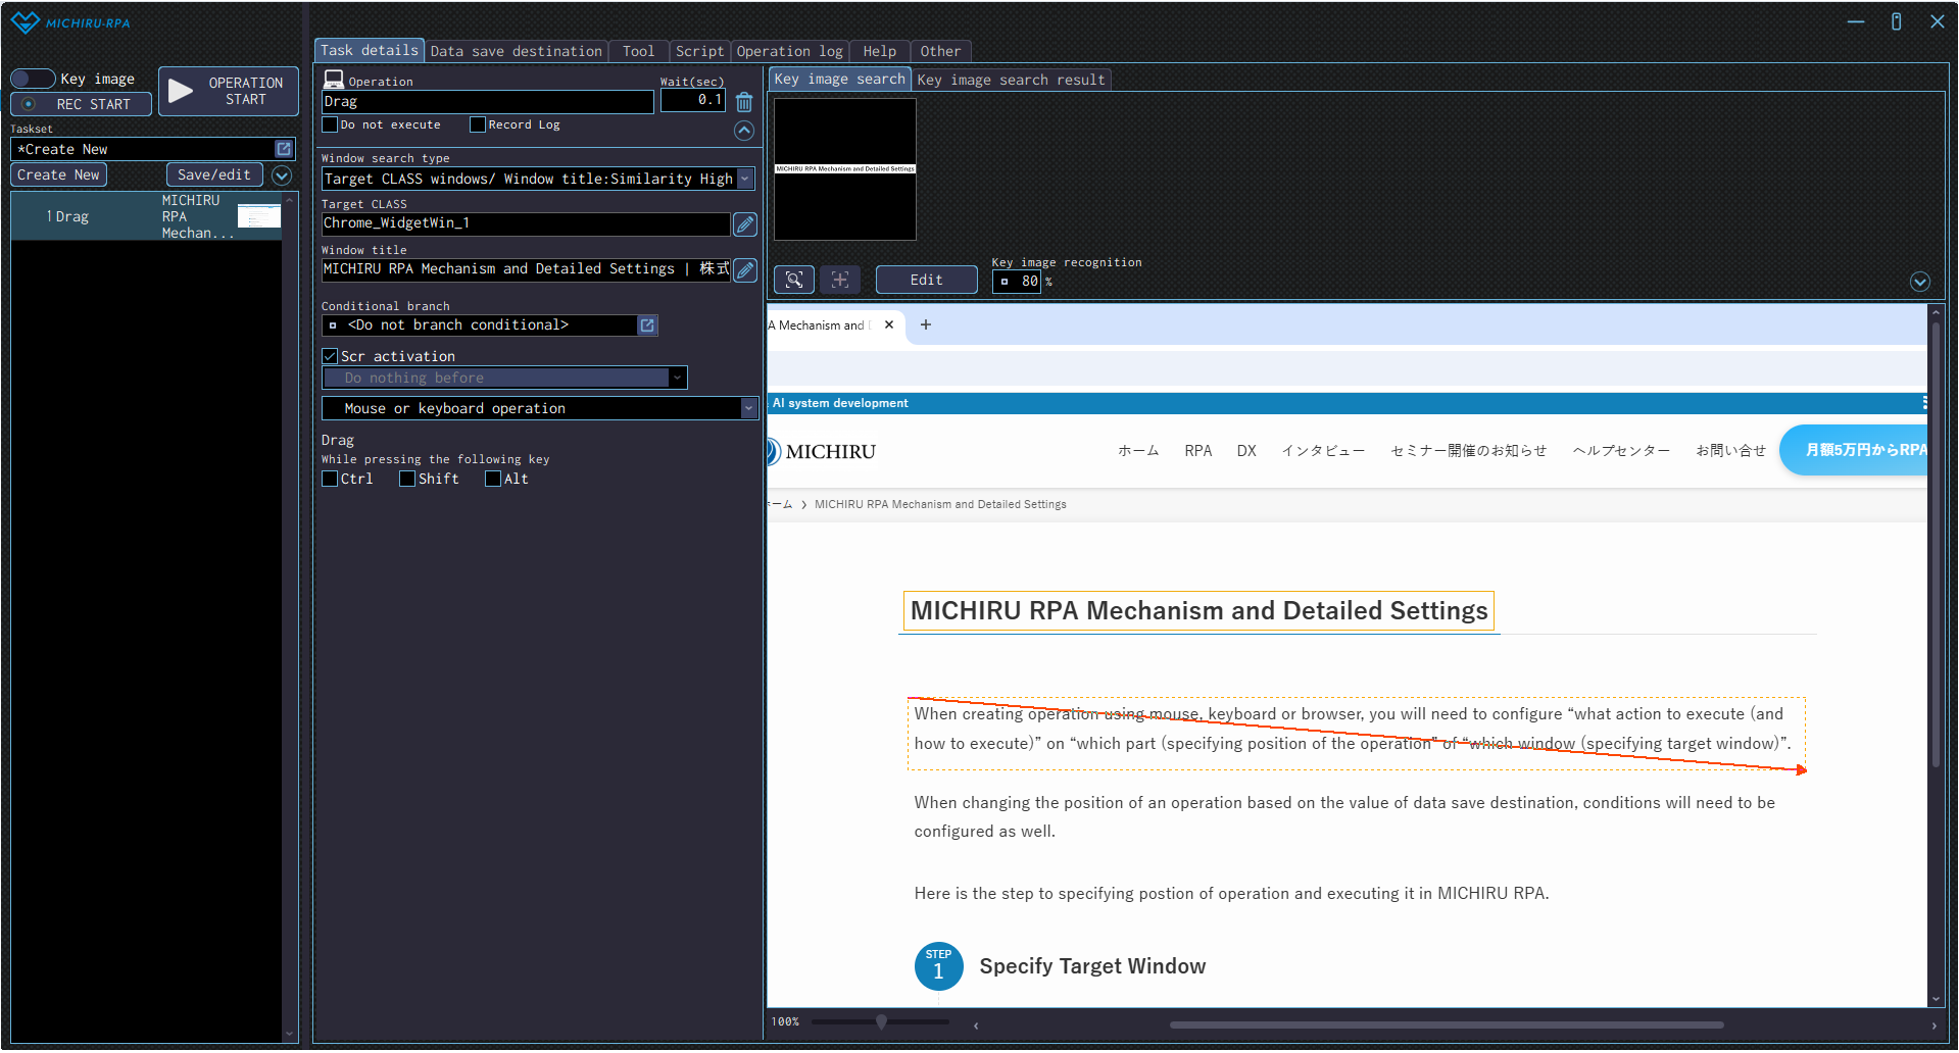
Use this operation to drag at the specified area using the left mouse button. Note that in the detailed setting for the operation, you can only select “Mouse or keyboard operation” regardless of the capture mode you are in.
Starting from version 1.4.1.0, direction of the mouse movement during the drag from the start to the end point can be configured.
The image below shows the case where the file is dragged in the lower-left direction.
Configuring the Operation Position
- When in Key Image Mode
-
Press the shortcut key to capture the image / element.
Open the “Edit” screen, specify the the area of the image you want to mark as key image by left mouse drag, and specify the area you want the RPA to drag over by right mouse drag.The example below shows the settings where the RPA look for the image of “ABOUT MICHIRU RPA” (in the orange frame), then drag on the area below (in the red frame with arrow).
- When in Element Mode
-
Move the cursor to the target element, press the shortcut key to capture the image / element, then change the operation type in the operation box to “Drag” in the “Mouse operation” menu.
You can also set to operation to “Drag” in the “Mouse operation” from the beginning, by moving the cursor to your target element and right-clicking to display the operation menu.Open the “Edit” screen after capturing the element, and specify the area you want the RPA to drag over by right mouse drag.
Right click
Use this operation to right-click on the specified position. Please refer to “Click ” for information on how to configure the operation.
Note that in the detailed setting for the operation, you can only select “Mouse or keyboard operation” regardless of the capture mode you are in.
Double right click
Use this operation to double right-click on the specified position. Please refer to “Click ” for information on how to configure the operation.
Note that in the detailed setting for the operation, you can only select “Mouse or keyboard operation” regardless of the capture mode you are in.
Right drag
Use this operation to drag at the specified area using the right mouse button.
Please refer to “Drag ” for information on how to configure the operation.
Center click
Use this operation to middle-click on the specified position.
Please refer to “Click ” for information on how to configure the operation. Note that in the detailed setting for the operation, you can only select “Mouse or keyboard operation” regardless of the capture mode you are in.
Double center click
Use this operation to double middle-click on the specified position.
Please refer to “Click ” for information on how to configure the operation.
Note that in the detailed setting for the operation, you can only select “Mouse or keyboard operation” regardless of the capture mode you are in.
Center drag
Use this operation to drag at the specified area using the middle mouse button.
Please refer to “Drag ” for information on how to configure the operation.
Scroll mouse wheel
Use this operation to scroll mouse wheel at the specified location.
Configuring the Operation Position
- When in Key Image Mode
-
Press the shortcut key to capture the image / element in order to specify the cursor position where the mouse wheel scroll should take place.
Open the”Edit” screen, and specify the area of the image you want to mark as key image by left mouse drag, then specify the position to do the mouse wheel scroll by right-clicking.The example below shows the settings where the RPA look for the image of “ABOUT MICHIRU RPA” (in the green frame), then do a mouse wheel scroll on the left (where the red cross is).
- When in Element Mode
-
Move the cursor to the target element, press the shortcut key to capture the image / element, then change the operation type in the operation box to “Scroll mouse wheel” in the “Mouse operation” menu. You can also set the operation to “Scroll mouse wheel” in the “Mouse operation” from the beginning, by moving the cursor to your target element and right-clicking to display the operation menu.
Position for scrolling (red cross) can be changed by right-clicking on the new position in the “Edit” screen.
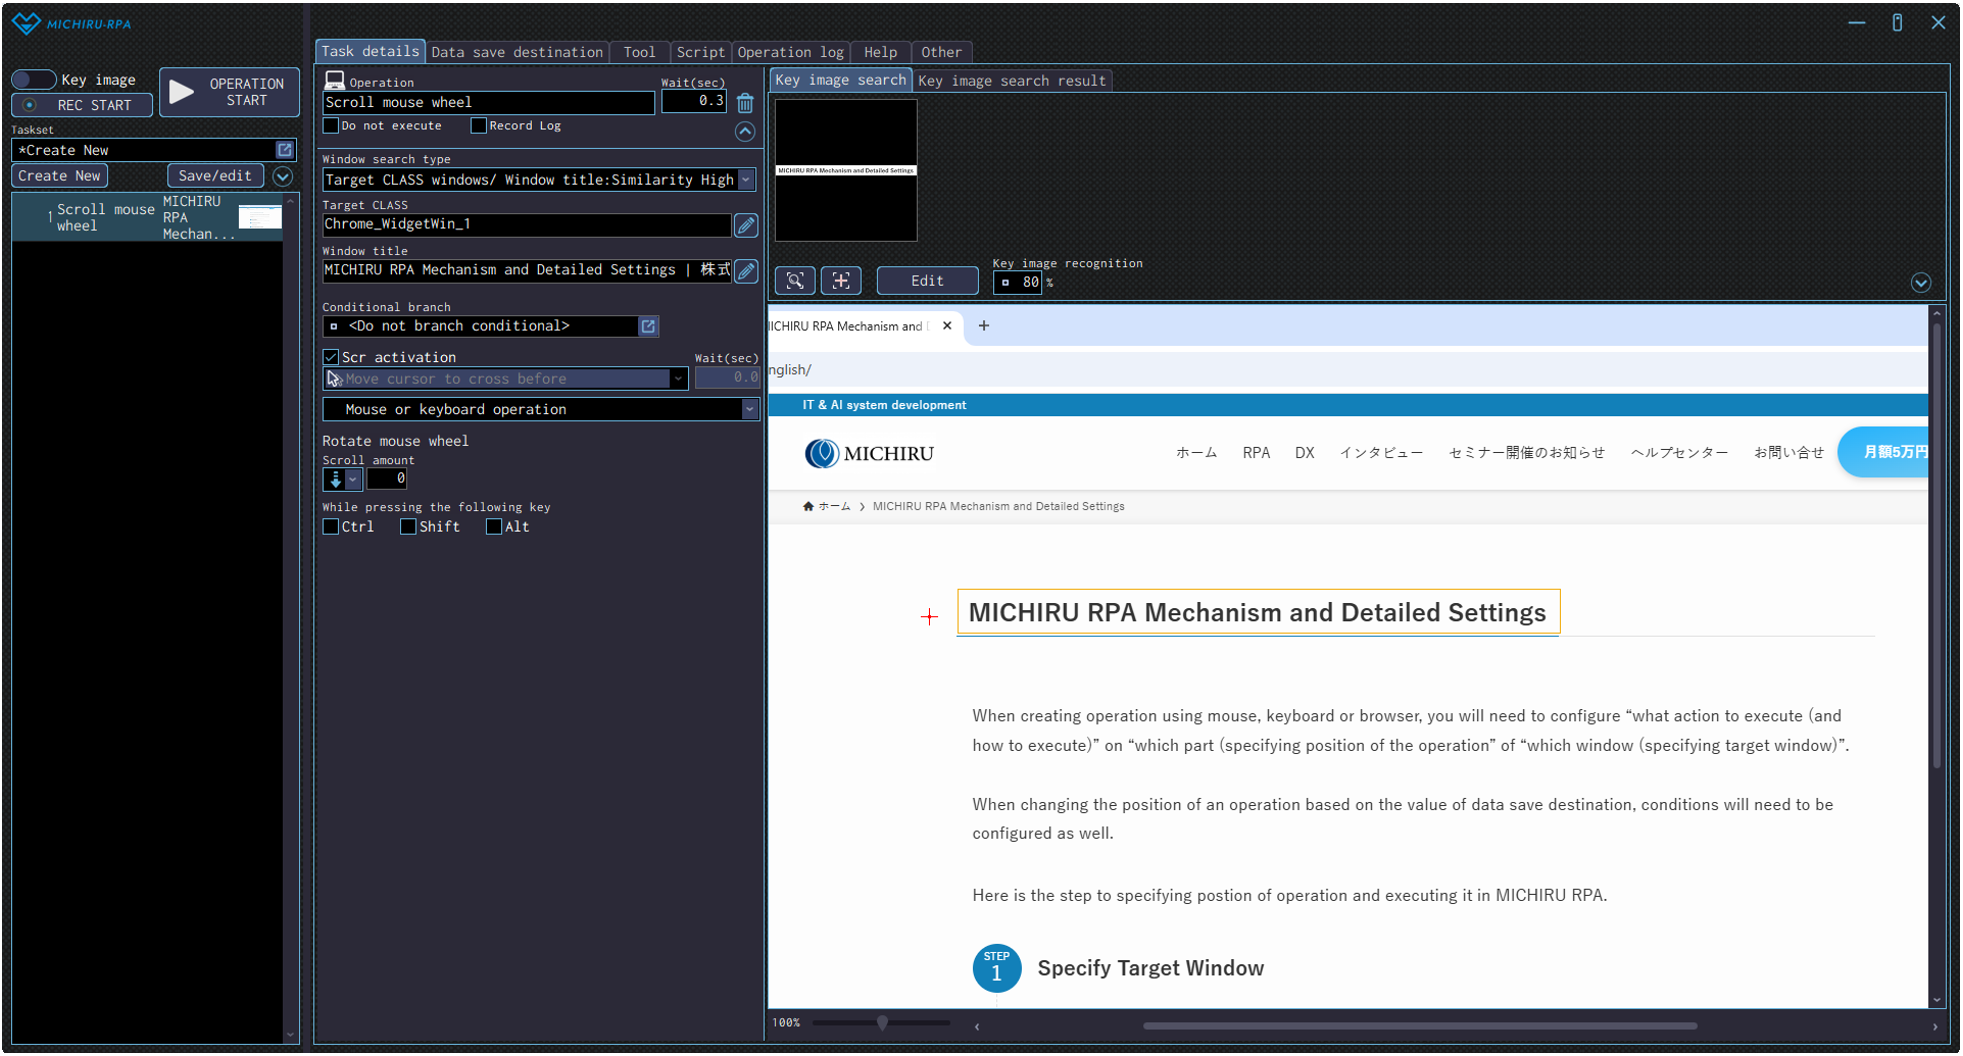
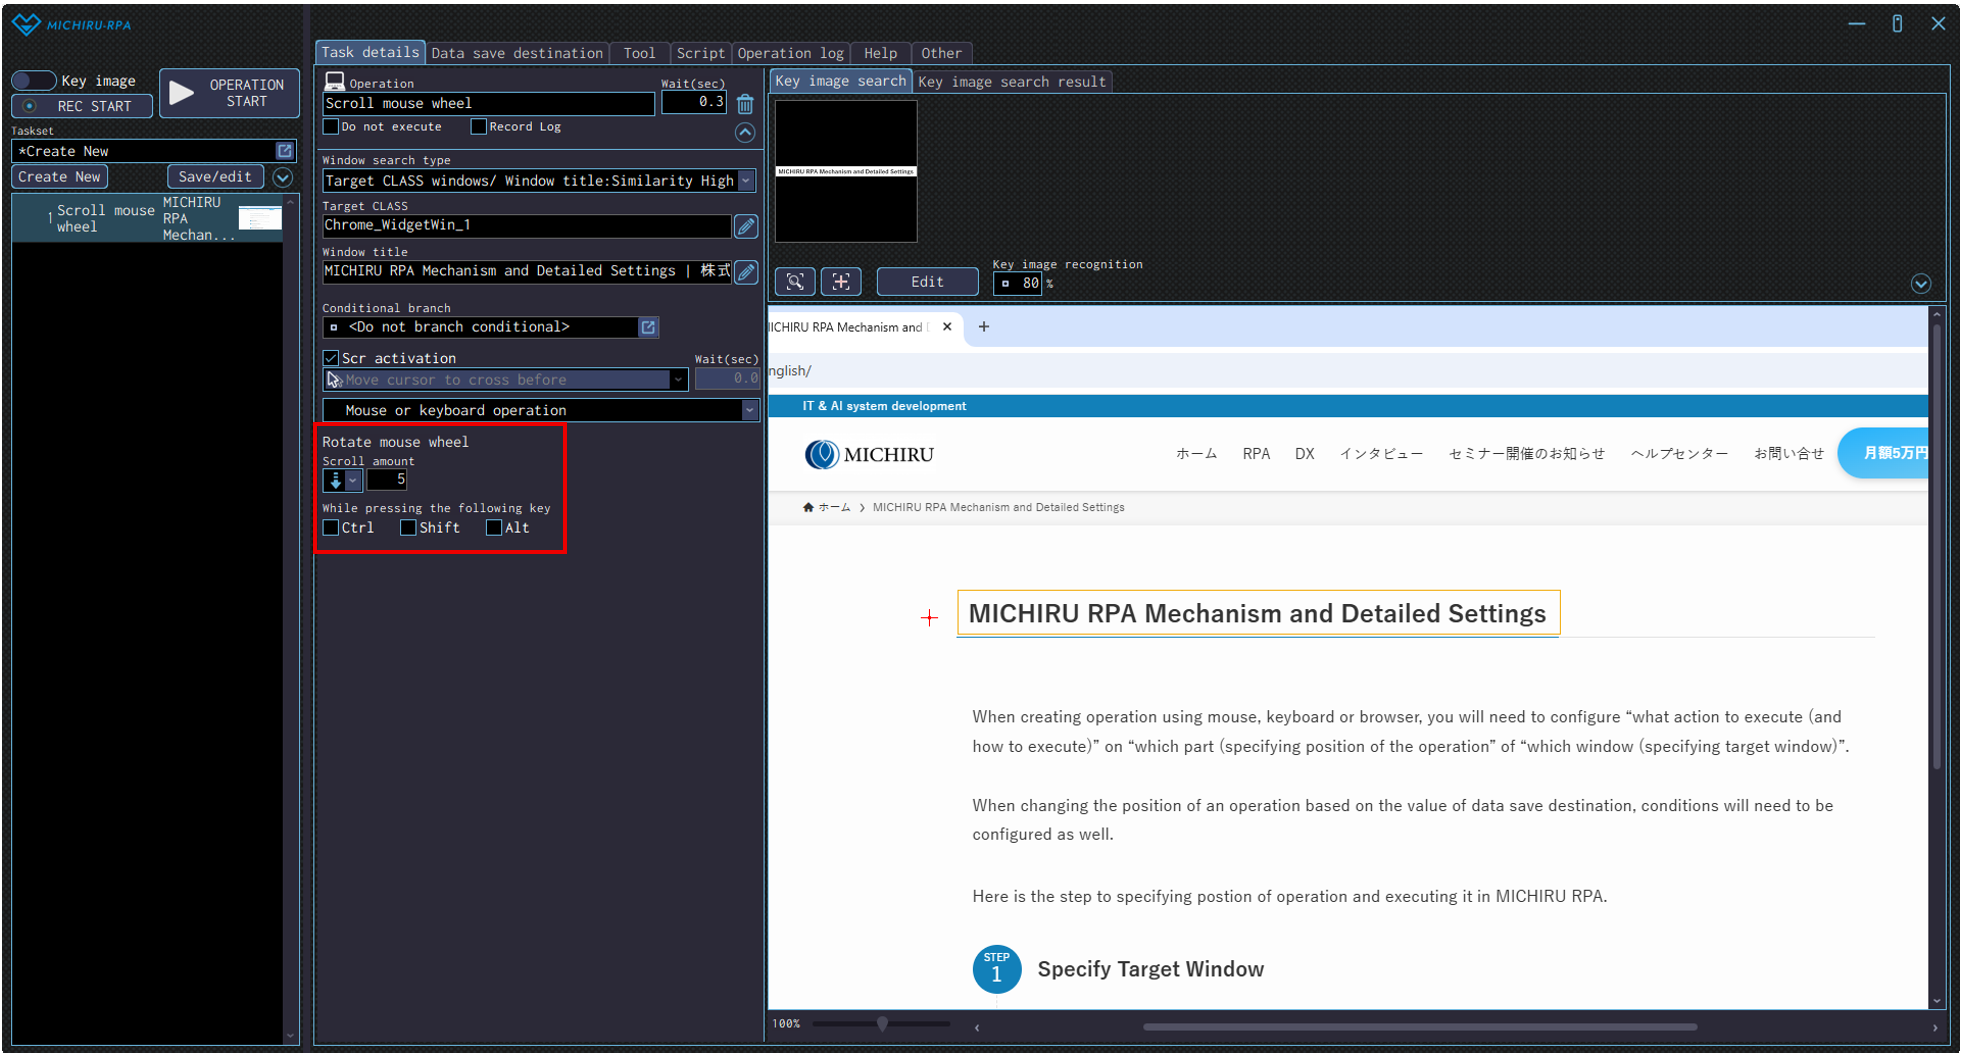
Detailed Setting for Operation
In the detailed setting for the operation, you can only select “Mouse or keyboard operation” regardless of the capture mode you are in.
You can configure the direction and the amount of the scroll in the settings marked by the red frame in the image below.
If you need to press Ctrl key, Shift key, or Alt key while scrolling, check on the respective checkbox to enable the setting.
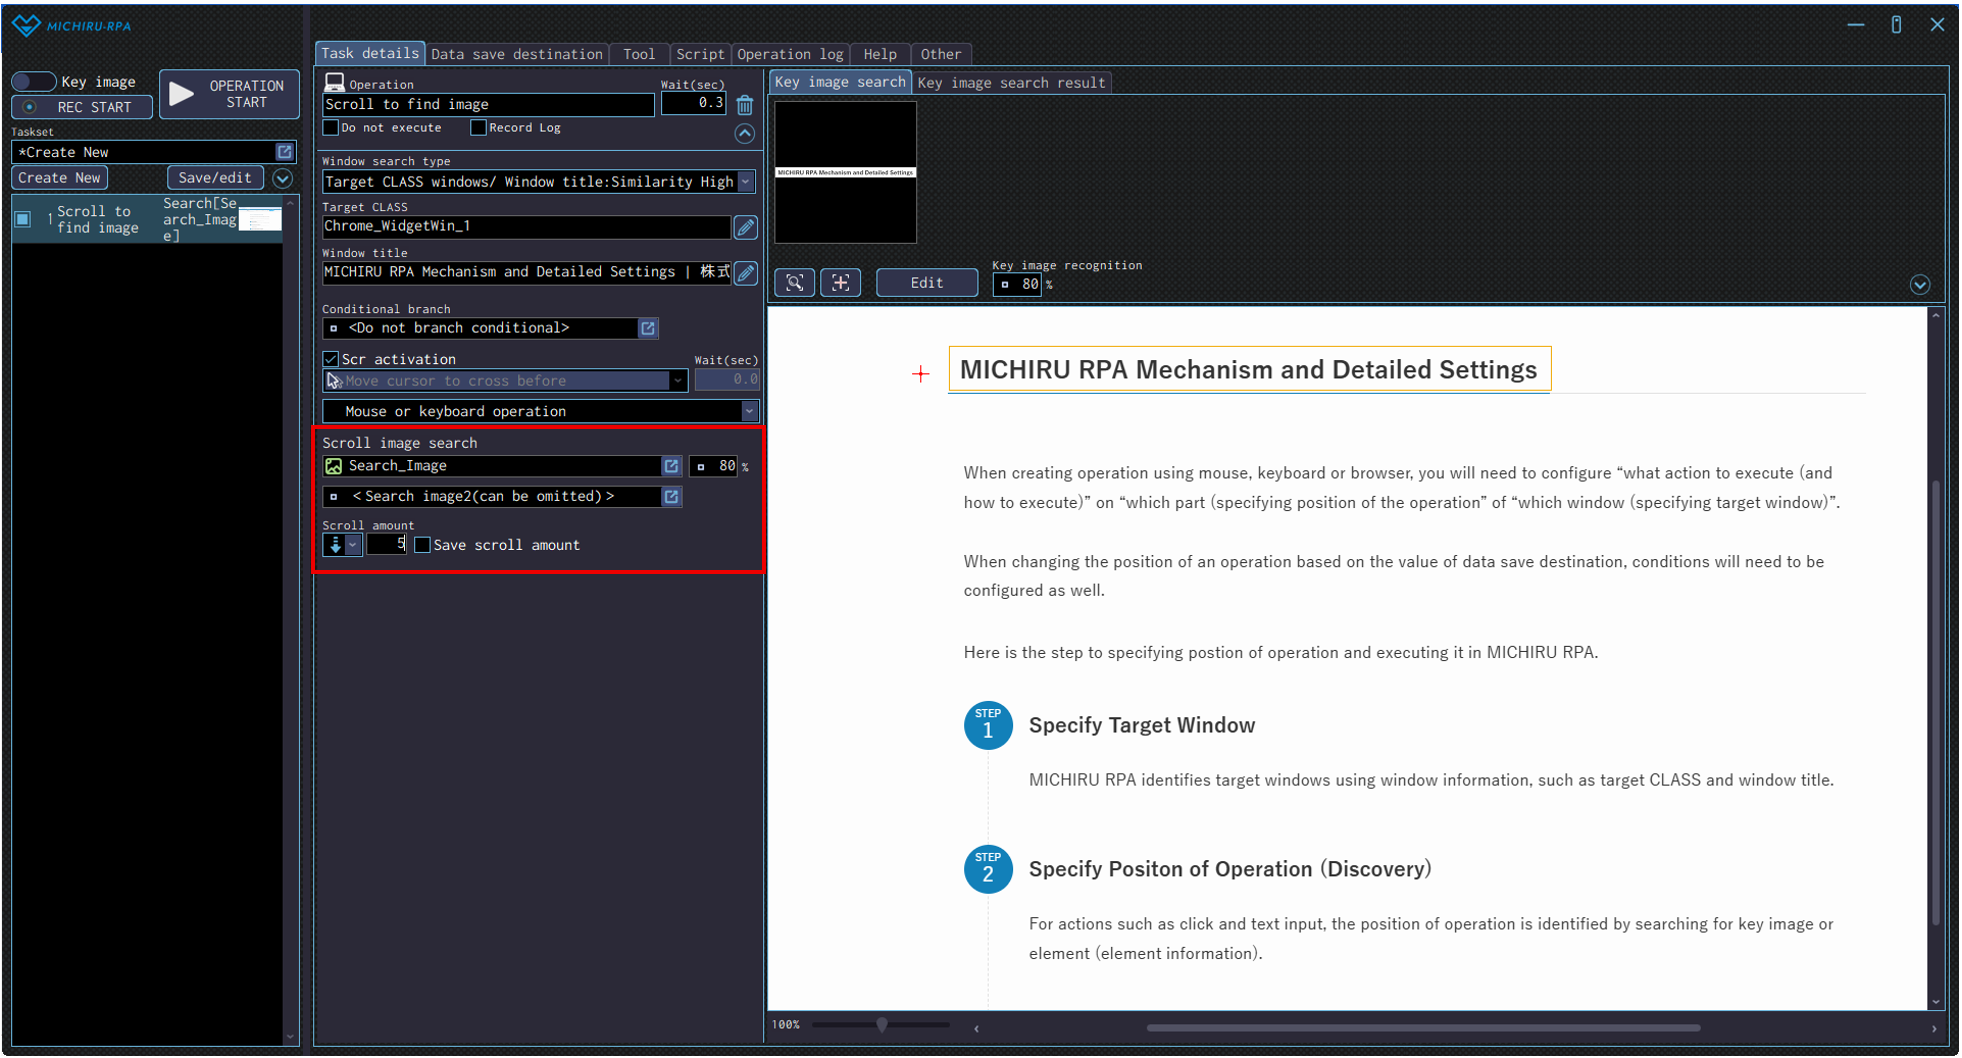
Scroll to find image
Use this operation to scroll mouse wheel until the specified image is found.
Note that in the detailed setting for the operation, you can only select “Mouse or keyboard operation” regardless of the capture mode you are in.
This is operation is great for when the element or the item you are looking for is not on the screen, or when the scroll amount is not fixed.
For example, it can be used when you want to look for a certain button or image by scrolling your mouse downwards in a list or a webpage, or when you need to locate an item or elements that change its location every time.
After the target image is found, the scroll will end, then the next operation will be executed.
Preparing Data Save Destination
Make preparation by saving the search image in the data save destination beforehand.
In the “Edit image range” screen, set up the search image by left mouse drag. The search image is now saved in the cropped state, as shown in the red box below .

Configuring the Operation Position
- When in Key Image Mode
-
Press the shortcut key to capture the image / element in order to specify the cursor position where the mouse wheel scroll should take place.
Open the”Edit” screen, and specify the area of the image you want to mark as key image by left mouse drag, then specify the position to do the mouse wheel scroll by right-clicking.The example below shows the settings where the RPA look for the image of “ABOUT MICHIRU RPA” (in the green frame), then do a mouse wheel scroll on the left (where the red cross is).
- When in Element Mode
-
Move the cursor to the target element, press the shortcut key to capture the image / element, then change the operation type in the operation box to “Scroll to find image” in the “Mouse operation” menu.
You can also set the operation to “Scroll to find image” in the “Mouse operation” from the beginning, by moving the cursor to your target element and right-clicking to display the operation menu.Position for scrolling (red cross) can be changed by right-clicking on the new position in the “Edit” screen.
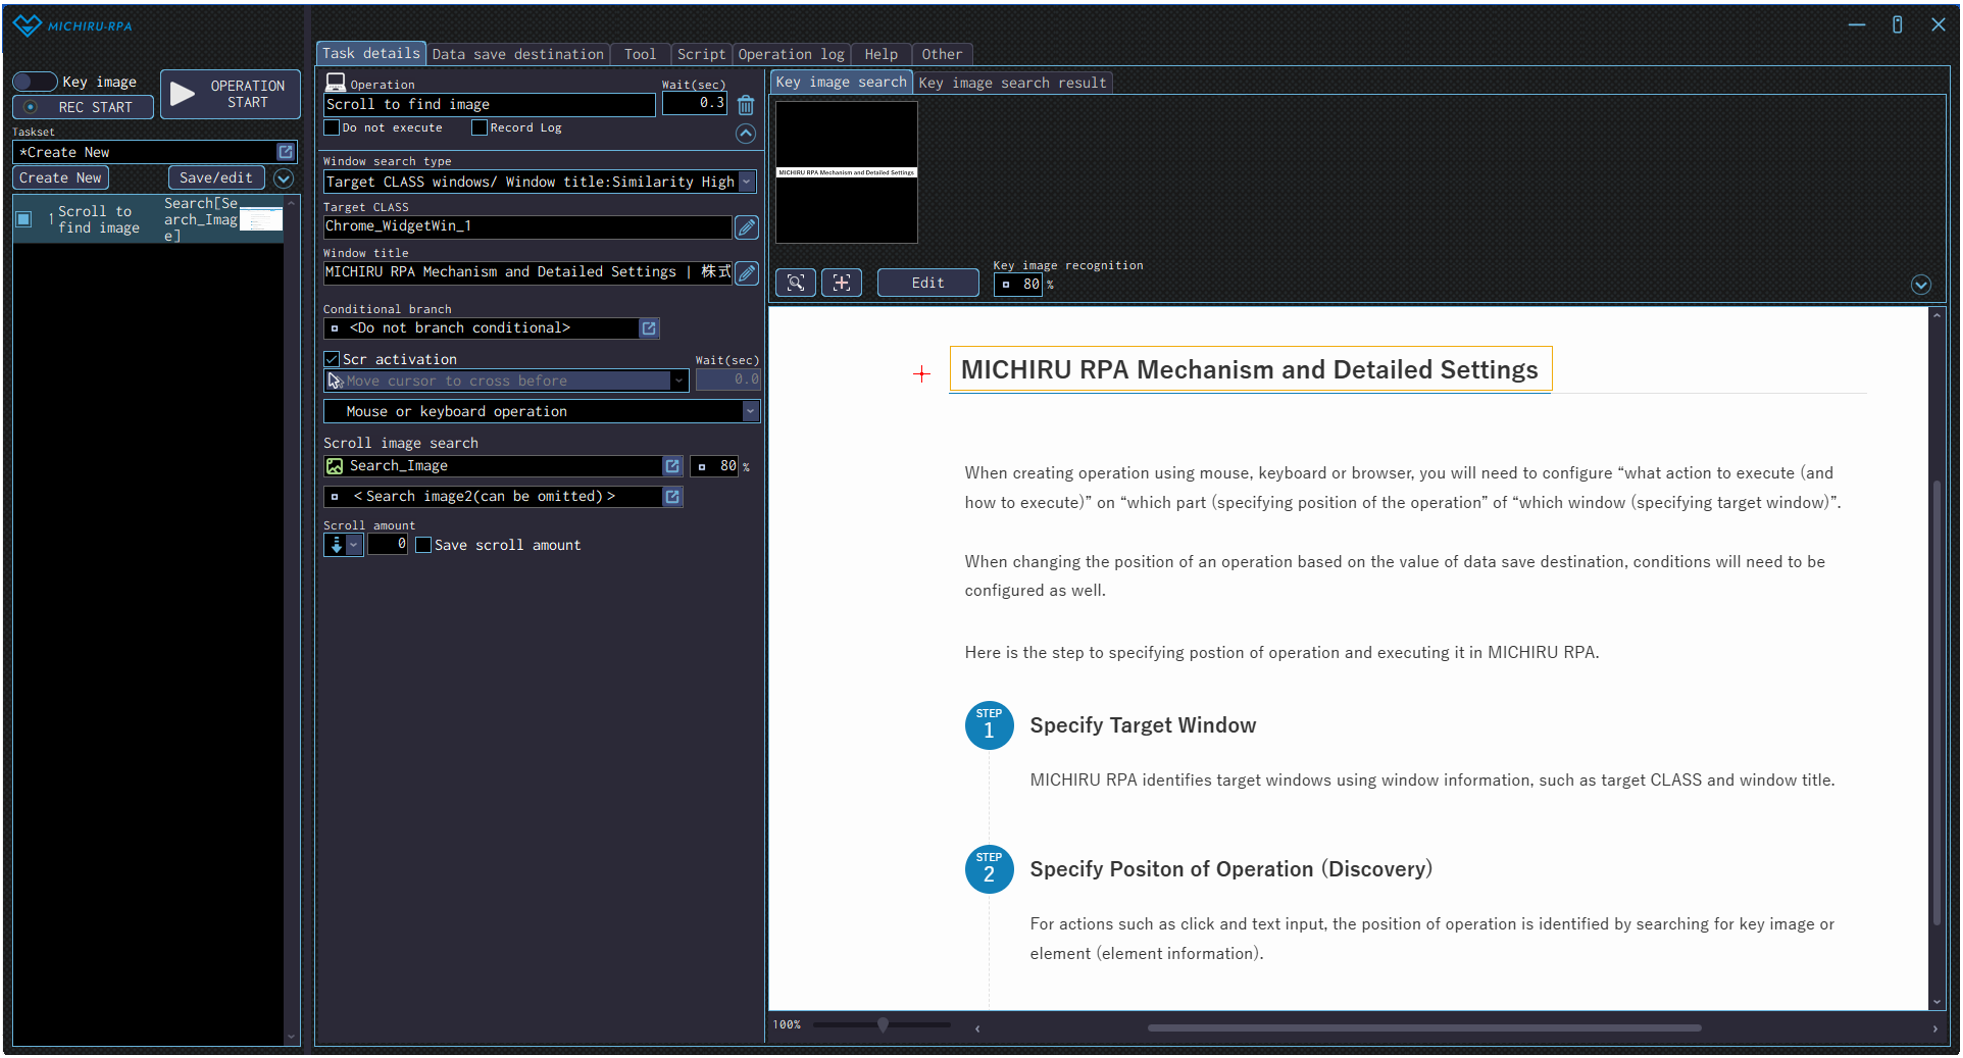
Detailed Setting for Operation
Specify the search image using the data save destination prepared, in the settings within the red frame.
In case you you specify 2 search images, RPA will continue to scroll until both images in found together on the screen.
You can configure the direction and the amount of the scroll in the settings marked by the red frame in the image below. You can also make the RPA record the scroll amount needed to find the image to make it faster to run the operation next time, by checking on the “Save scroll amount” checkbox.
Text operation
Key input
Use this operation to perform keystroke input at the specified position.
It is mainly used for inputs such as Backspace , Delete, and shortcut keys.
This will make the RPA automatically perform keyboard operation for you, enabling automation using shortcut key input predefined for each application.
For instance, short key like copy (Ctrl+C), paste (Ctrl+V), and save (Ctrl+S) can be input with this operation.
Configuring the Operation Position
- When in Key Image Mode
-
Move the cursor to the position you want to input keystrokes, press the shortcut key to capture the image / element. Open the “Edit” screen, specify the the area of the image you want to mark as key image by left mouse drag.
You can change the input position by right-clicking on the new position (red cross).The example below shows the settings where the RPA look for the Google’s logo (in the orange frame), click on the search field (red cross), then input Backspace key 5 times.
- When in Element Mode
-
Move the cursor to the position for inputting keystrokes, press the shortcut key to capture the image / element, then change the operation type in the operation box to “Key input” in the “Text operation” menu.
You can also set the operation to “Key input” in the “Text operation” from the beginning, by moving the cursor to the desired position and right-clicking to display the operation menu.
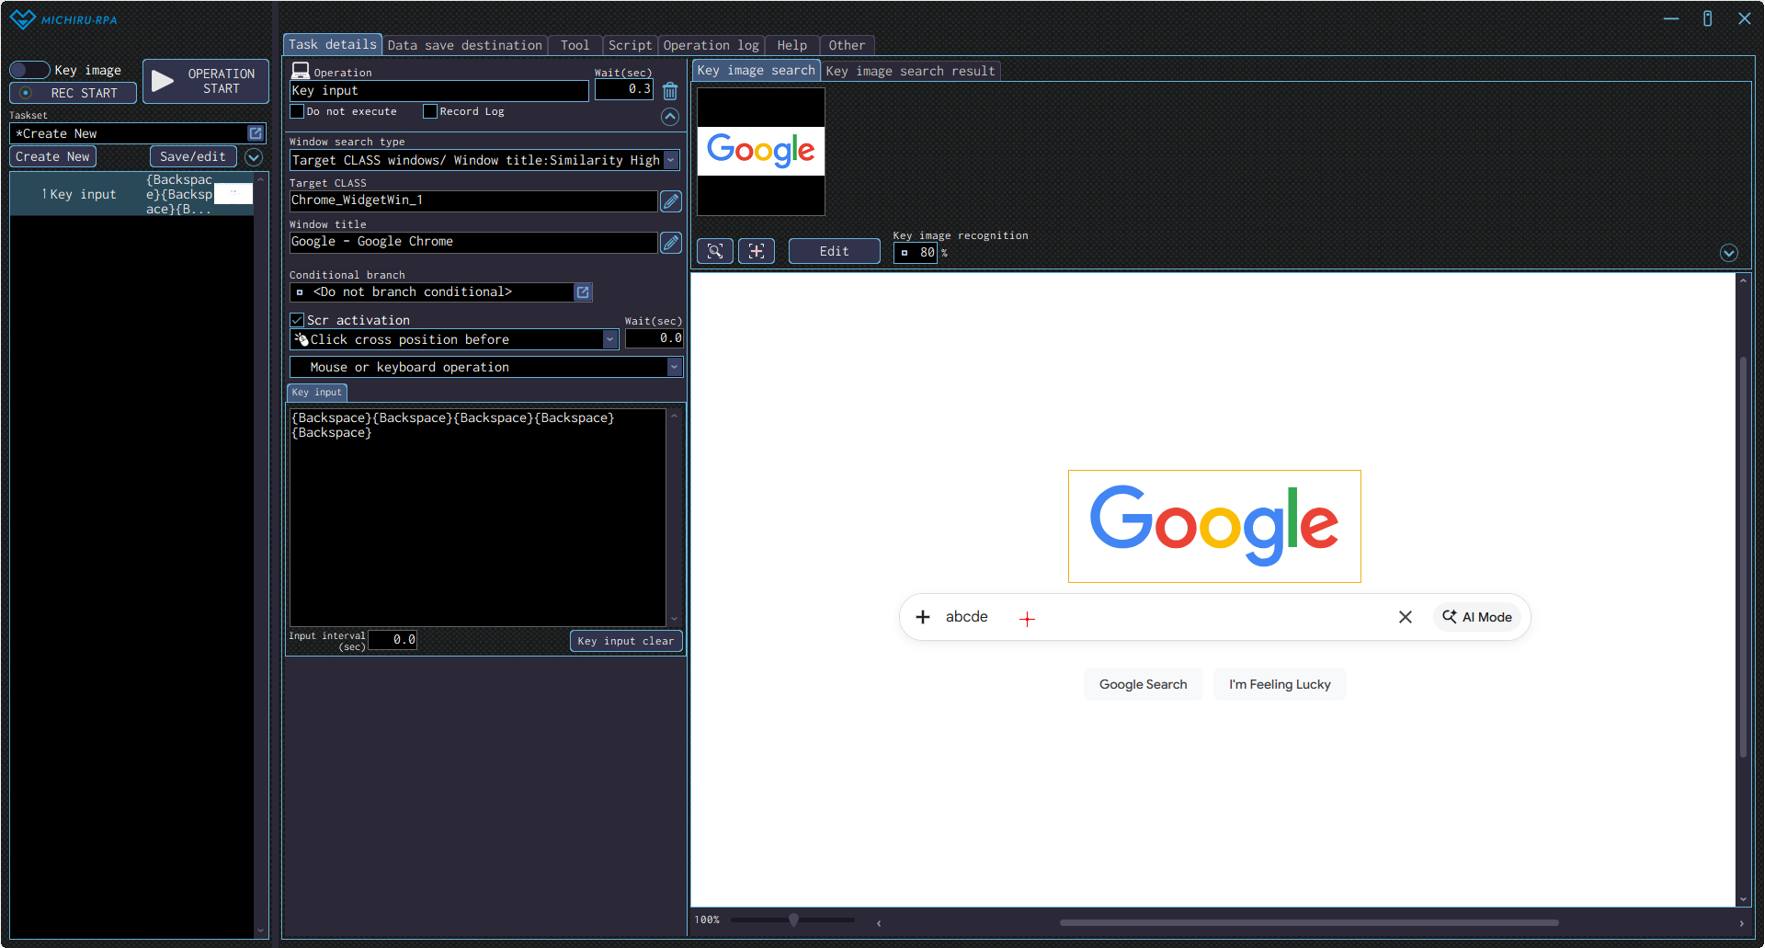
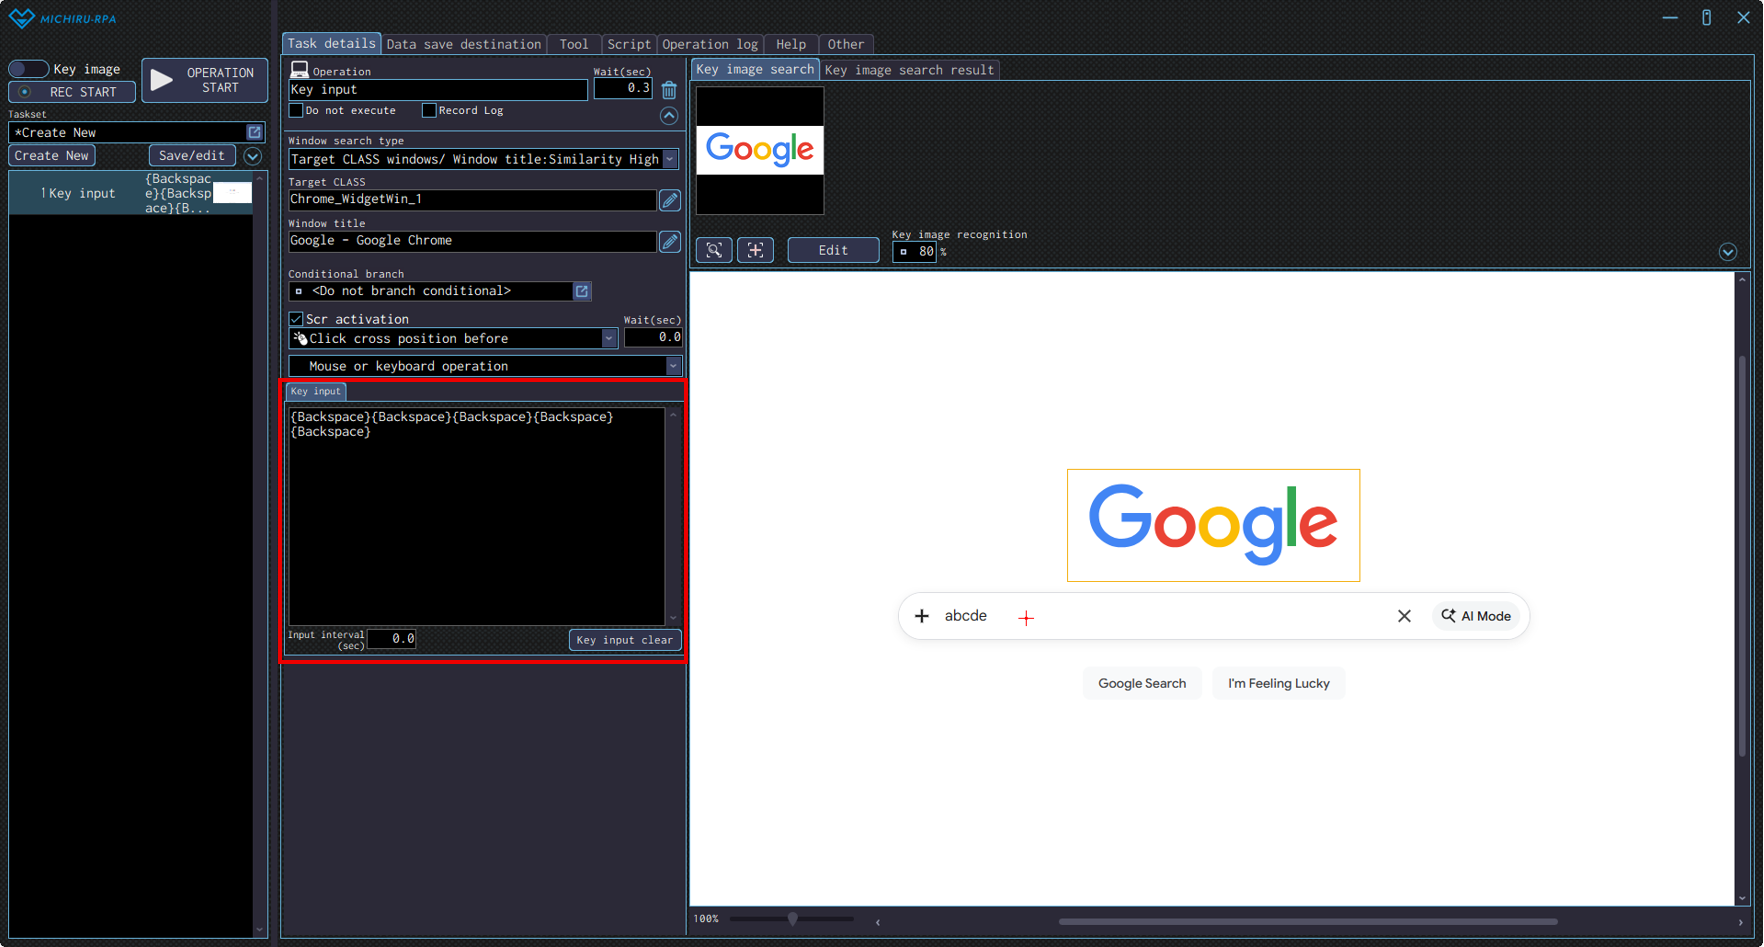
Detailed Setting for Operation
Input the intended key input to the “Key input: field. To clear the current key input setting, click “Key input clear” button. You can also specify the interval between each input in the “input interval (sec) field.
Text input
Use this operation to input text to the specified position.
Configuring the Operation Position
- When in Key Image Mode
-
Move the cursor to the position you want to input text, press the shortcut key to capture the image / element.
Open the “Edit” screen, specify the the area of the image you want to mark as key image by left mouse drag.
You can change the input position by right-clicking on the new position (red cross).The example below shows the settings where the RPA look for the Google’s logo (in the orange frame), click on the search field (red cross), then input “abcde” into the field.
- When in Element Mode
-
Move the cursor to the position for inputting texts, press the shortcut key to capture the image / element, then change the operation type in the operation box to “Text input” in the “Text operation” menu.
You can also set the operation to “Text input” in the “Text operation” from the beginning, by moving the cursor to the desired position and right-clicking to display the operation menu.
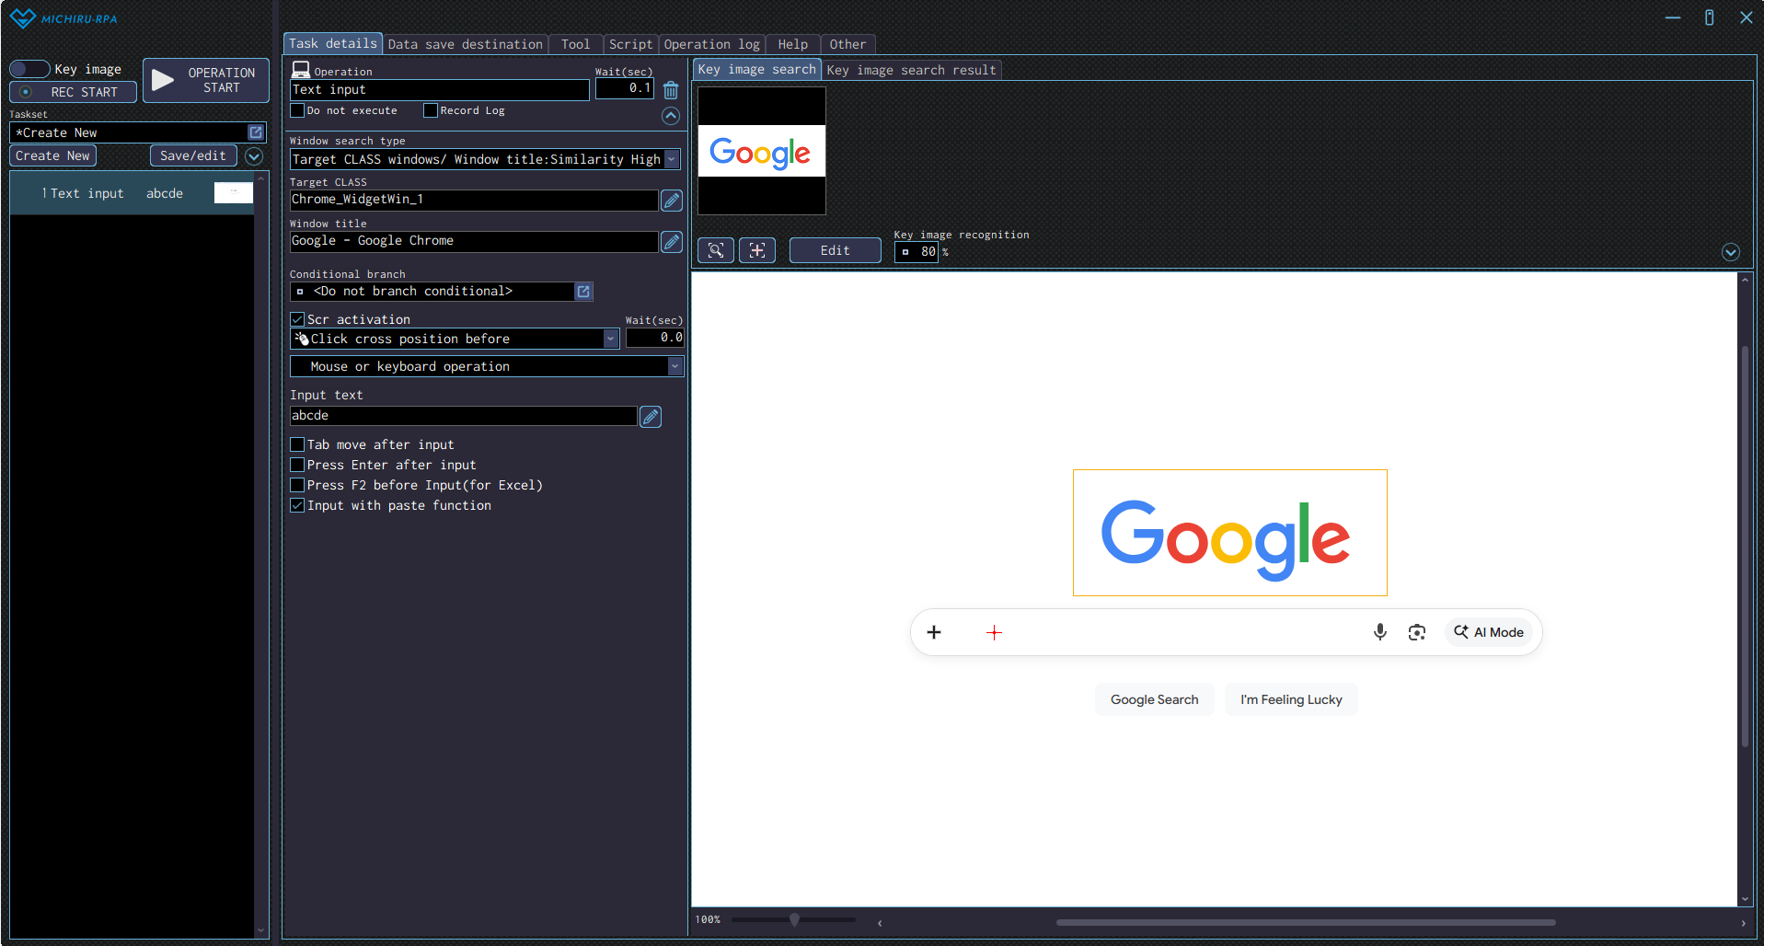
Detailed Setting for Operation
Type the desired texts in the “Input text” field.
In case you want to input contents from data save destination, access the “Edit formula” screen to specify the data to use.
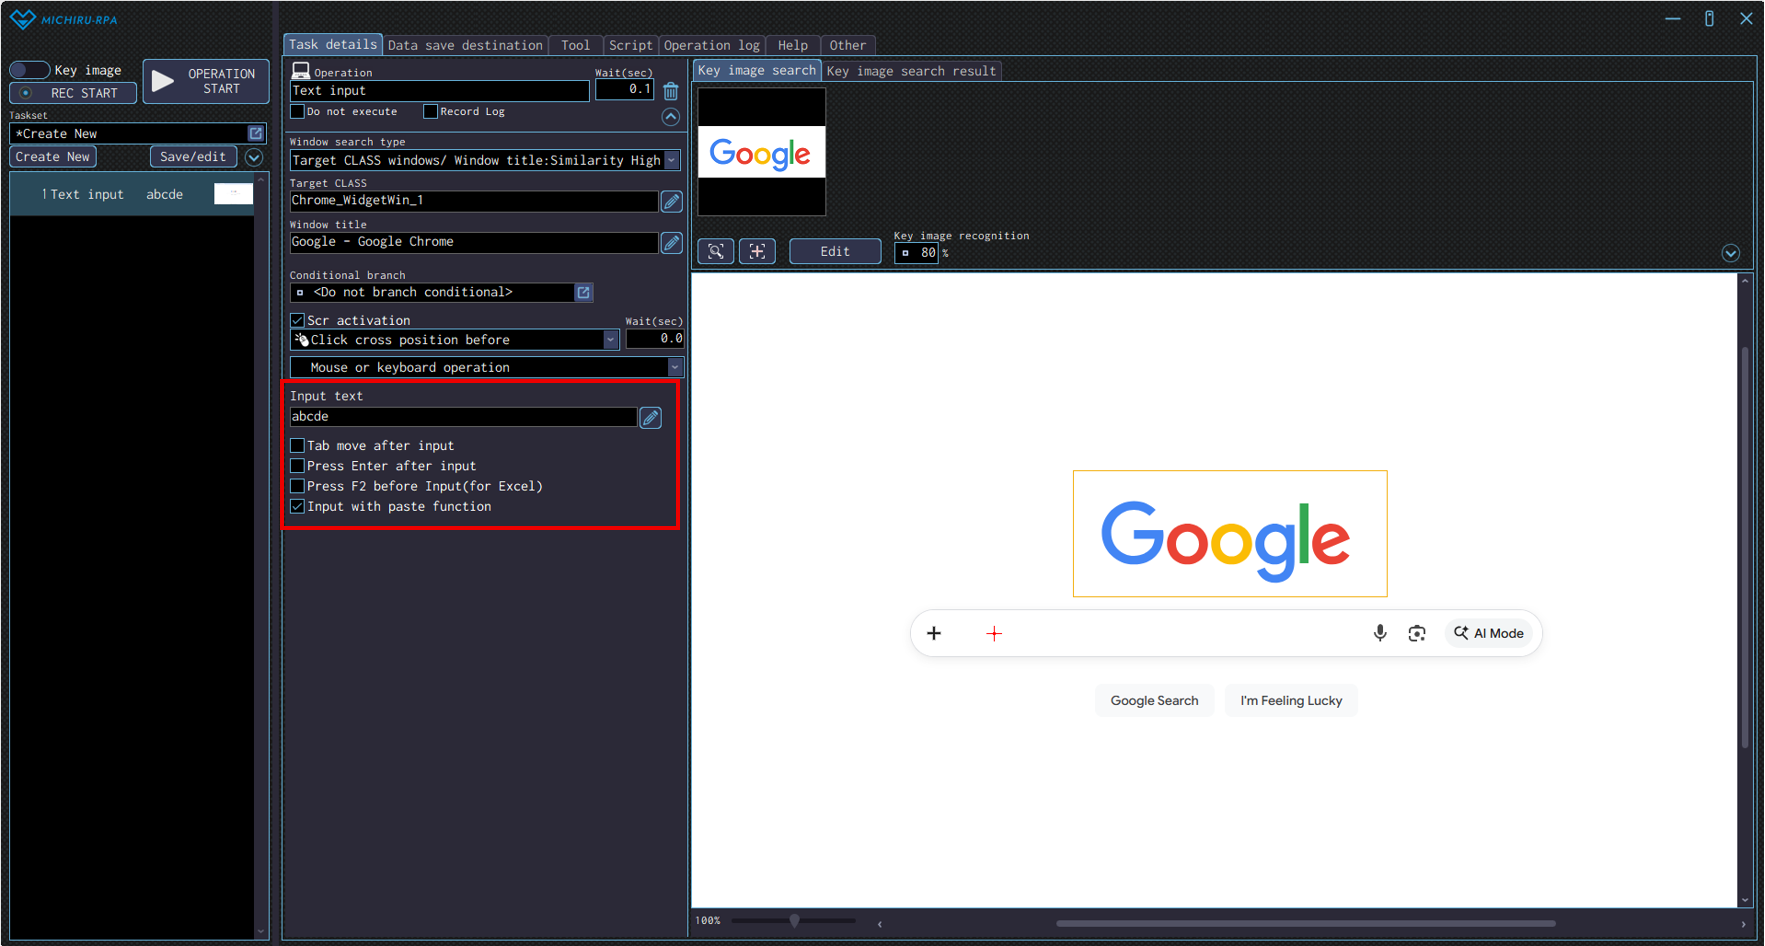
You can configure the additional actions listed below when you you set the operation to “Mouse or keyboard operation”.
Check on the check box of the action you desire.
| Tab move after input | Press Tab key after inputting text. |
|---|---|
| Press Enter after input | Press Enter key after inputting text. |
| Press F2 key before inputting text (when editing Excel file) | Press F2 key before inputting text. This is useful when editing cells in Excel file. |
| Input with paste function | Input the text to the field using using paste function. |
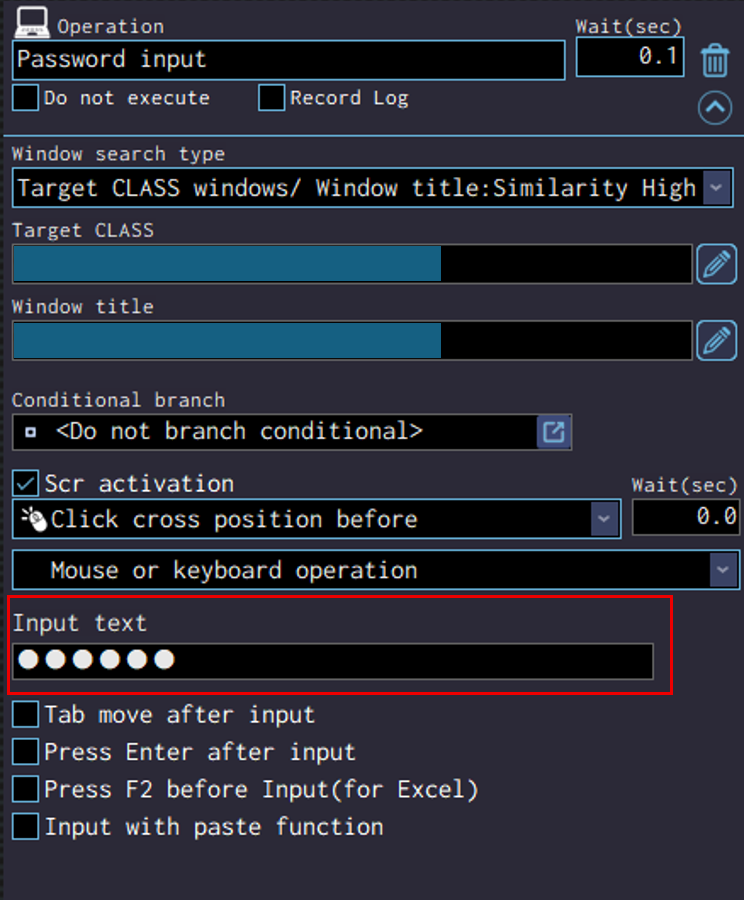
Password input
This operation is basically the same as the “Text input” operation but the text to be input will not be displayed. This is useful when you want to input password to a field. Please refer to “Text input ” for information on how to configure the operation.
Select from list
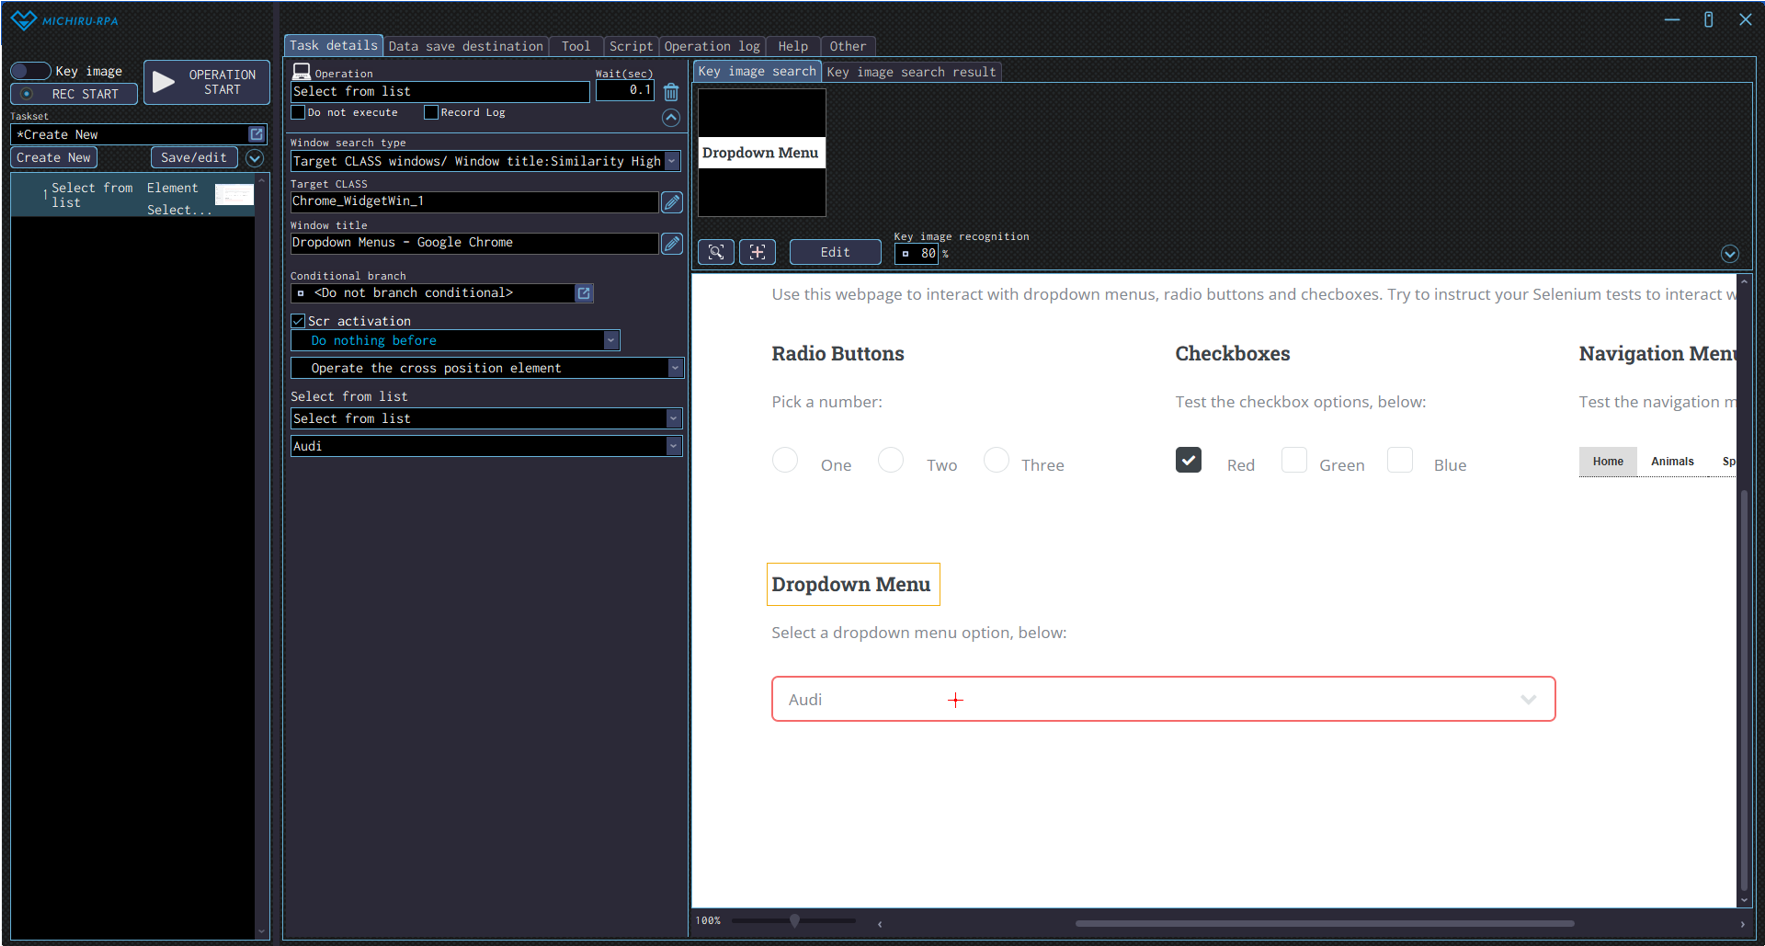
Use this operation to select item from dropdown lists, list boxes, and similar UI components.
Configuring the Operation Position
- When in Key Image Mode
-
Move the cursor to the dropdown list or list box, press the shortcut key to capture the image / element.
Open the “Edit” screen, specify the the area of the image you want to mark as key image by left mouse drag.
You can change the input position by right-clicking on the new position (red cross).The example below shows the settings where the RPA look for the “Dropdown Menu” (in the orange frame), then operate on the dropdown list (red cross).
- When in Element Mode
-
Move the cursor to the dropdown list or list box, then press the shortcut key to capture the image / element.
If the operation that appears is not automatically set to “Select from list”, change the operation type in the operation box to “Select from list” in the “Text operation” menu.
You can also set to operation to “Select from list” in the “Text operation” from the beginning, by moving the cursor to the dropdown list or list box and right-clicking to display the operation menu.
Detailed Setting for Operation
Choose the method of selection from the “Select from list” dropdown menu.
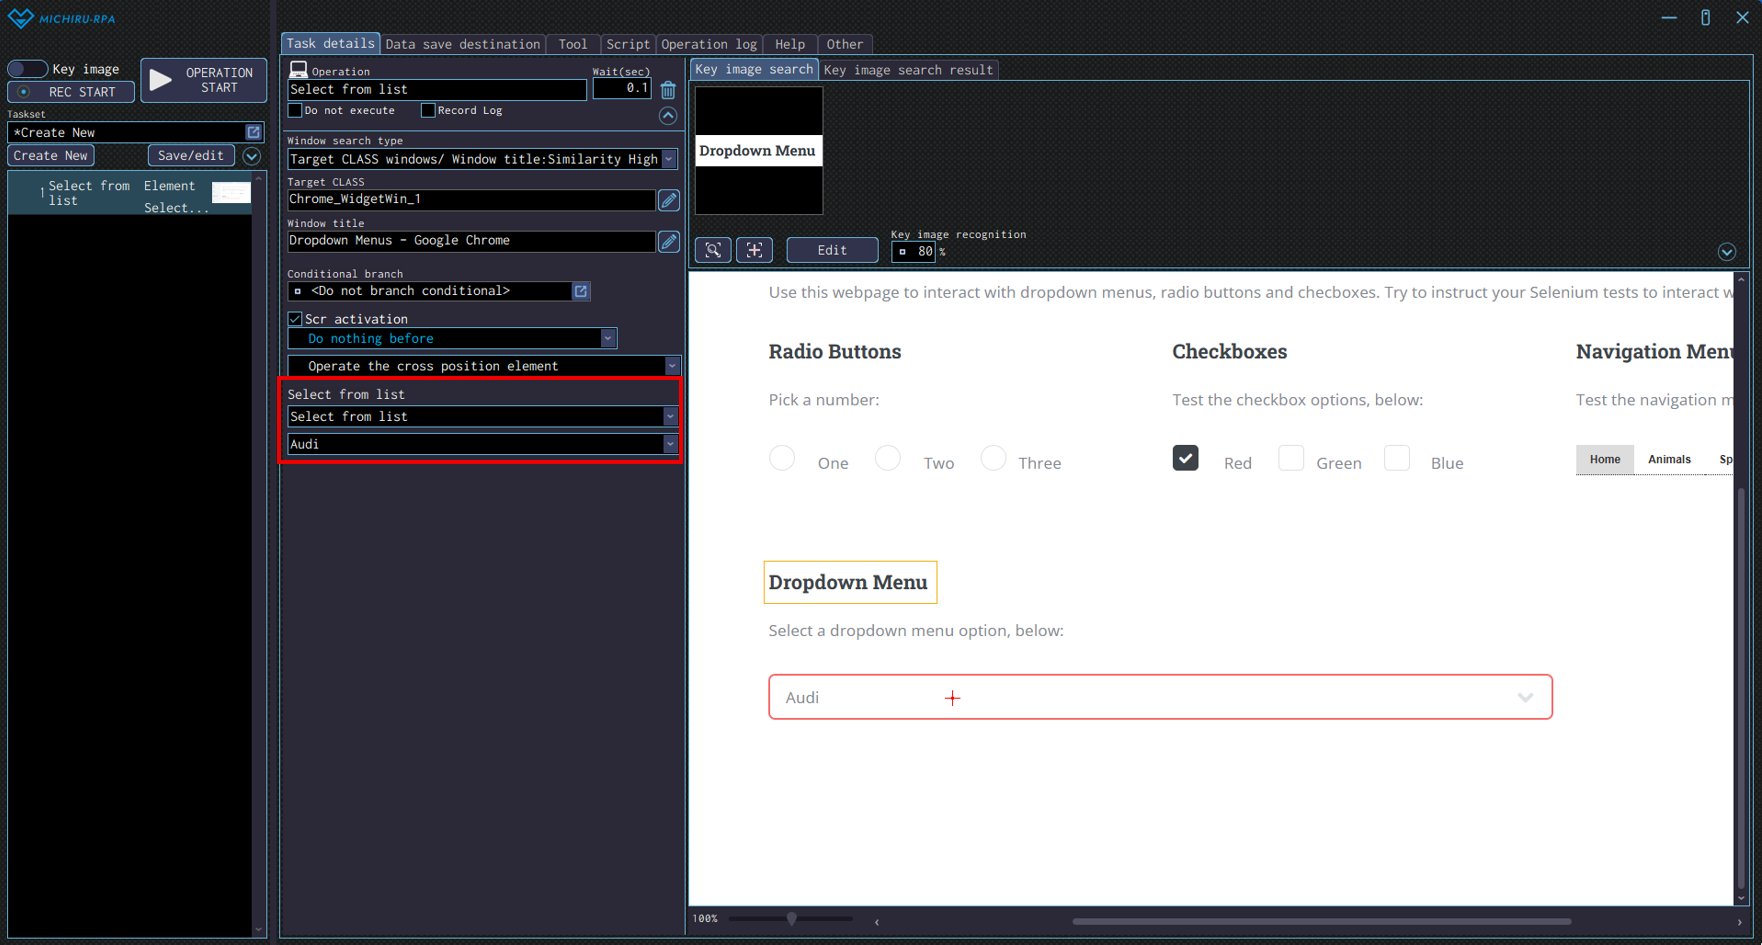
| Select from list | Select a single item from the list. Items that can be selected is listed in the dropdown box below. |
|---|---|
| Select by similar text | Select by looking for text similar to the one specified. Data save destination can also be used. |
| Select by matching text | Select by looking for text matching the one specified. Data save destination can also be used. |
| Select by number | Select by the nuumber of the item (starting from 0 for the first item) |
| Select multiple items from list | Select multiple items from list |
Select checkbox
Use this operation to select item from checkboxes, and radio buttons.
For checkboxes, you can choose to “Check” or “Uncheck”. For radio buttons, only “Check” is available.
Configuring the Operation Position
- When in Key Image Mode
-
Move the cursor to the checkbox, press the shortcut key to capture the image / element.
Open the “Edit” screen, specify the the area of the image you want to mark as key image by left mouse drag.
You can change the input position by right-clicking on the new position (red cross).The example below shows the settings where the RPA look for the “How to test Checkboxes” (in the orange frame), then check on the “I have a cat” check box (red cross).
- When in Element Mode
-
Move the cursor to the checkbox, then press the shortcut key to capture the image / element.
If the operation that appears is not automatically set to “Select checkbox”, change the operation type in the operation box to “Select checkbox” in the “Text operation” menu.
You can also set to operation to “Select checkbox” in the “Text operation” from the beginning, by moving the cursor to the dropdown list or list box and right-clicking to display the operation menu.
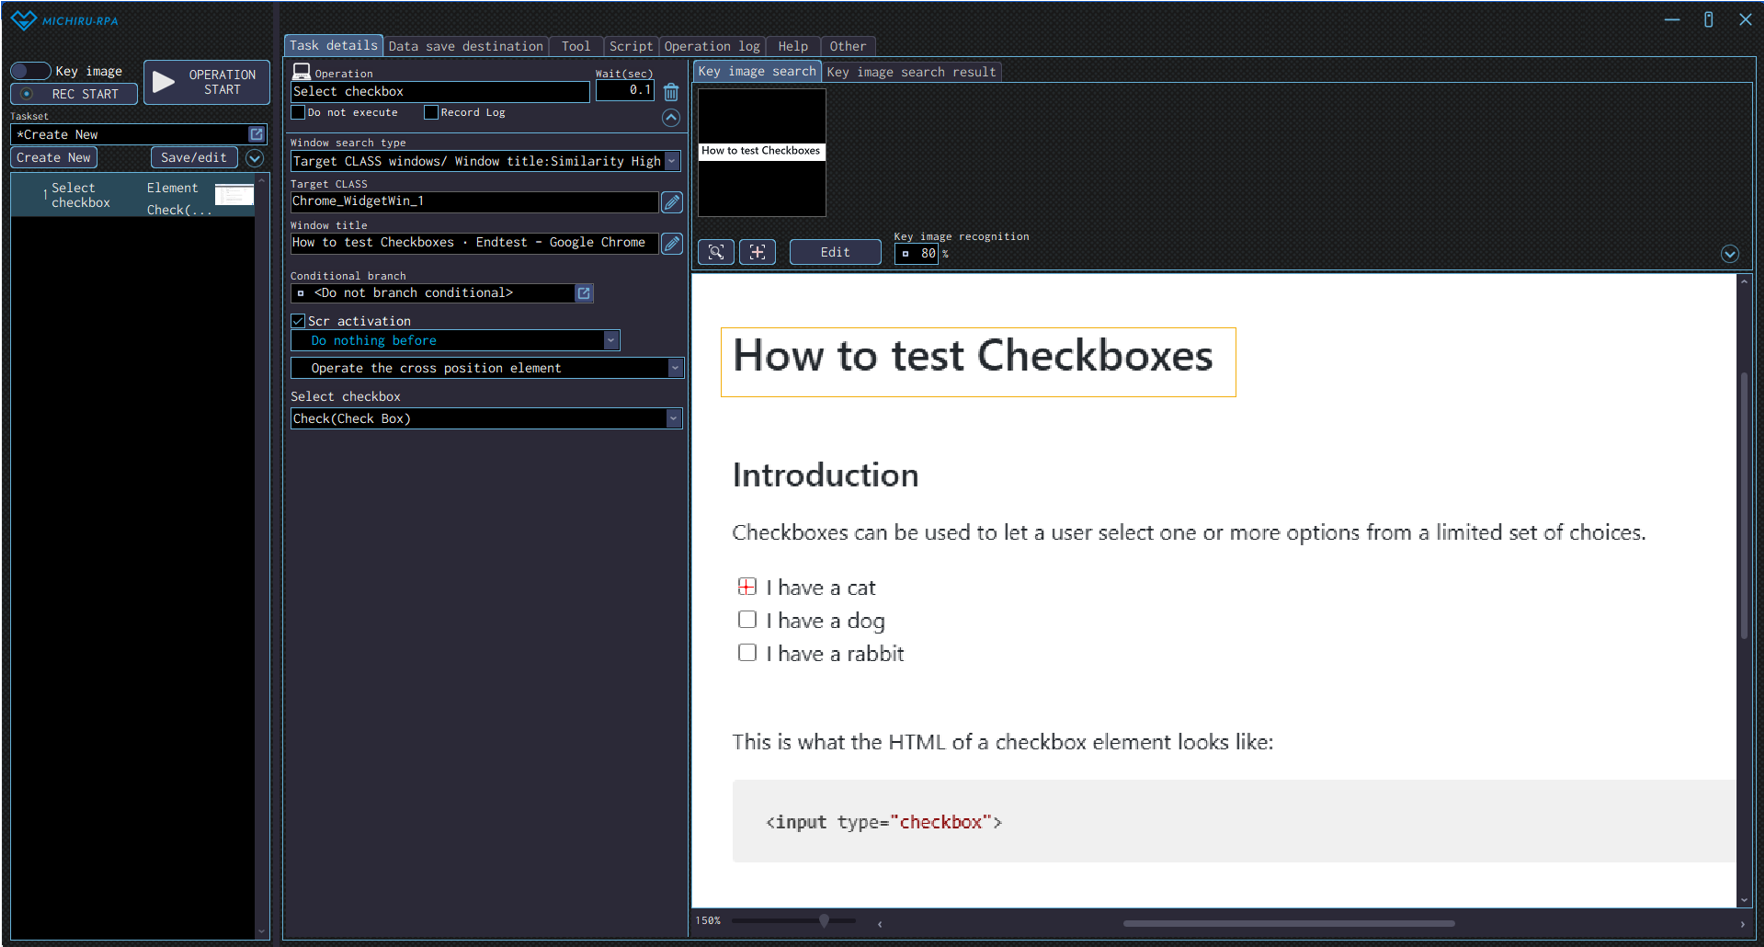
Detailed Setting for Operation
Choose the method of selection from the “Select checkbox” dropdown menu.
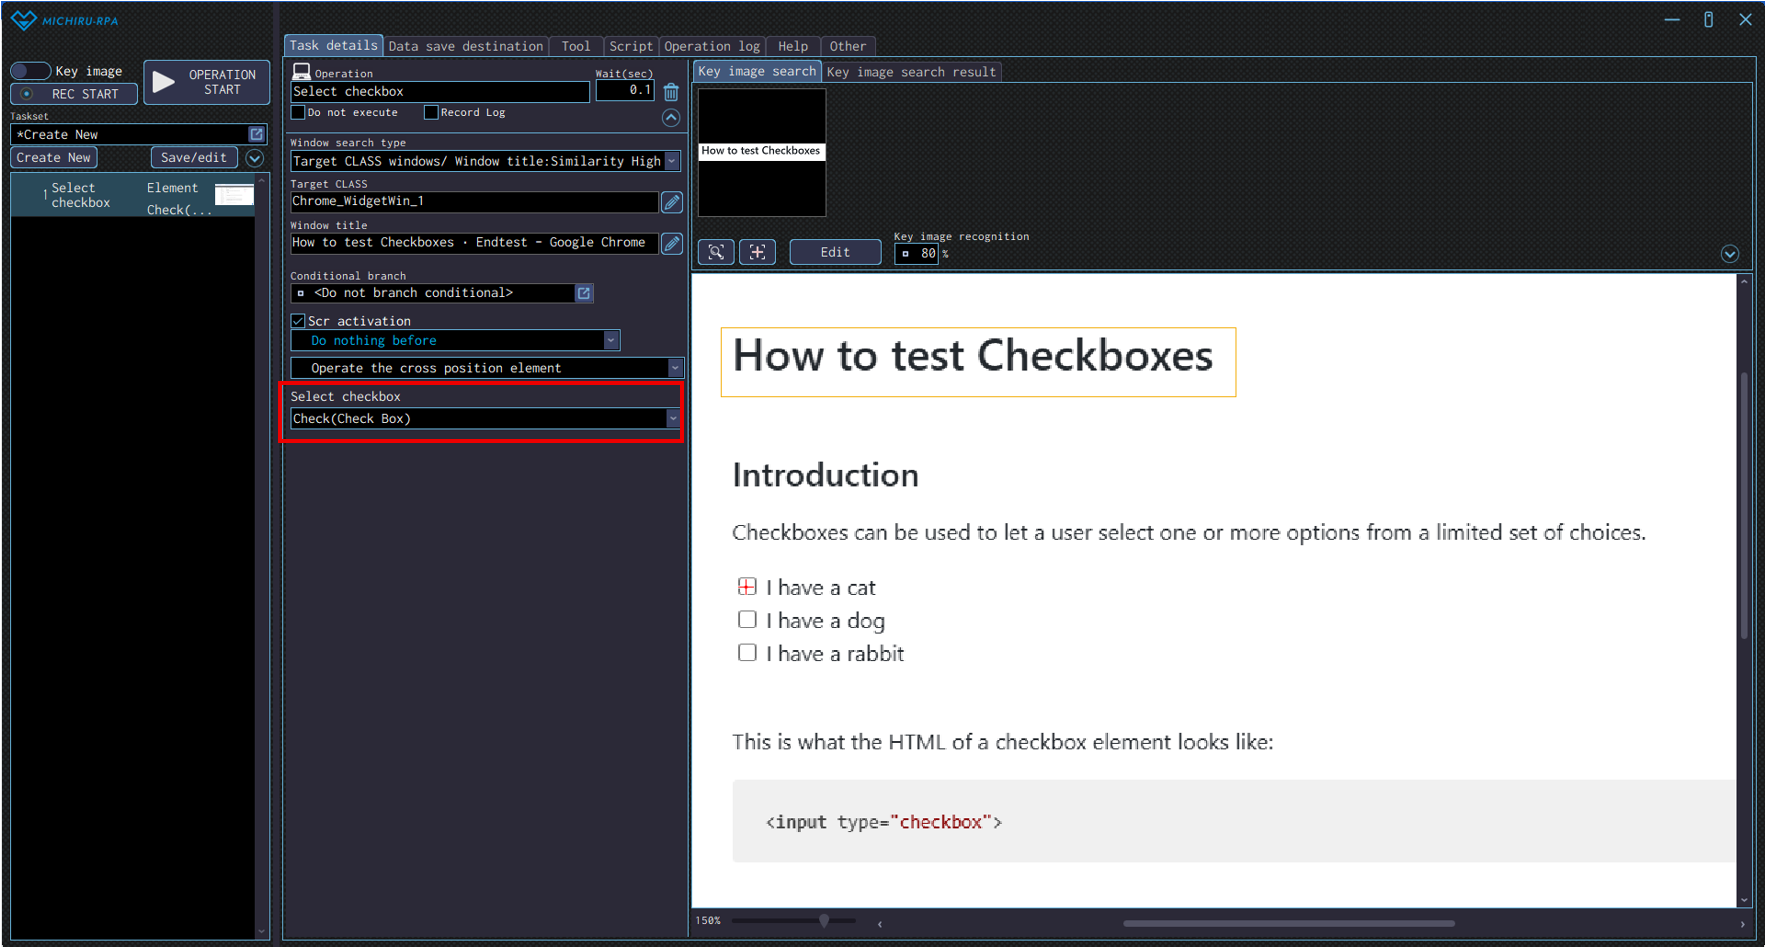
| Check (Check Box) | The checkbox will be checked regardless of its previous state. |
|---|---|
| Uncheck (Check Box) | The checkbox will be unchecked regardless of its previous state. |
| Check (Radio Button) | The radio button will be checked. |
Get element information
Use this operation to collect data such as displayed text and the value it contains.
Configuring the Operation Position
- When in Key Image Mode
-
Move the cursor to the data you want to collect, press the shortcut key to capture the image / element.
Open the “Edit” screen, specify the the area of the image you want to mark as key image by left mouse drag.
You can change the input position by right-clicking on the new position (red cross).The example below shows the settings where the RPA look for the “STEP 1” (in the orange frame), then collect data from the text to its right.
- When in Element Mode
-
Move the cursor to the data you want to collect, press the shortcut key to capture the image / element, then change the operation type in the operation box to “Get element information” in the “Text operation” menu.
You can also set to operation to “Get element information” in the “Text operation” from the beginning, by moving the cursor to the dropdown list or list box and right-clicking to display the operation menu.
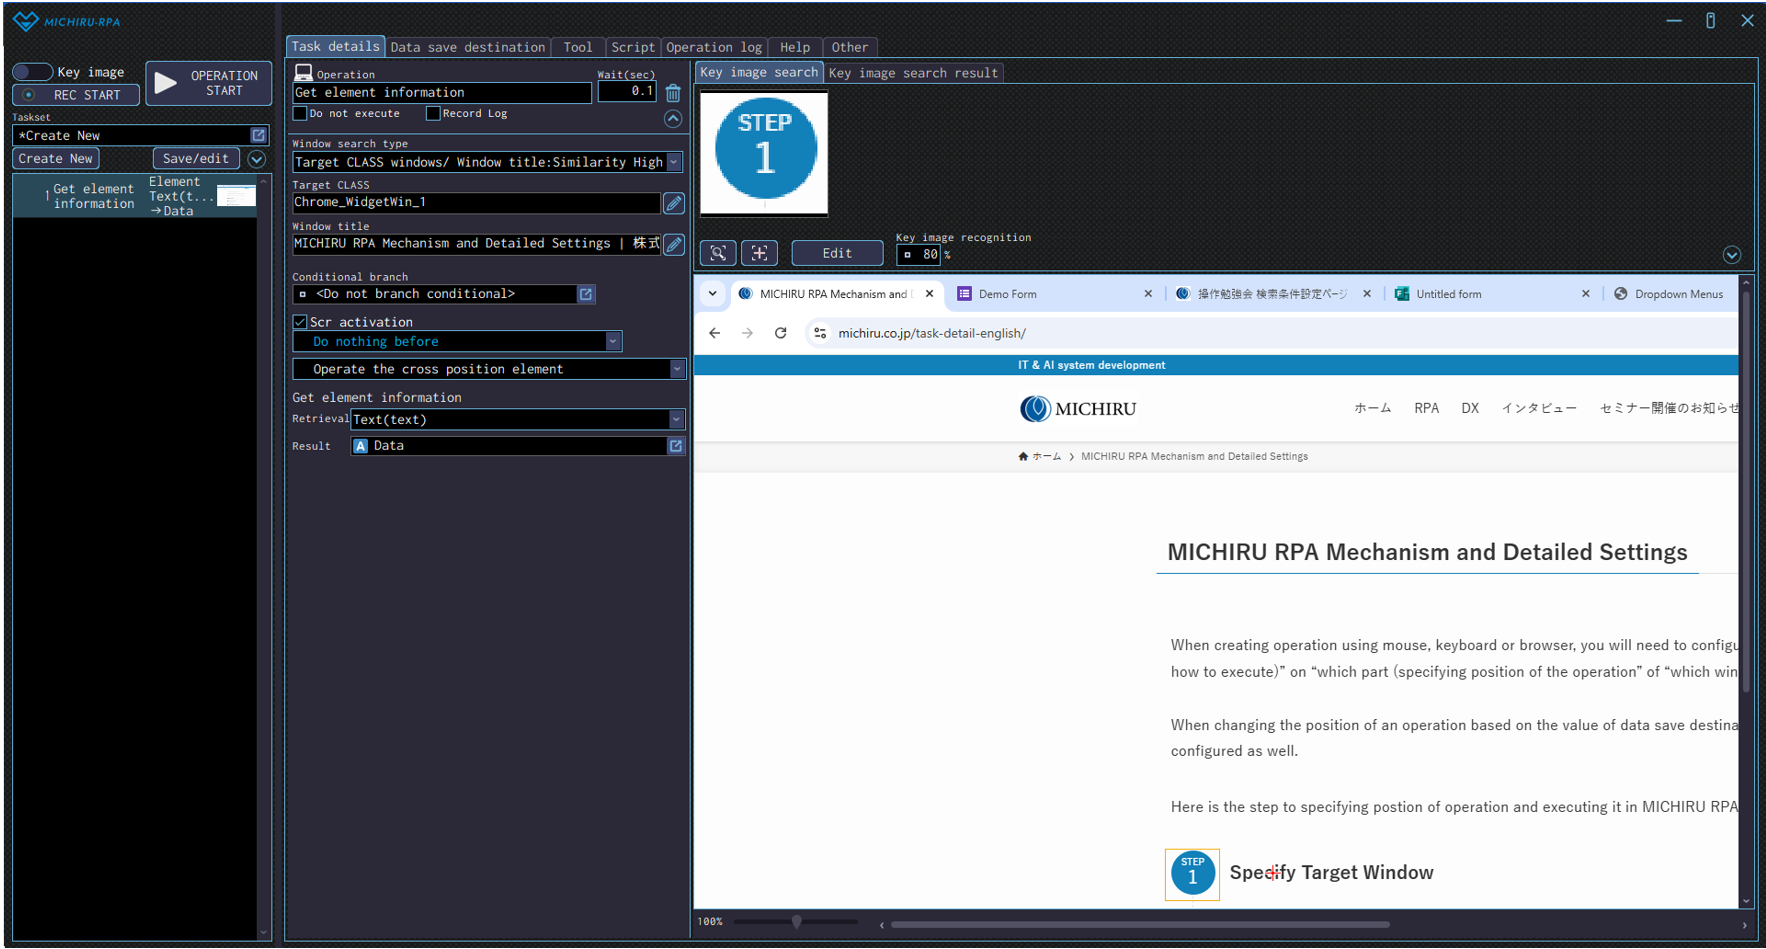
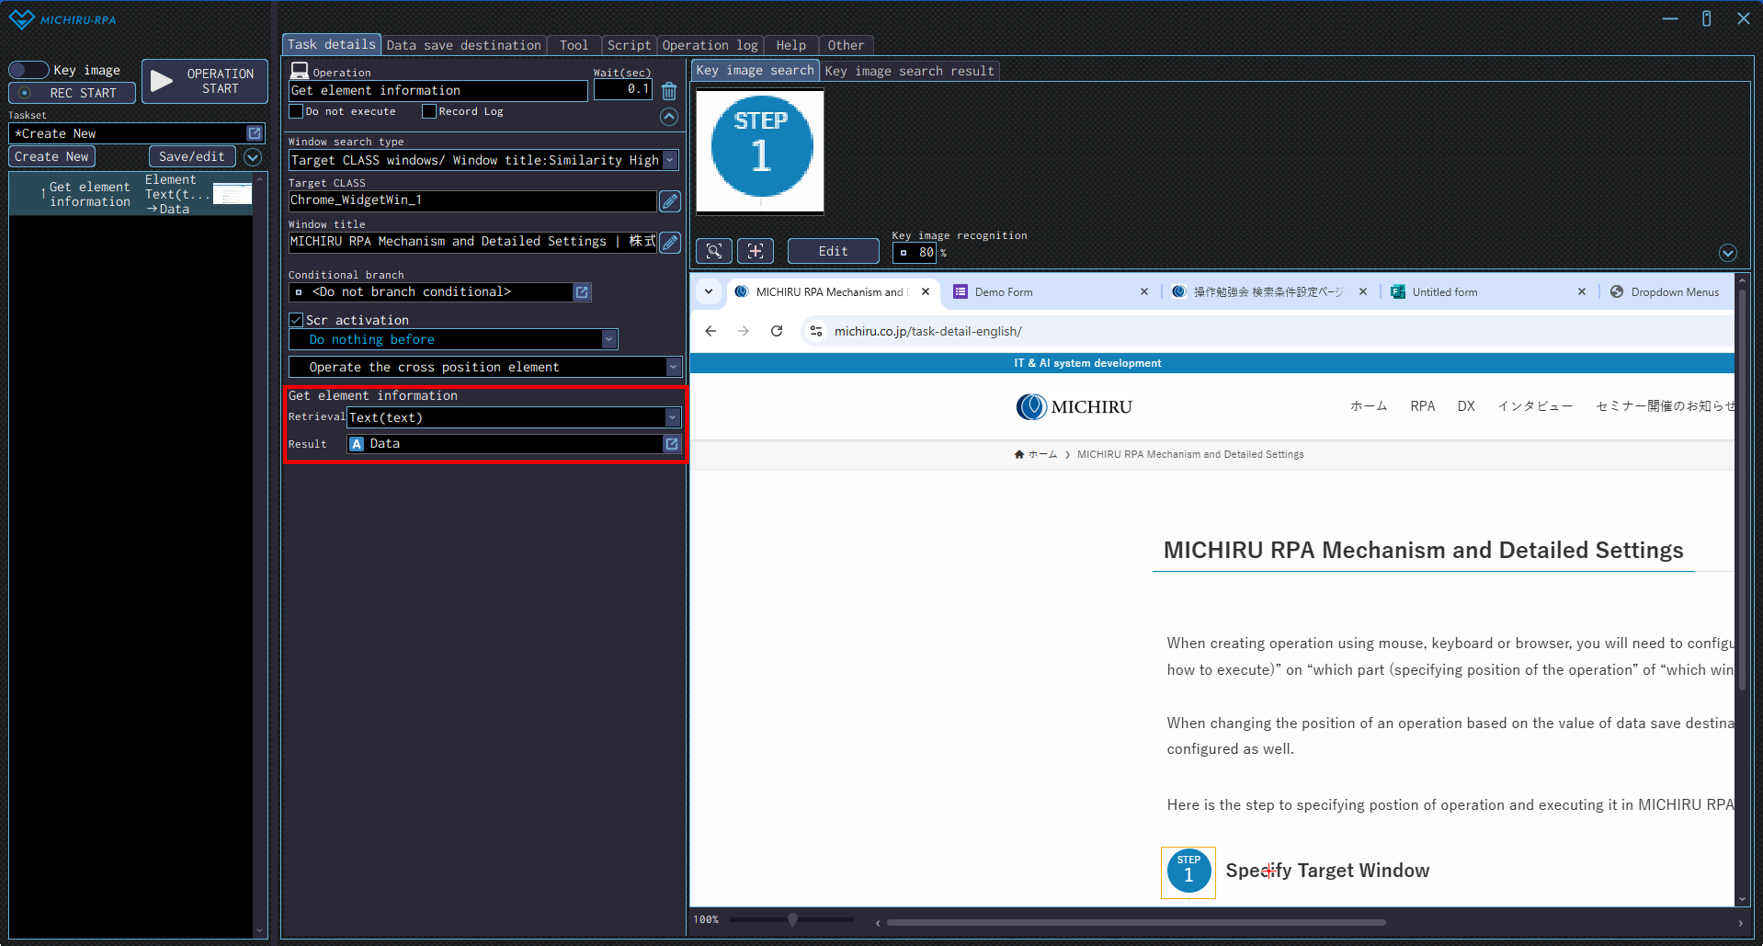
Detailed Setting for Operation
In the “Retrieval” dropdown, you can select the type of data to collect. The type of data that can be collected depends instruction for the operation.
You can choose data save destination where the data is collected in “Result”.
- When operating using elements
-
Text(text) Collect text from the target element. Value(value) Collect value of the target element. Selected state(selected) Collect the state of selection of a certain option in an element where selection is possible such as a dropdown menu. If the state is “selected”, “true” will be saved in the data save destination. If the state is “not selected”, “false” will be saved in the data save destination. Checked state(checked) Collect the checked/unchecked state of an element. If the state is “checked”, “true” will be saved in the data save destination. If the state is “unchecked”, “false” will be saved in the data save destination. Options abvailable for selection in the “Get element information” dropdown. (when operating using elements) - When operating using HTML
-
Display text(inner text) Collect text from the target element. Value(value) Collect value of the target element. Link URL(href) Collect link URL of the target element. Selected state(selected) Collect the state of selection of a certain option in an element where selection is possible such as a dropdown menu. If the state is “selected”, “true” will be saved in the data save destination. If the state is “not selected”, “false” will be saved in the data save destination. Checked state(checked) Collect the checked/unchecked state of an element. If the state is “checked”, “true” will be saved in the data save destination. If the state is “unchecked”, “false” will be saved in the data save destination. Options abvailable for selection in the “Get element information” dropdown. (when operating using HTML)
Get elements count
Use this operation to count the number of elements in applications or web pages.
It is handy for tasks like counting table rows or buttons on the screen.
Configuring the Operation Position
- When in Key Image Mode
-
Move the cursor to the area you want to count the number of elements, press the shortcut key to capture the image / element.
Open the “Edit” screen, specify the the area of the image you want to mark as key image by left mouse drag. - When in Element Mode
-
Move the cursor to the area you want to count the number of elements, press the shortcut key to capture the image / element, then change the operation type in the operation box to “Get elements count” in the “Text operation” menu.
You can also set to operation to “Get elements count” in the “Text operation” from the beginning, by moving the cursor to the dropdown list or list box and right-clicking to display the operation menu.
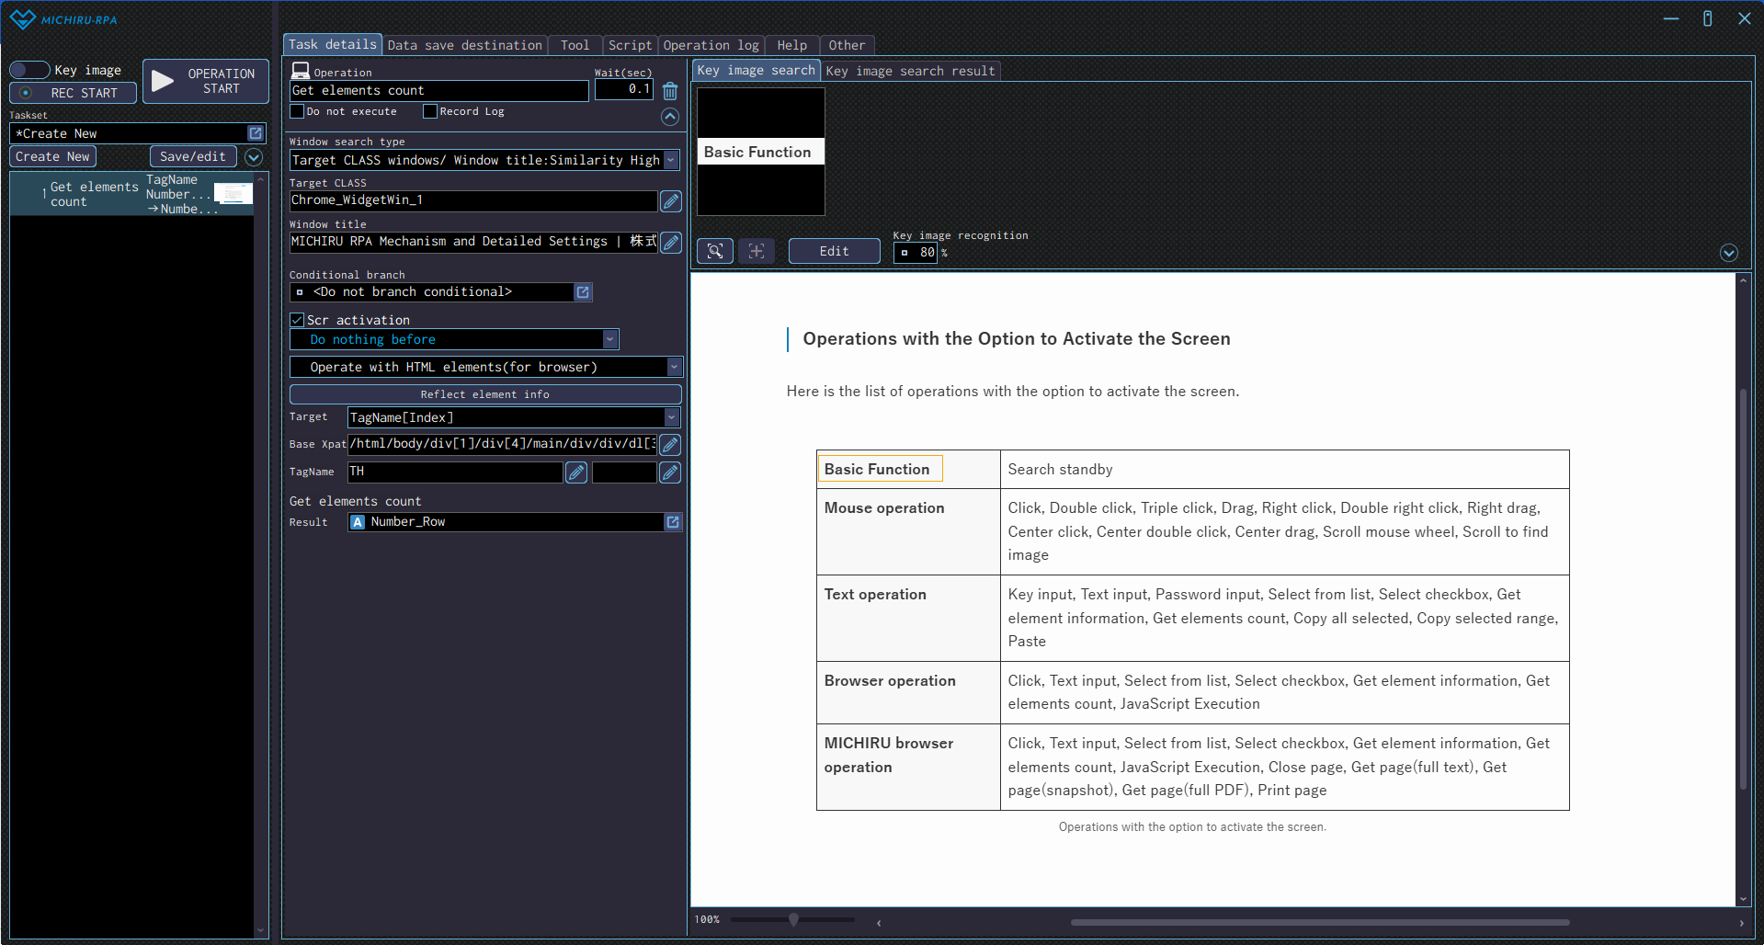
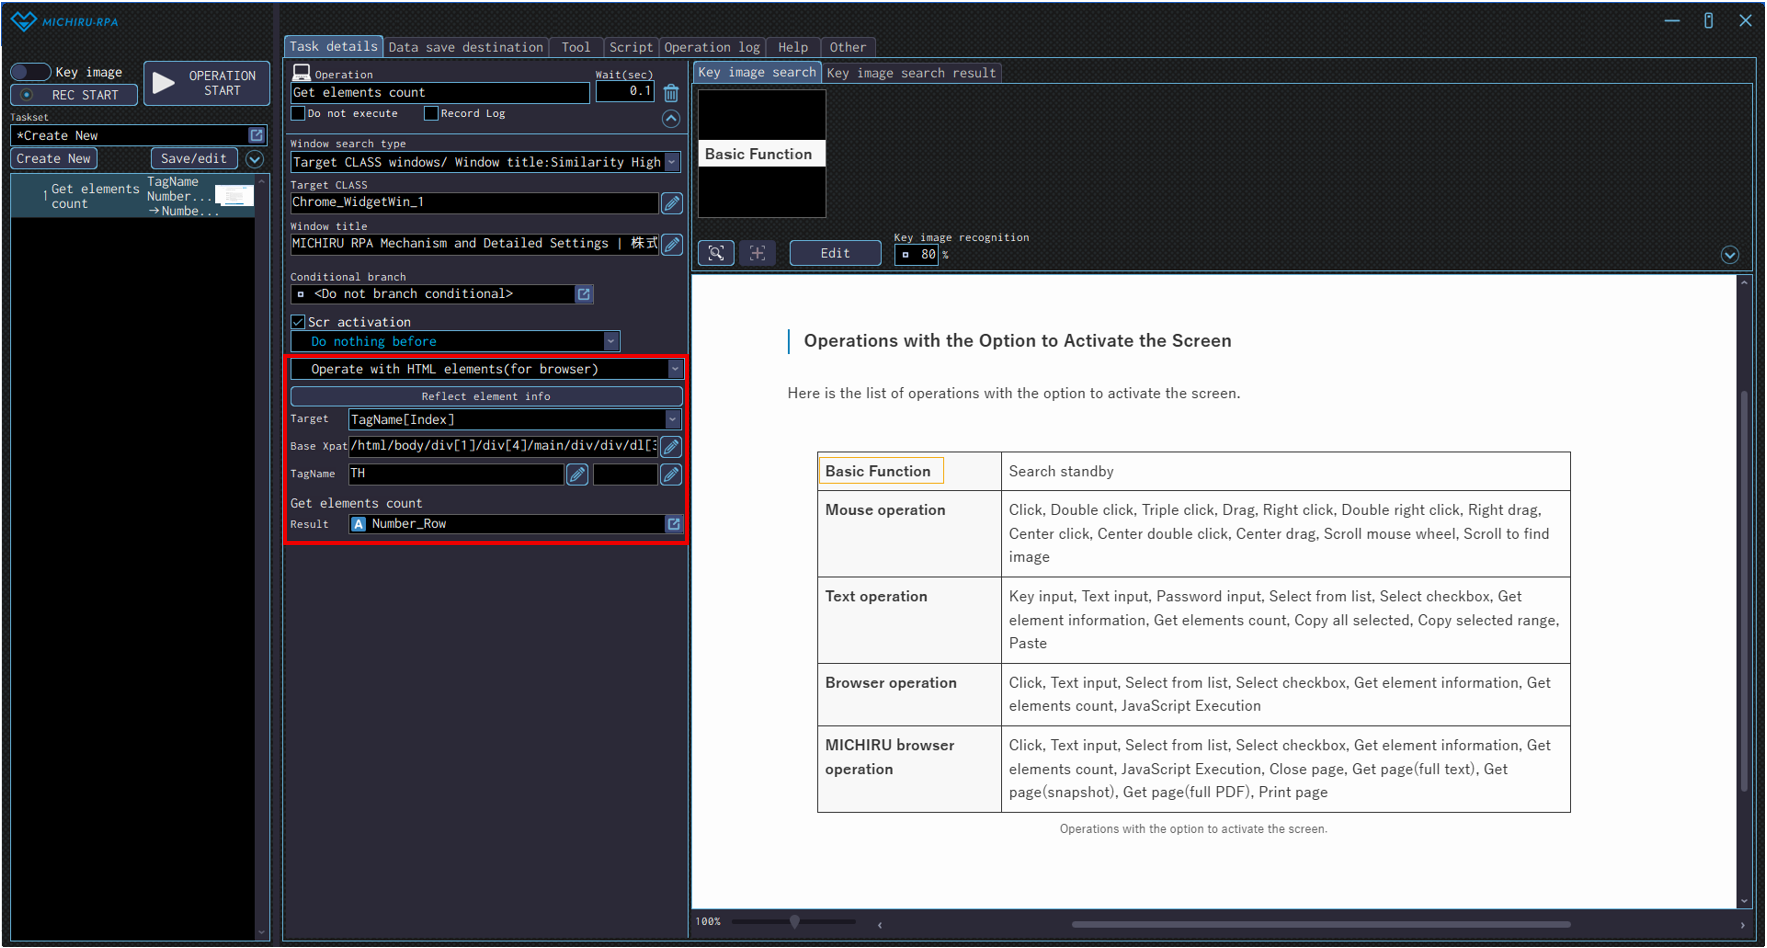
Detailed Setting for Operation
The available settings vary depending on the instruction for the operation. The number of elements will be saved in the data save destination.
The example below shows the settings where the RPA count the number of rows in the first table displayed in the browser.
The instruction is set to “Operate with HTML elements(for browser)”, target to “TagName[Index]”, and TR (number of rows of the table) is count as the result.
Please refer to this page for more information regarding Xpath.
Copy all selected
Use this operation to select and copy all at the specified position.
This works the same way as when inputting “Ctrl+A (select all)” + “Ctrl+C (copy)” as shortcut keys. Please refer to “Click ” for information on how to configure the operation.
Note that in the detailed setting for the operation, you can only select “Mouse or keyboard operation” regardless of the capture mode you are in.
Copy selected range
Use this operation to select and copy the specified range. This works the same way as when inputting “Ctrl+C (copy)” as shortcut keys. Please refer to “Click ” for information on how to configure the operation.
Paste
Use this operation to paste copied contents to the specified position.
This works the same way as when inputting “Ctrl+V (paste)” as shortcut keys.
Please refer to “Click ” for information on how to configure the operation.
Note that in the detailed setting for the operation, you can only select “Mouse or keyboard operation” regardless of the capture mode you are in.
Execution order control
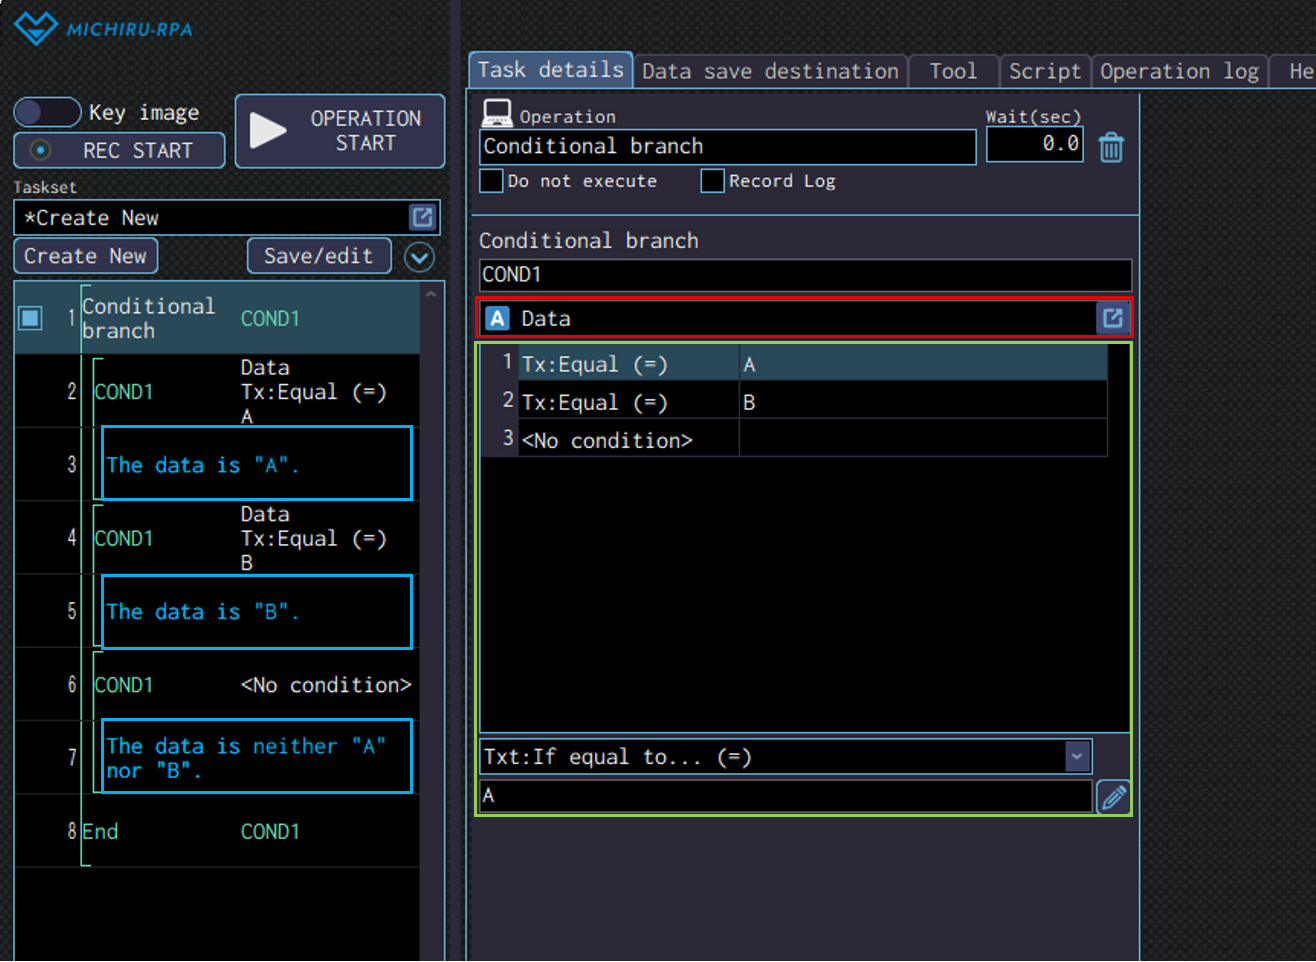
Conditional branch
Use this operation to make the RPA branches the operation based on the specified conditions.
Conditional branch allows you to change what the automation set does based on things like the content of data save destination or the presence of images on the screen.
For example, you can make RPA perform a diffrent process when the value stored in a data save destination matches a specific string, or proceed to the next step only when a specified image is displayed.
By creating separated operations for each condition, you can build flexible automation sets that adapts to different situations.
Detailed Setting for Operation
In the red frame below, specify the data save destination that will be used for evaluating the condition. In the green frame, define the branching condition. The available conditions vary depending on the data type of the data save destination. Please refer to “Available conditions” for more information. Add the operations to be executed when each conditions is met (blue frame in the image below).
Available conditons
The available conditions vary depending on the data type of the data save destination. Here is the list of the conditions that can be found.
| Condition | Explanation | Text | Number | Image |
|---|---|---|---|---|
| <No condition> | If none of the other specified conditions are met, this condition will be treated as matched. | ○ | ○ | ○ |
| Txt: If equal to… (=) | If the specified value matches, the condition is considered met. | ○ | – | – |
| Txt: If not equal to… (≠) | If the specified value does not match, the condition is considered met. | ○ | – | – |
| Txt: If prefix matches with… | If the beginning of the text matches the specified value, the condition is considered met. | ○ | – | – |
| Txt: If suffix matches with… | If the end of the text matches the specified value, the condition is considered met. | ○ | – | – |
| Txt: If includes… | If the specified value is contained in the saved data, the condition is considered met. | ○ | – | – |
| Txt: If does not include… | If the specified value is not contained in the saved data, the condition is considered met. | ○ | – | – |
| Txt: If matches the following regular expression | If the specified regular expression matches, the condition is considered met. | ○ | – | – |
| Txt: If saved data size greater than… (>) | If the size of saved data is greater than the specified value when compared as texts, the condition is considered met. | ○ | – | – |
| Txt: If saved data size less than… (<) | If the size of saved data is less than the specified value when compared as texts, the condition is considered met. | ○ | – | – |
| Num: If equal to… (=) | If the specified value matches, the condition is considered met. | ○ | ○ | – |
| Num: If not equal to… (≠) | If the specified value does not match, the condition is considered met. | ○ | ○ | – |
| Num: If greater than or equal to… (≧) | If the saved data is greater than or equal to the specified value, the condition is considered met. | ○ | ○ | – |
| Num: If less than or equal to… (≦) | If the saved data is less than or equal to the specified value, the condition is considered met. | ○ | ○ | – |
| Num: If greater than… (>) | If the saved data is greater than the specified value, the condition is considered met. | ○ | ○ | – |
| Num: If less than… (<) | If the saved data is less than the specified value, the condition is considered met. | ○ | ○ | – |
| Num: If in the following range | If the saved data falls within the specified value range, the condition is considered met. | ○ | ○ | – |
| Num: If not in the the following range | If the saved data is outside the specified value range, the condition is considered met. | ○ | ○ | – |
| If in the active window | If the saved image data is present on the active window, the condition is considered met. | – | – | ○ |
| If in the front window | If the saved image data is present on the foremost window, the condition is considered met. | – | – | ○ |
| If on the desktop | If the saved image data is present anywhere on the entire desktop, including on other monitors, the condition is considered met | – | – | ○ |
| If not in the active window | If the saved image data is not present on the foremost window, the condition is considered met. | – | – | ○ |
| If not in the front window | If the saved image data is not present on the foremost window, the condition is considered met. | – | – | ○ |
| If not on the desktop | If the saved image data is not present anywhere on the entire desktop, including on other monitors, the condition is considered met | – | – | ○ |
| If the found X coordinate is greater than or equal to | If the saved image data is found on the entire desktop and its detected X-coordinate is greater than or equal to the specified value, the condition is considered met. | – | – | ○ |
| If the found X coordinate is less than or equal to | If the saved image data is found on the entire desktop and its detected X-coordinate is less than or equal to the specified value, the condition is considered met. | – | – | ○ |
| If the found X coordinate is within the following range | If the saved image data is found on the entire desktop and its detected X-coordinate falls within the specified value range, the condition is considered met. | – | – | ○ |
| If the found Y coordinate is greater than or equal to | If the saved image data is found on the entire desktop and its detected Y-coordinate is greater than or equal to the specified value, the condition is considered met. | – | – | ○ |
| If the found Y coordinate is less than or equal to | If the saved image data is found on the entire desktop and its detected Y-coordinate is less than or equal to the specified value, the condition is considered met. | – | – | ○ |
| If the found Y coordinate is within the following range | If the saved image data is found on the entire desktop and its detected Y-coordinate falls within the specified value range, the condition is considered met. | – | – | ○ |
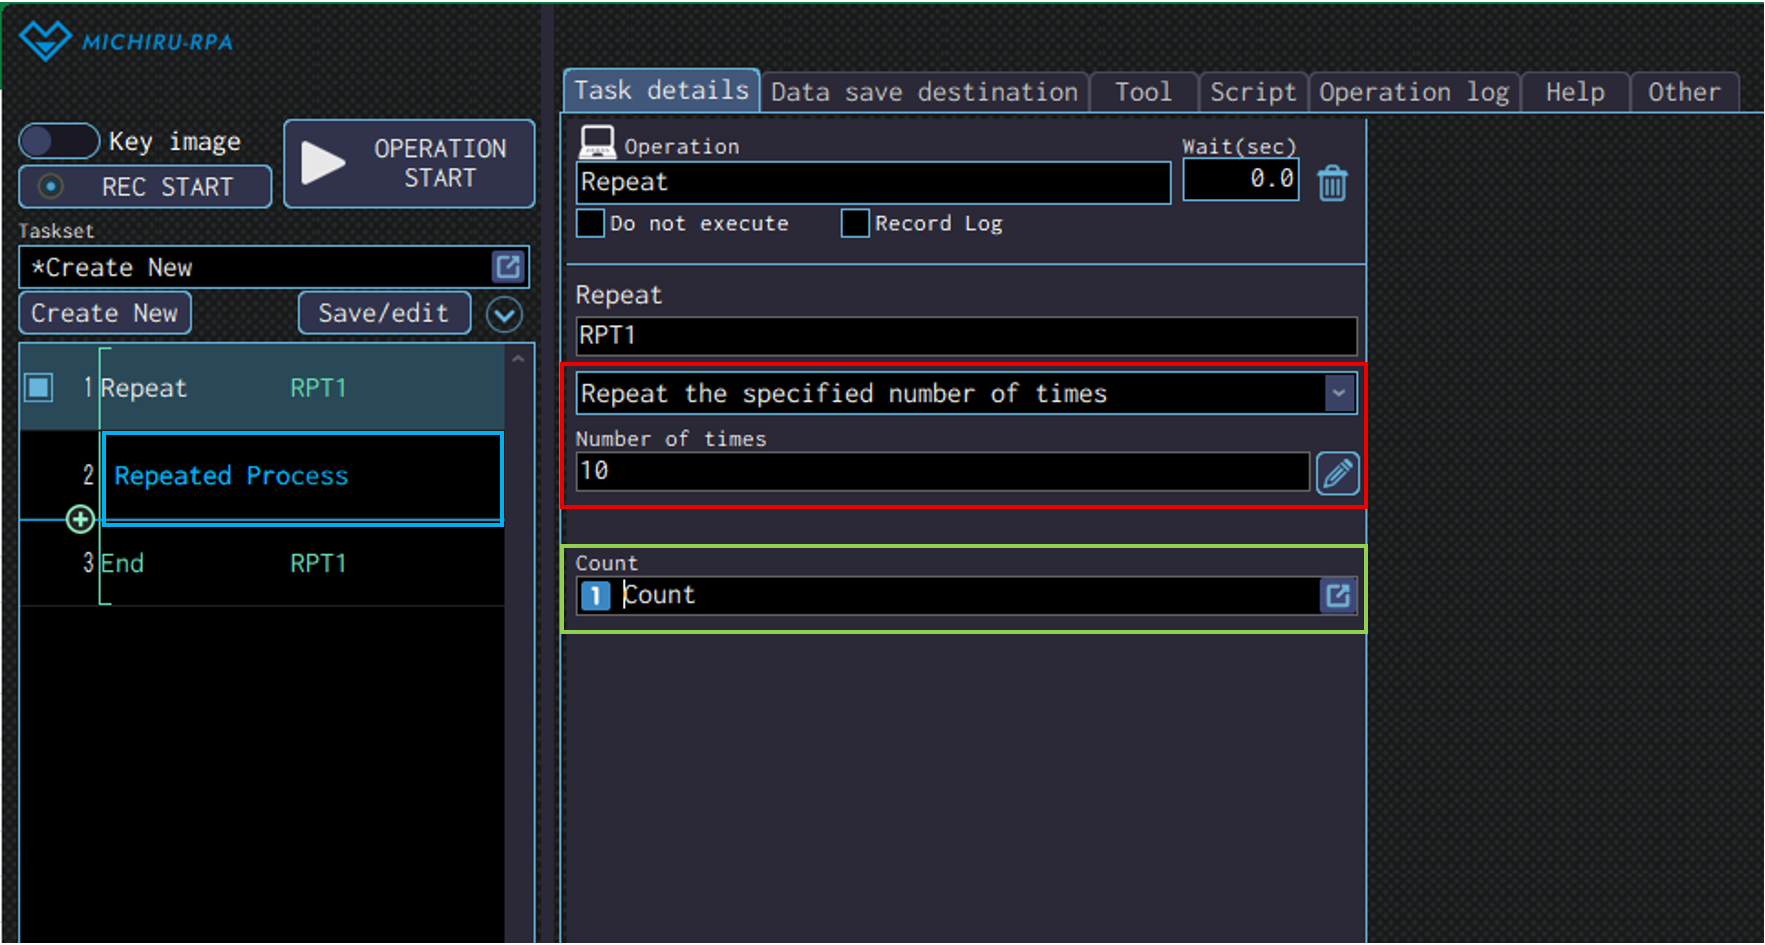
Repeat
Use this operation to make the RPA repeat the process within the specified range multiple times.
By repeating a succession of operation multiple times, the RPA will be able to automatically handle the same task repeatedly.
For example, you can use the operation to process a row of data in Excel one by one, or when doing the same process on multiple files or web pages repeatedly. This eliminates the need to repeatedly create the same or similar operations, allowing you to build automation sets more efficiently.
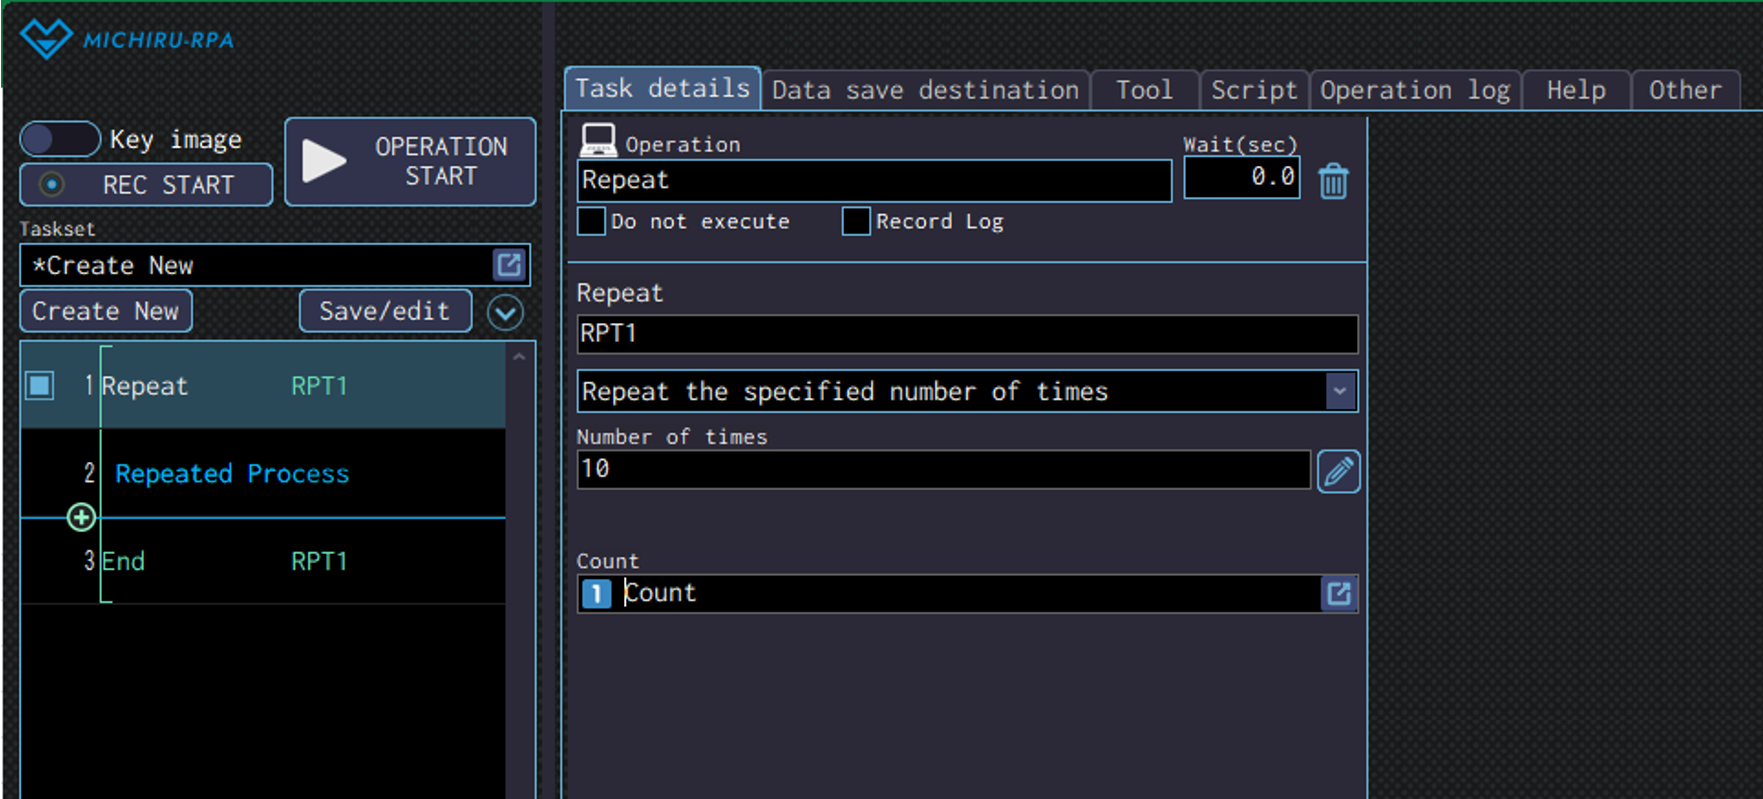
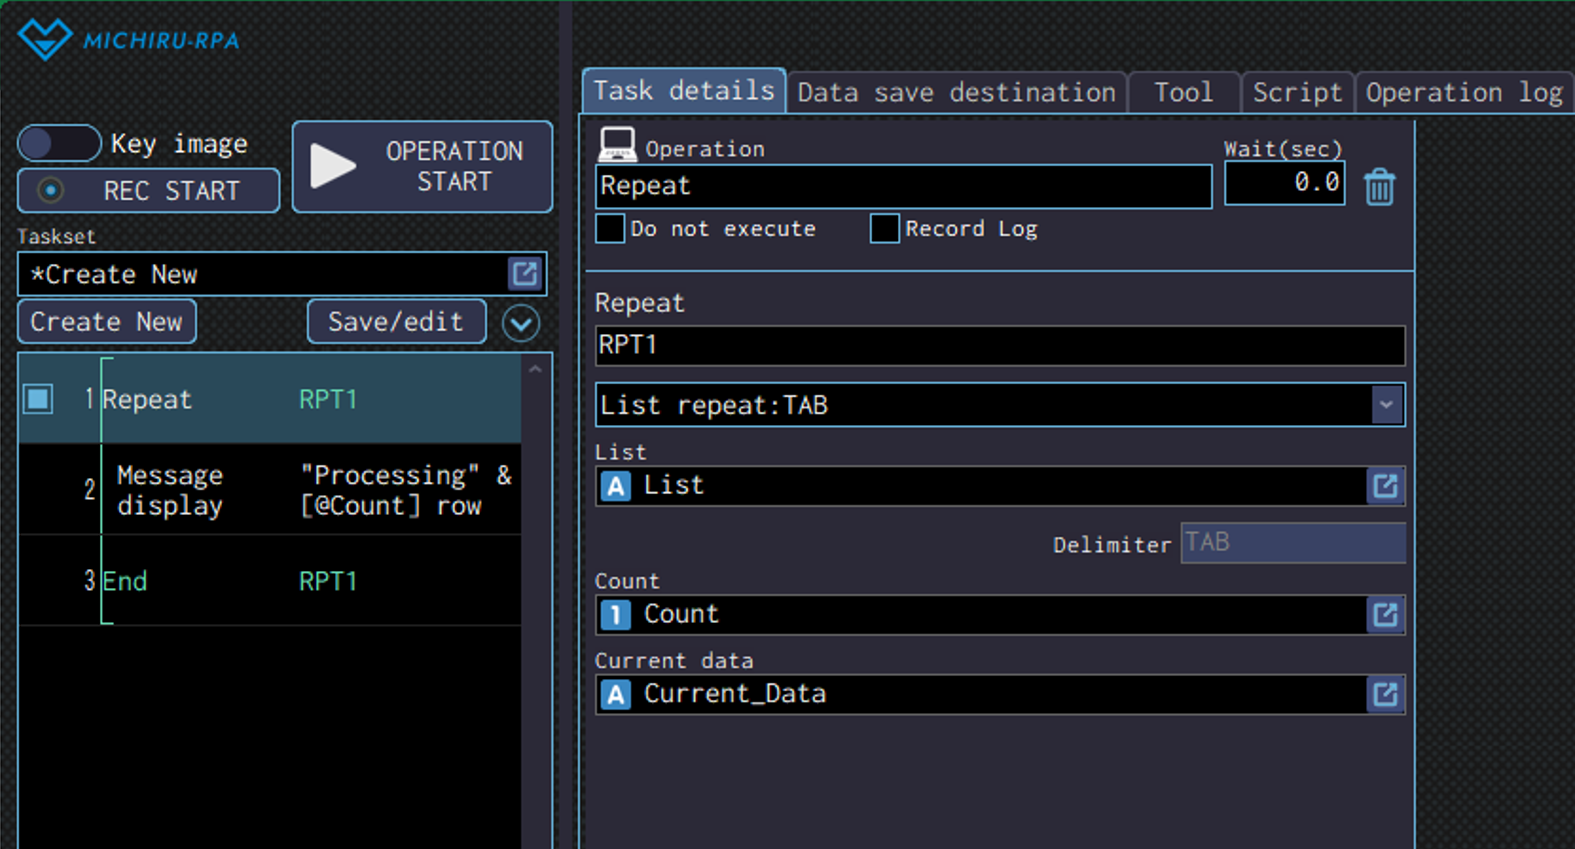
Detailed Setting for Operation
In the red frame below, specify the type and number of times to repeat. For more information regarding the type of repeat available, please refer to the upcoming “Specifying and configuring repeat”.
If you need a data save destination that counts the number of times the process is repeated, configure that in the green frame. The data type of the data save destination you use for counting must be number.
You can use this data save destination as a variable in formulas and when displaying messages. If there is no need to keep the count, leave the setting to .
Add the operations to be repeated between the start and the end of the repeat connected by a green line (blue frame in the image below).
Specifying and Configuring Repeat
You can select the followings as the type of repeat
- Repeat the specified number of times
-
Repeat for the specified number of times, which is to be input directly , or specified using data save destination that contains number.
The 1st image below shows the case where the number of times is directly input.
The message will be displayed 10 times because the number is set to 10.
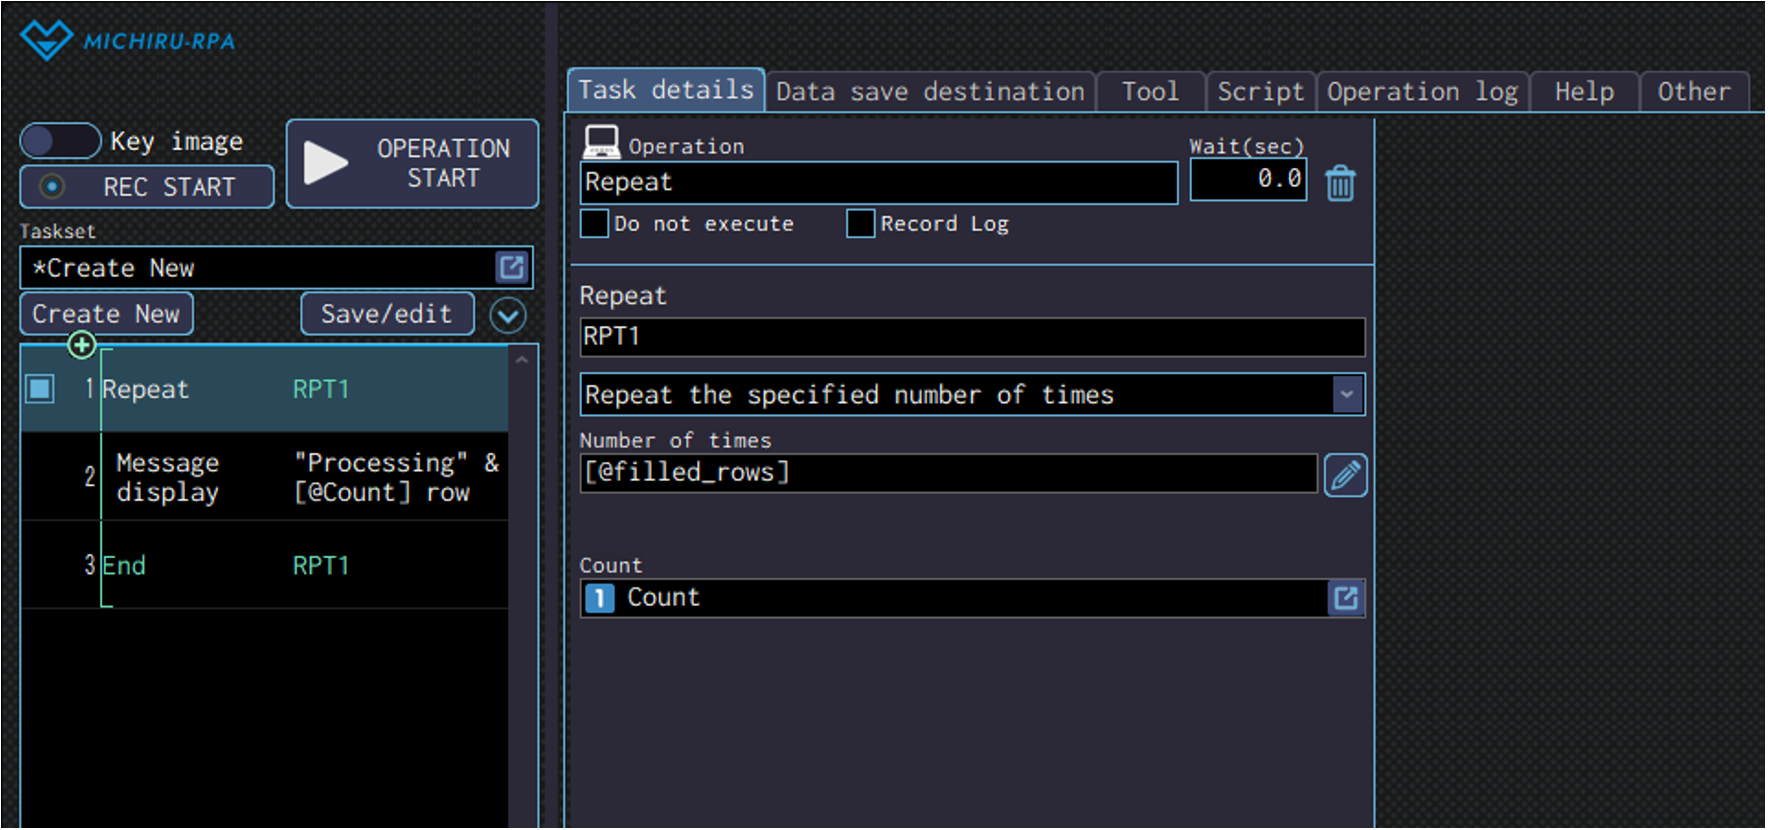
The 2nd image shows the case where data save destination is used. The operation will be repeated for the number of times saved in the data save destination “[@filled_rows]”. - List repeat: Specify delimiter (blank: line break)
-
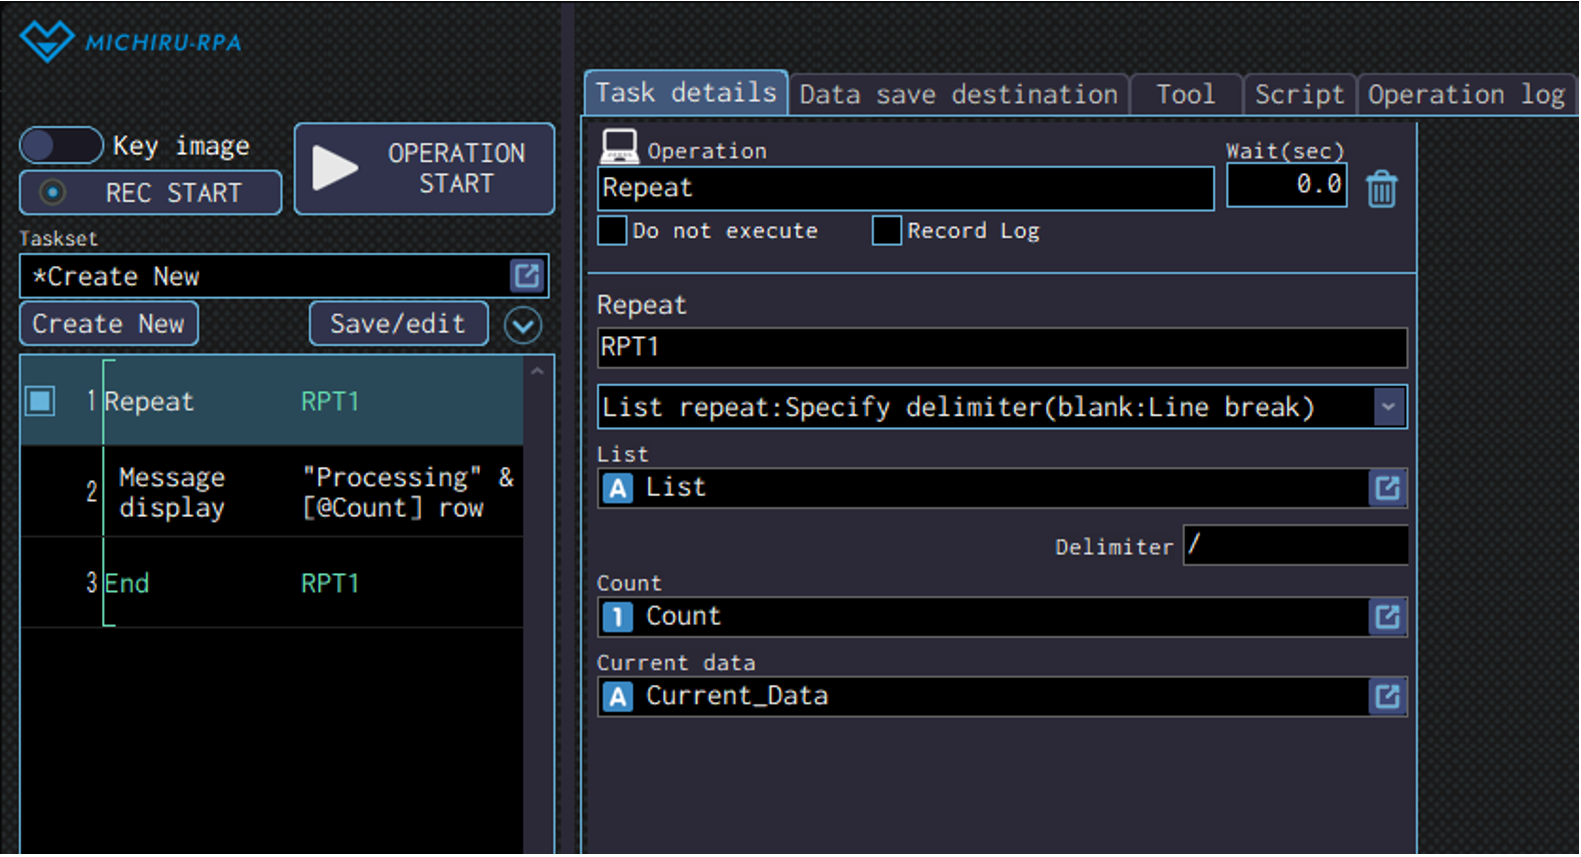
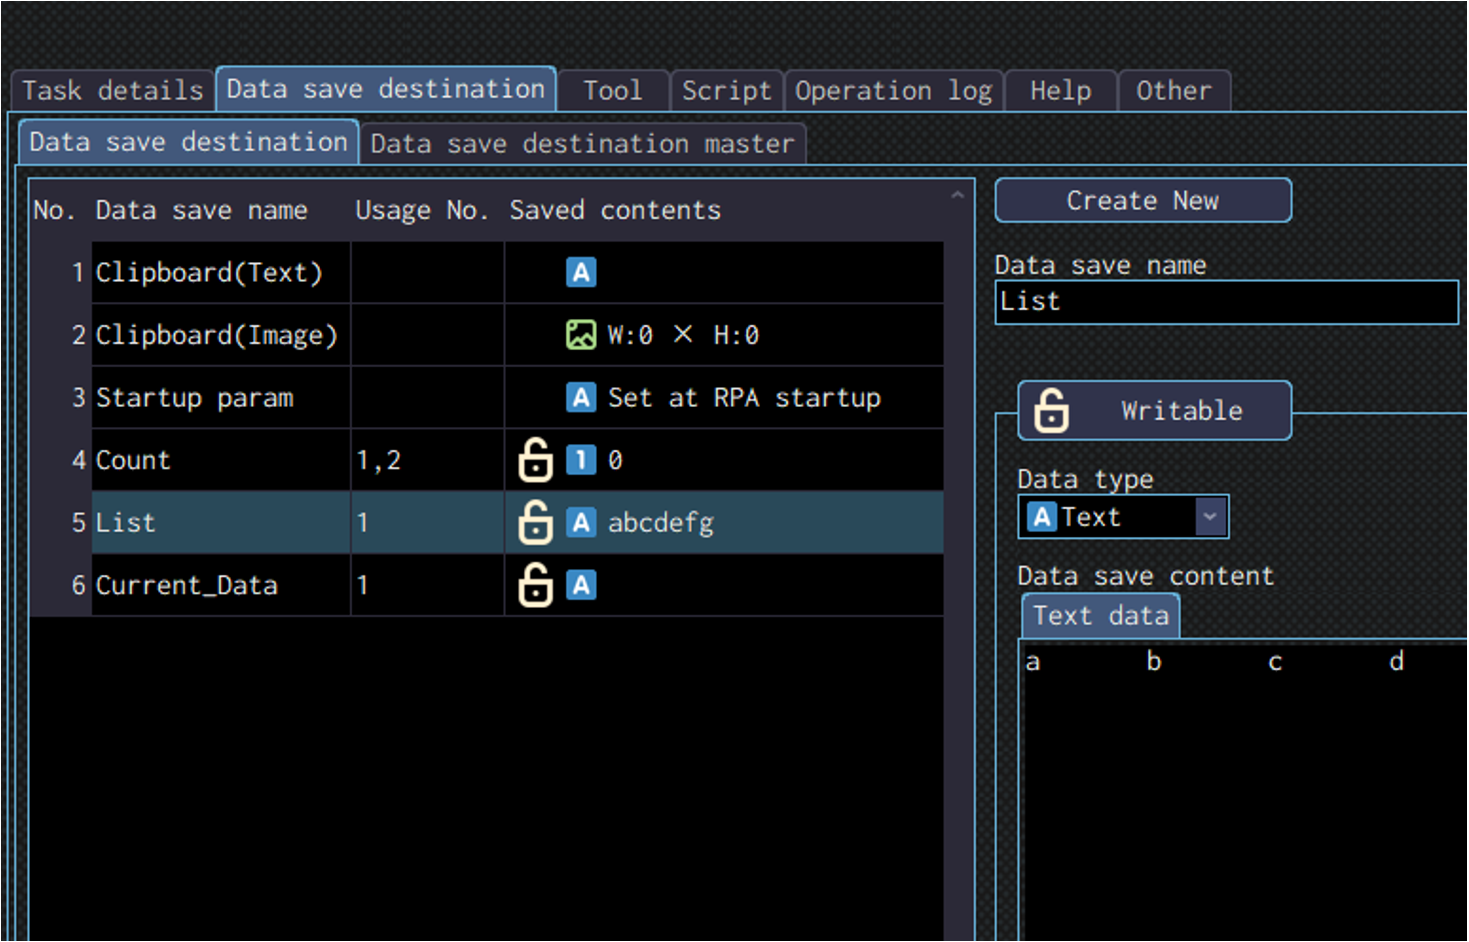
Repeat for the number of items in the list that is delimited by the specified delimiter. In the “Count” field, you can specify a data save destination that will keep record of the number of times the process is repeated, and in the “Current data” field, you can specify a data save destination that will contain the current item in the list.
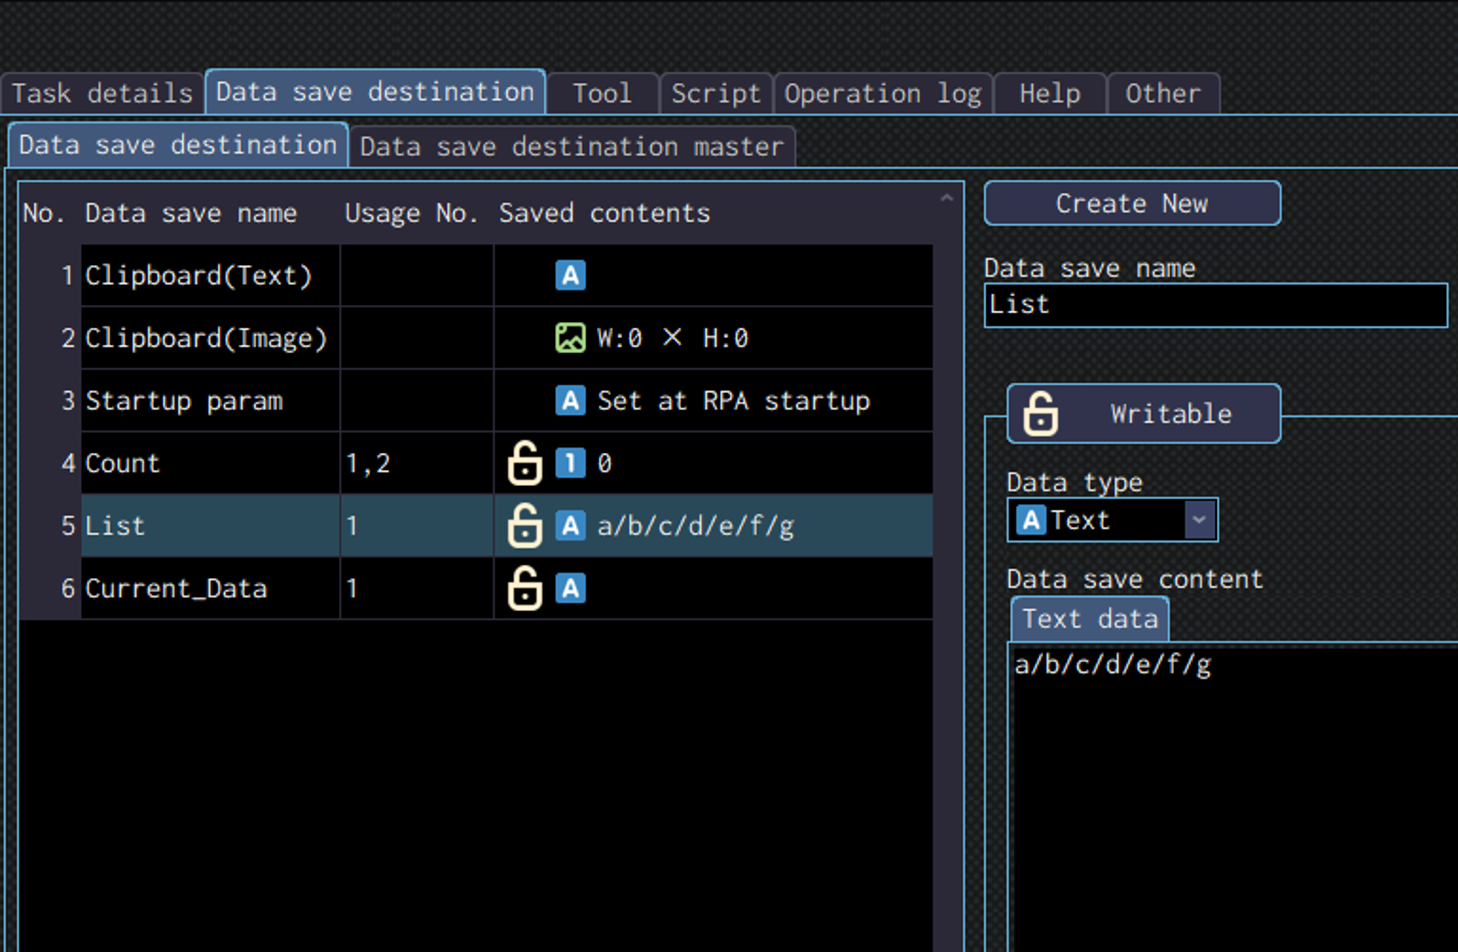
The 1st image below shows the case where “a/b/c/d/e/f/g” is saved in the data saved destination “List”, with “/” set as delimiter. Every time the process is repeated, the current data that got extracted fron the list will be one of the letter form “a” to “g” that is delimited by “/”, which will be saved in “Current_Data”. The message will displayed what is currently in “Current_Data”.
The 2nd image shows what is saved in the list.
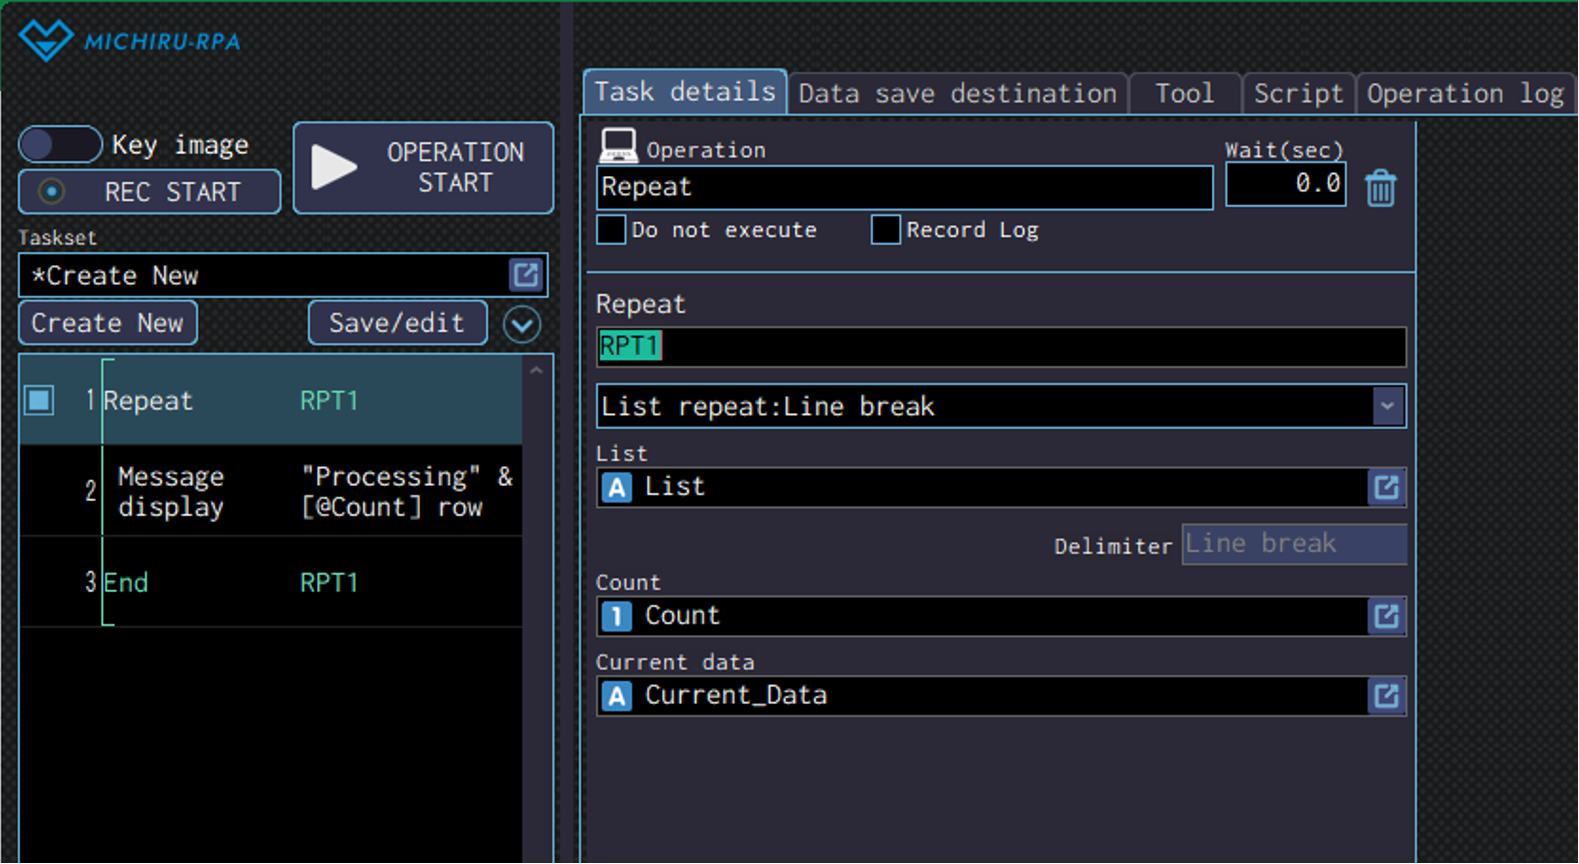
- List repeat: Line break
-
Repeat for the number of items in the list that is delimited by line break. In the “Count” field, you can specify a data save destination that will keep record of the number of times the process is repeated, and in the “Current data” field, you can specify a data save destination that will contain the current item in the list.
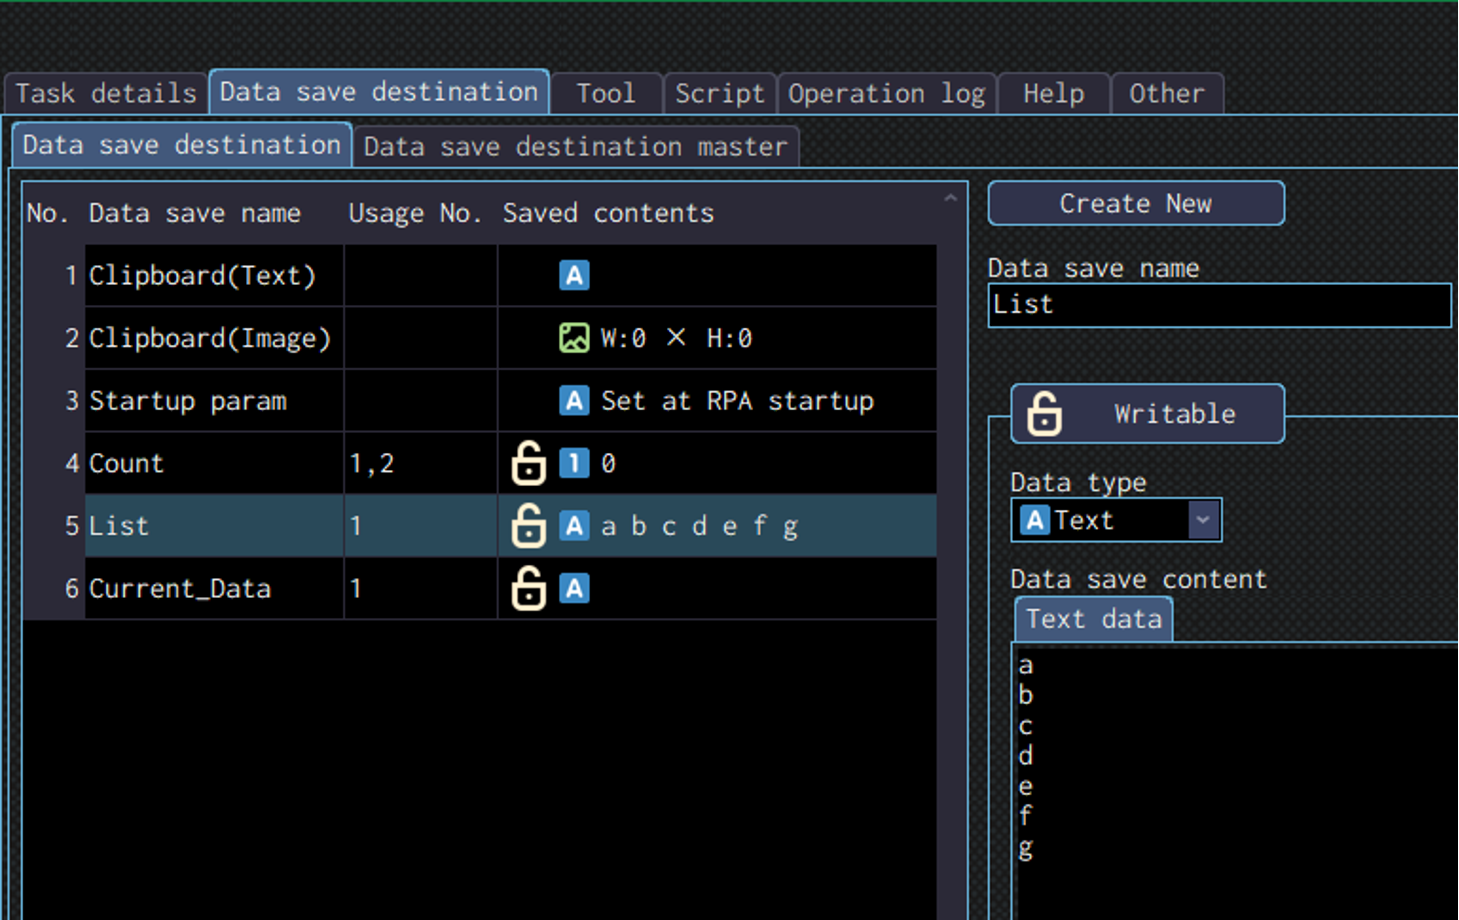
The 1st image below shows the case where letters from “a” to “g” is saved in the data saved destination “List”, with each saved in a separate line from line break. Every time the process is repeated, the current data that got extracted fron the list will be one of the letter form “a” to “g” that is delimited by line break, which will be saved in “Current_Data”. The message will displayed the what is currently in “Current_Data”.
The 2nd image shows what is saved in the list.
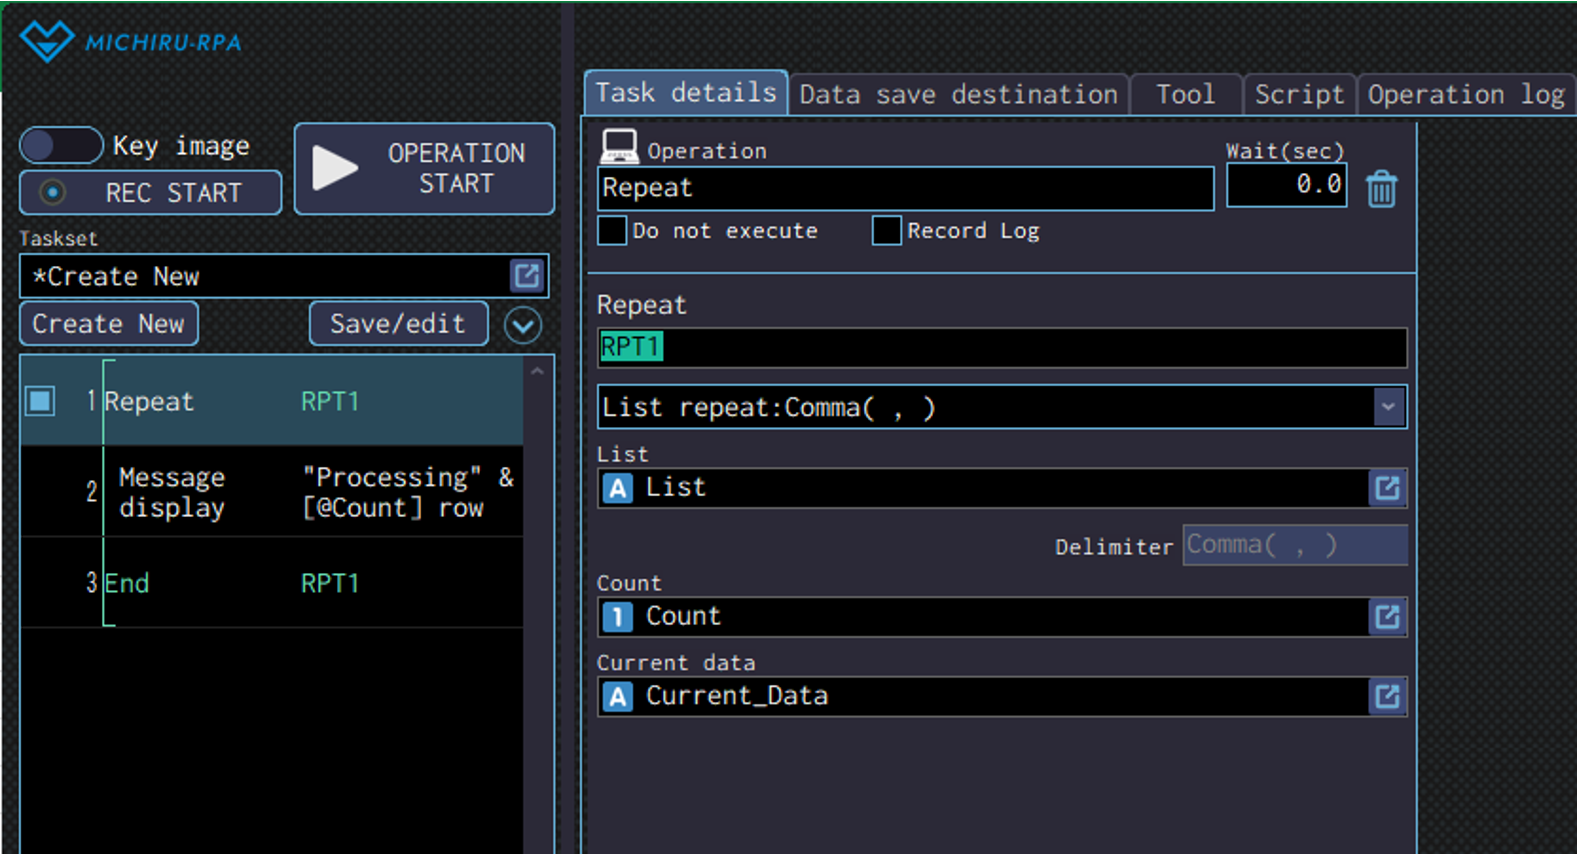
- List repeat: Comma ( , )
-
Repeat for the number of items in the list that is delimited by a comma. In the “Count” field, you can specify a data save destination that will keep record of the number of times the process is repeated, and in the “Current data” field, you can specify a data save destination that will contain the current item in the list.
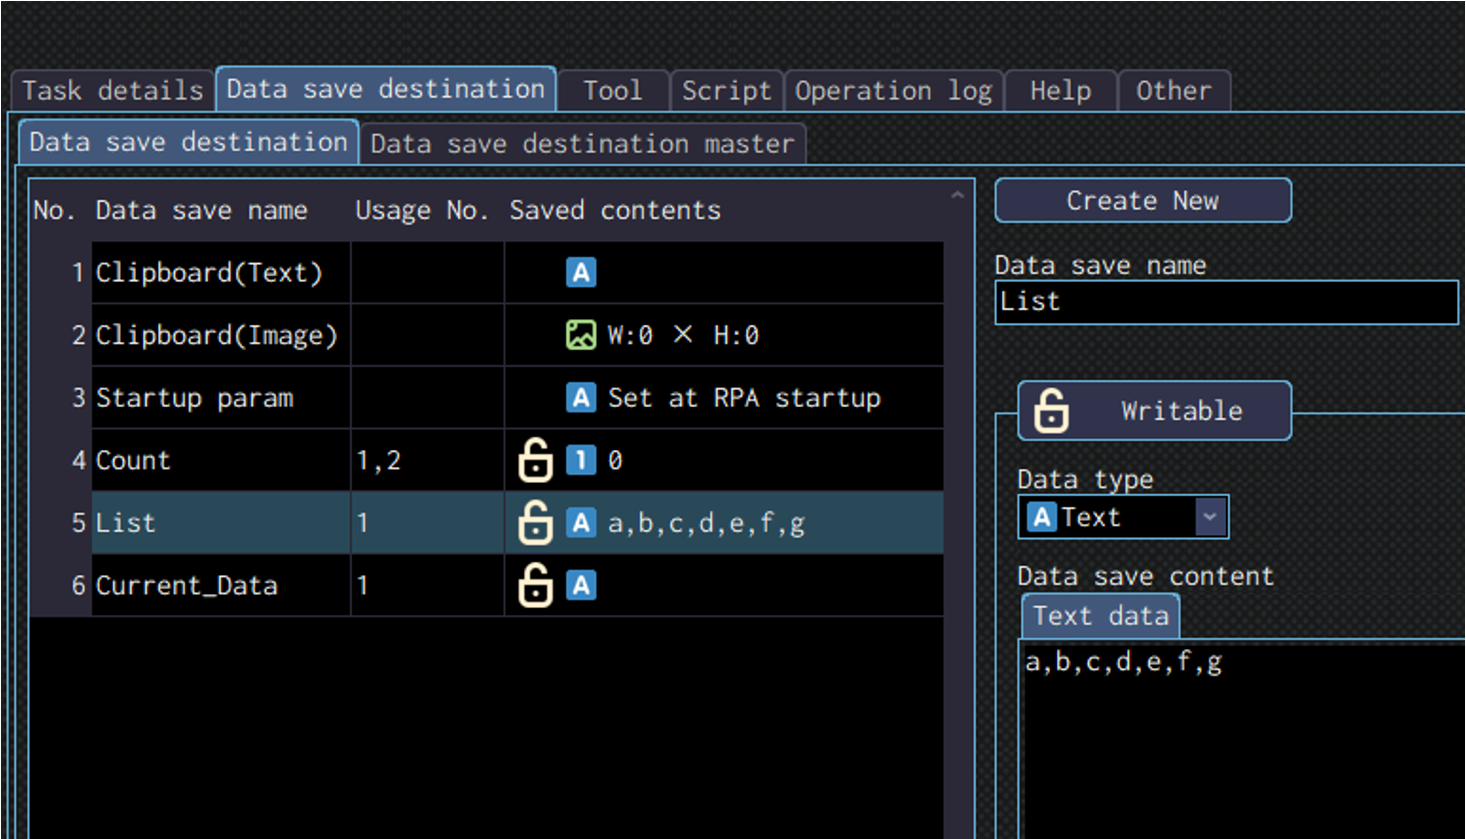
The 1st image below shows the case where “a,b,c,d,e,f,g” is saved in the data saved destination “List”, with ” , ” set as delimiter. Every time the process is repeated, the current data that got extracted fron the list will be one of the letter form “a” to “g” that is delimited by ” , “, which will be saved in “Current_Data”. The message will displayed the what is currently in “Current_Data”.
The 2nd image shows what is saved in the list.
- List repeat: TAB
-
Repeat for the number of items in the list that is delimited by a tab. In the “Count” field, you can specify a data save destination that will keep record of the number of times the process is repeated, and in the “Current data” field, you can specify a data save destination that will contain the current item in the list.
The 1st image below shows the case where letters from “a” to “g” is saved in the data saved destination “List”, with a tab set as delimiter. Every time the process is repeated, the current data that got extracted fron the list will be one of the letter form “a” to “g” that is delimited by a tab, which will be saved in “Current_Data”. The message will displayed the what is currently in “Current_Data”.
The 2nd image shows what is saved in the list.
Conditional move
Use this operation to make the RPA moves to the specified operation number based on whether if the specified condition is considered met or not.|
Unlike Conditional branch, only 1 condition can be set in this operation. You can set the number to move to both for when the condition is met, and is not met.
\In MICHIRU RPA, operations are executed from top to bottom. However, by using conditional branching, you can skip certain steps or return to earlier operations to repeat them.
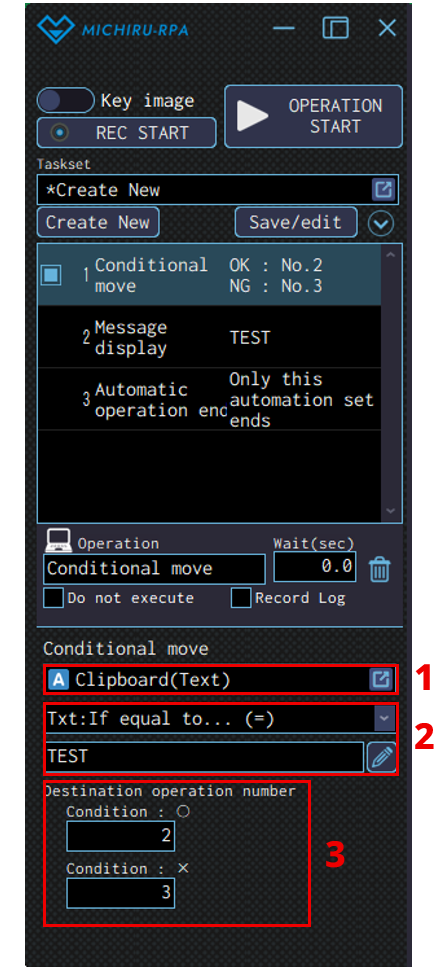
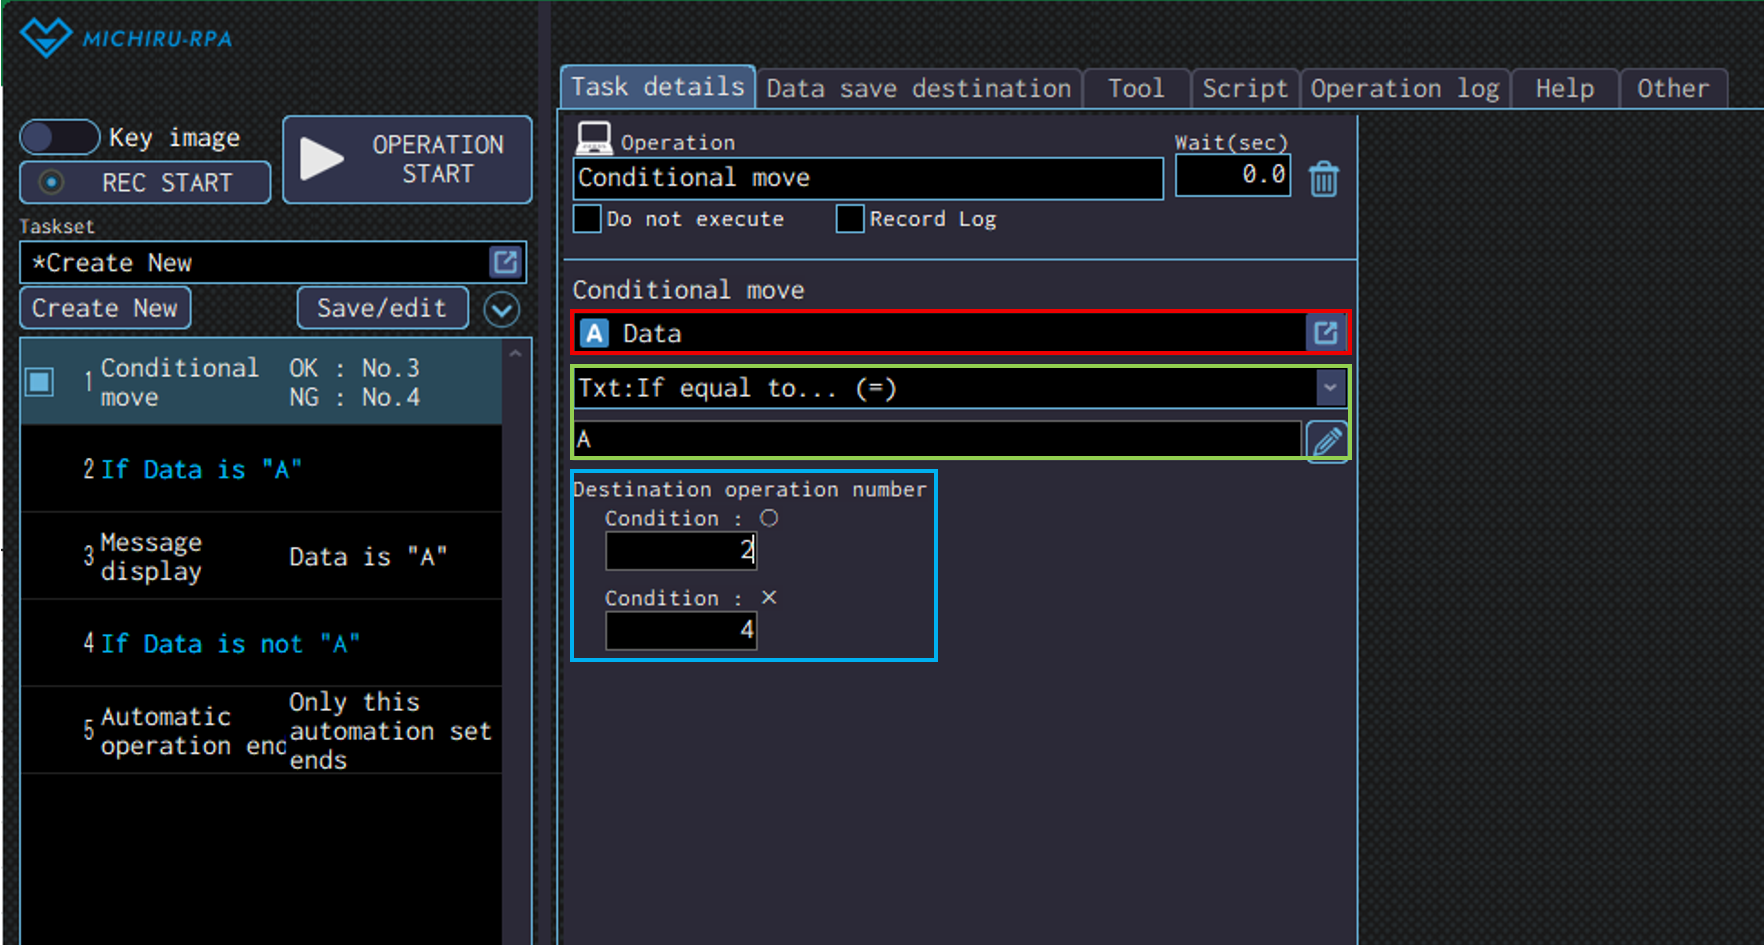
Detailed Setting for Operation
In the red frame below, specify the data save destination that will be used for evaluating the condition.
In the green frame, define the branching condition.
The available conditions vary depending on the data type of the data save destination. Please refer to “Available conditions” for more information.
In the blue frame, specify the number to move when the condition is met and when it is not met.
Available conditions
The available conditions vary depending on the data type of the data save destination.
Here is the list of the conditions that can be found.
| Condition | Explanation | Text | Number | Image |
|---|---|---|---|---|
| <No condition> | If none of the other specified conditions are met, this condition will be treated as matched. | ○ | ○ | ○ |
| Txt: If equal to… (=) | If the specified value matches, the condition is considered met. | ○ | – | – |
| Txt: If not equal to… (≠) | If the specified value does not match, the condition is considered met. | ○ | – | – |
| Txt: If prefix matches with… | If the beginning of the text matches the specified value, the condition is considered met. | ○ | – | – |
| Txt: If suffix matches with… | If the end of the text matches the specified value, the condition is considered met. | ○ | – | – |
| Txt: If includes… | If the specified value is contained in the saved data, the condition is considered met. | ○ | – | – |
| Txt: If does not include… | If the specified value is not contained in the saved data, the condition is considered met. | ○ | – | – |
| Txt: If matches the following regular expression | If the specified regular expression matches, the condition is considered met. | ○ | – | – |
| Txt: If saved data size greater than… (>) | If the size of saved data is greater than the specified value when compared as texts, the condition is considered met. | ○ | – | – |
| Txt: If saved data size less than… (<) | If the size of saved data is less than the specified value when compared as texts, the condition is considered met. | ○ | – | – |
| Num: If equal to… (=) | If the specified value matches, the condition is considered met. | ○ | ○ | – |
| Num: If not equal to… (≠) | If the specified value does not match, the condition is considered met. | ○ | ○ | – |
| Num: If greater than or equal to… (≧) | If the saved data is greater than or equal to the specified value, the condition is considered met. | ○ | ○ | – |
| Num: If less than or equal to… (≦) | If the saved data is less than or equal to the specified value, the condition is considered met. | ○ | ○ | – |
| Num: If greater than… (>) | If the saved data is greater than the specified value, the condition is considered met. | ○ | ○ | – |
| Num: If less than… (<) | If the saved data is less than the specified value, the condition is considered met. | ○ | ○ | – |
| Num: If in the following range | If the saved data falls within the specified value range, the condition is considered met. | ○ | ○ | – |
| Num: If not in the the following range | If the saved data is outside the specified value range, the condition is considered met. | ○ | ○ | – |
| If in the active window | If the saved image data is present on the active window, the condition is considered met. | – | – | ○ |
| If in the front window | If the saved image data is present on the foremost window, the condition is considered met. | – | – | ○ |
| If on the desktop | If the saved image data is present anywhere on the entire desktop, including on other monitors, the condition is considered met | – | – | ○ |
| If not in the active window | If the saved image data is not present on the foremost window, the condition is considered met. | – | – | ○ |
| If not in the front window | If the saved image data is not present on the foremost window, the condition is considered met. | – | – | ○ |
| If not on the desktop | If the saved image data is not present anywhere on the entire desktop, including on other monitors, the condition is considered met | – | – | ○ |
| If the found X coordinate is greater than or equal to | If the saved image data is found on the entire desktop and its detected X-coordinate is greater than or equal to the specified value, the condition is considered met. | – | – | ○ |
| If the found X coordinate is less than or equal to | If the saved image data is found on the entire desktop and its detected X-coordinate is less than or equal to the specified value, the condition is considered met. | – | – | ○ |
| If the found X coordinate is within the following range | If the saved image data is found on the entire desktop and its detected X-coordinate falls within the specified value range, the condition is considered met. | – | – | ○ |
| If the found Y coordinate is greater than or equal to | If the saved image data is found on the entire desktop and its detected Y-coordinate is greater than or equal to the specified value, the condition is considered met. | – | – | ○ |
| If the found Y coordinate is less than or equal to | If the saved image data is found on the entire desktop and its detected Y-coordinate is less than or equal to the specified value, the condition is considered met. | – | – | ○ |
| If the found Y coordinate is within the following range | If the saved image data is found on the entire desktop and its detected Y-coordinate falls within the specified value range, the condition is considered met. | – | – | ○ |
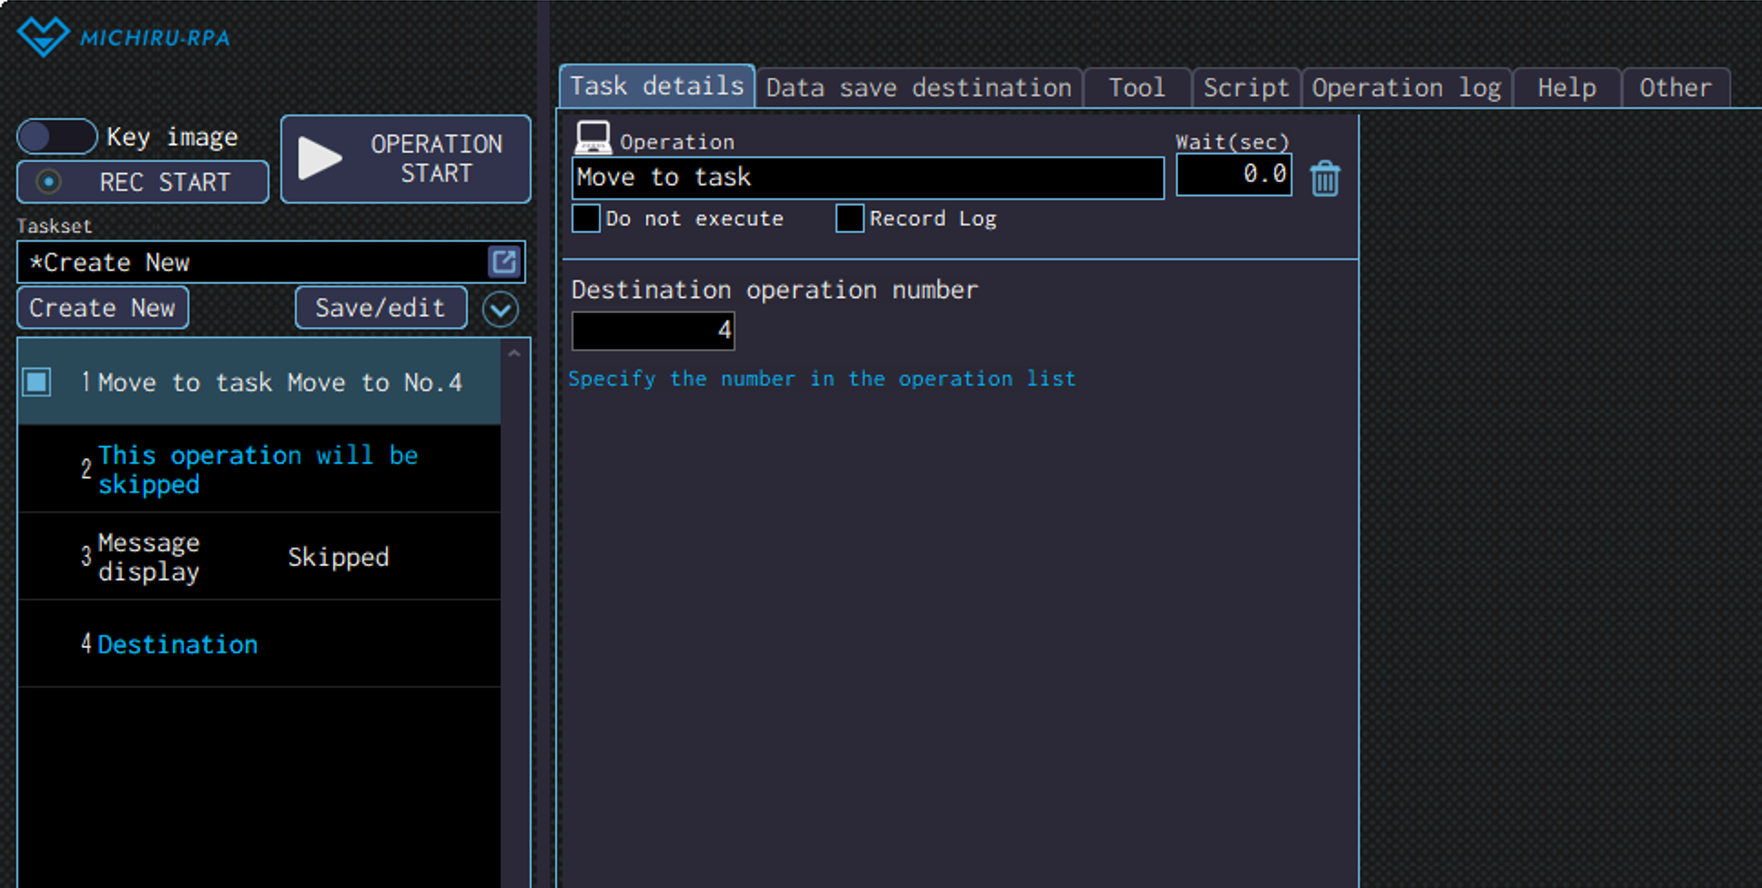
Move to task
Use this operation to make the RPA move to the specified number.
Input the number of the operation you want the RPA to move to.
Using Move to task allows you to skip sections of the processing flow and restart execution from a specified point.
For example, this is useful when you want to skip error-steps when no error has occurred.
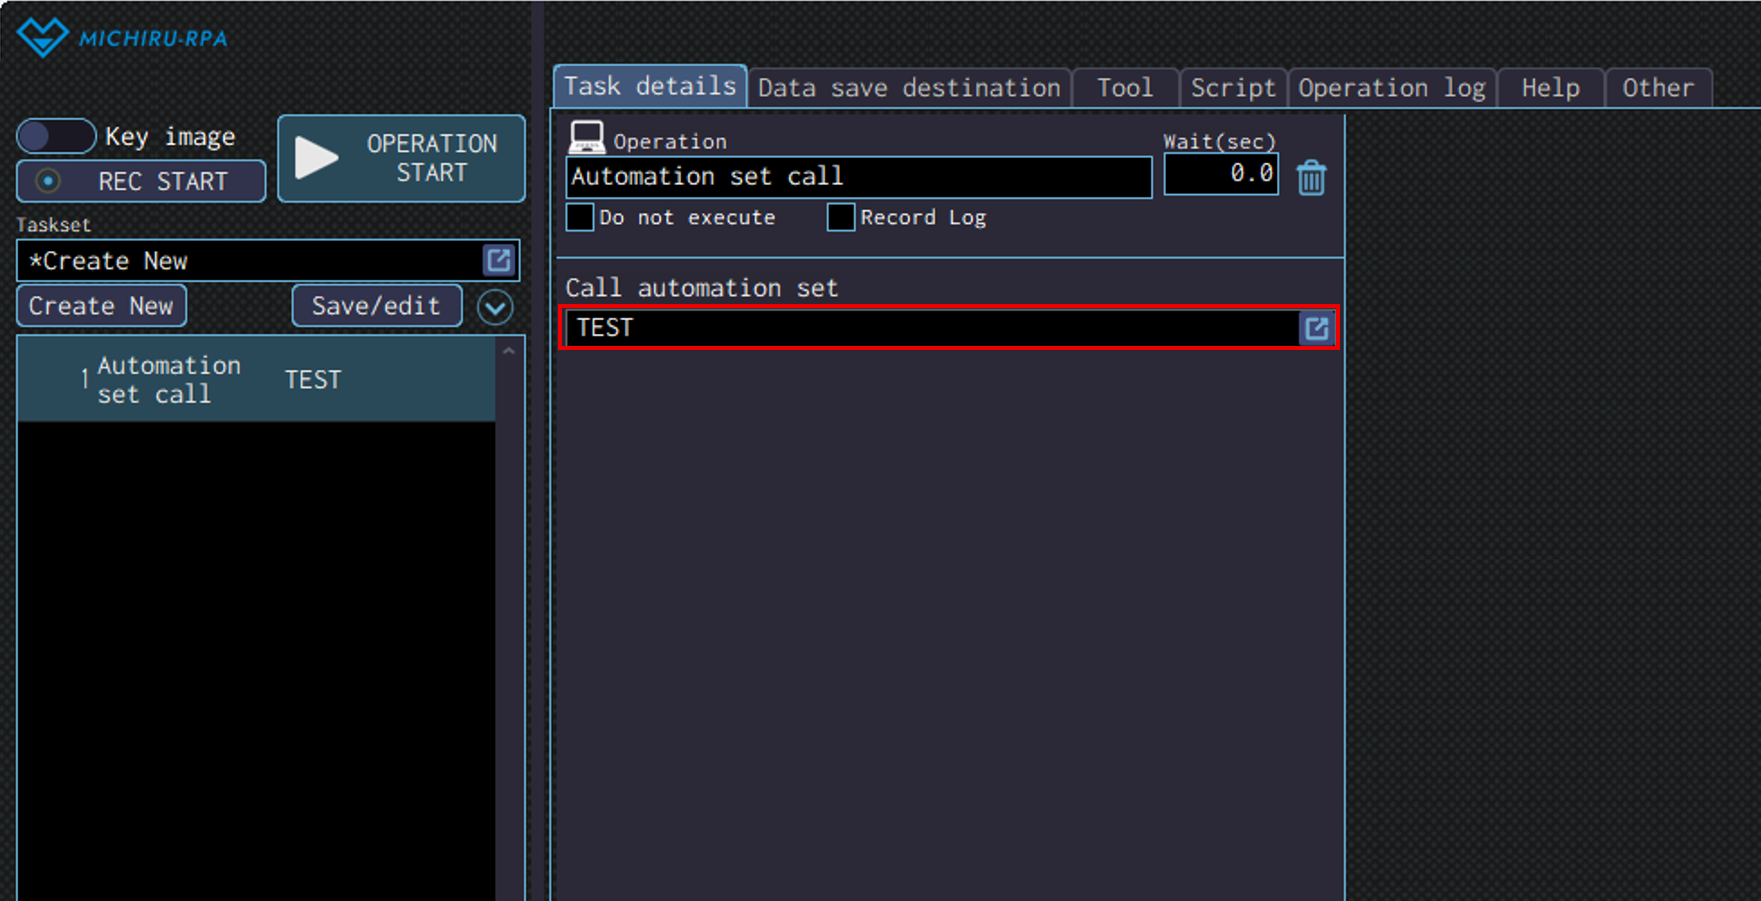
Automation set call
Use this operation to make the RPA call a saved automation set.
Select the automation set you want to execute.
With this operation you can call and execute automation set that was premade for a specific task when necessary.
By creating multiple automation set specifically to be called, and using them in combination, you can design the work flow more flexibly.
You can also use this with operation like Conditional branch or Conditional move to call a specific automation set under a specific circumstances.
Error handling
Use this operation to configure how the RPA should handle error it comes across while running.
You can set the RPA to move to a specific operation, or call another automation set when an error occurs.
Please note that the “error” mentioned here refers to the state where an error message is displayed inside MICHIRU RPA.
Error handling will start at the point where you create the operation.
When you create another error handling operation, the previous one created becomes invalid, and the latest error handling created will be applied.
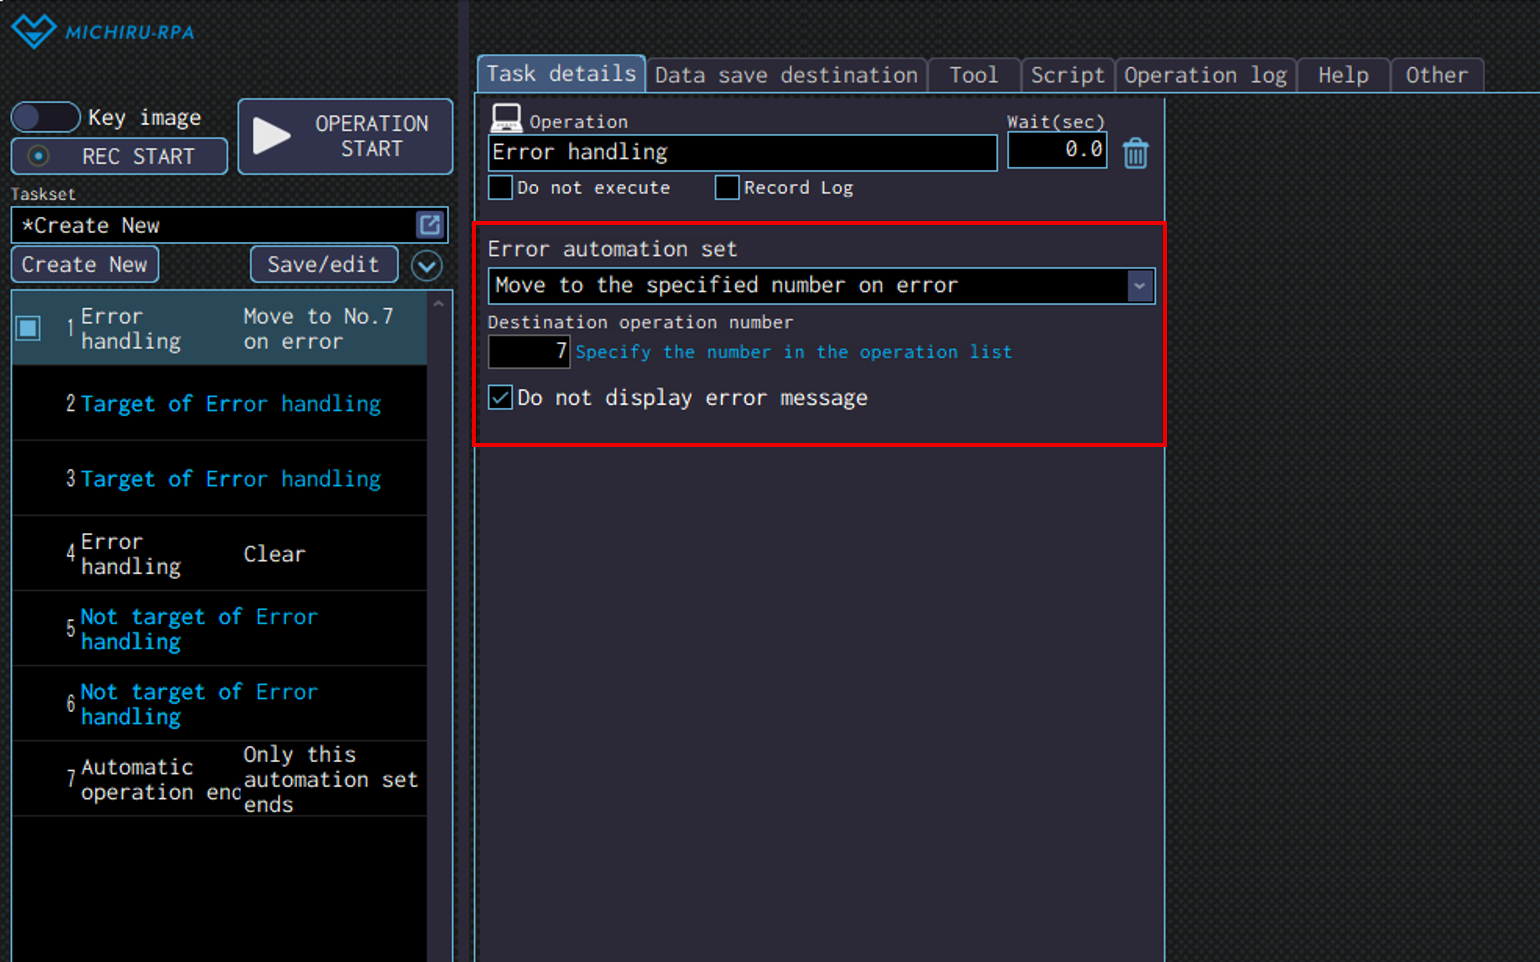
Detailed Setting for Operation
Select the method of error handling from the dropdown menu.
Please refer to the table below for more information.
If “Do not display error message” is checked, no message will be displayed when errors occur.
| Clear error handling | Clear the configuration for the error handling that was previously configured. |
|---|---|
| Move to the specified number on error | Move to operation with the specified number when errors occur. |
| Call the automation set on error | Call a saved automation set when errors occur. you need to specify the number of the operation you want the RPA to comeback to. |
In the automation set in the image above, because there is an error handling configured in no.1, when an error occurs in no. 2 – 3, the RPA will move to no.7 without displaying the error message.
Error handling is cleared in no.4, so if the error occurr in no. 5-6, error message will be displayed, and the automation set will be stopped.
Automatic operation end
Use this operation to end the automation set.
Please note that even without using this opetaion, automation set will automatically end when it runs until the end .
Detailed Setting for Operation
Configure how the operation will end.
Please refer to the table below for more information
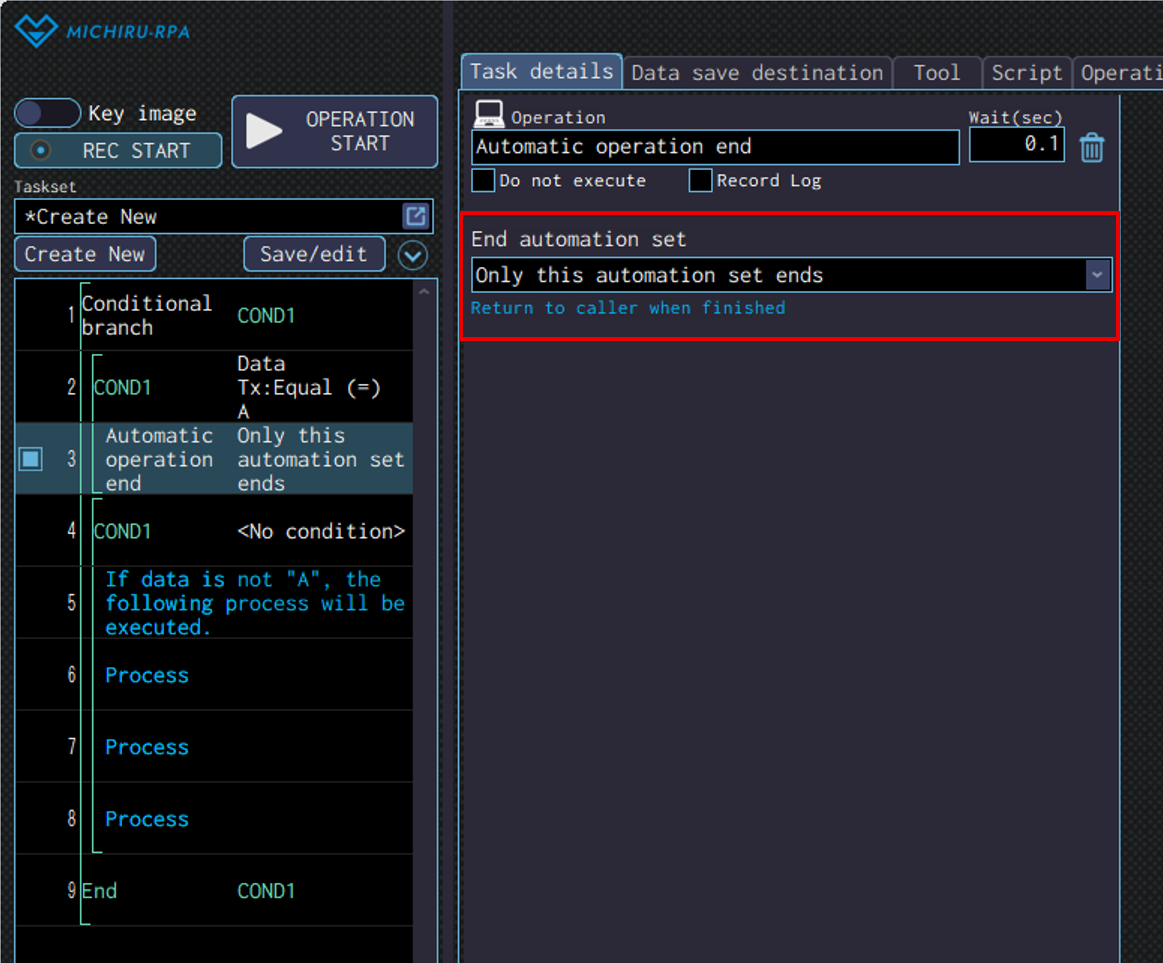
| Only this automation set ends | End only the current automation set, including the operation to end it. |
|---|---|
| End all automation sets | When called by “Automation set call”, this will also end the automation set that initiate the “Automation set call”. |
| Exit MICHIRU RPA | In addtion to the automation set, this will also end MICHIRU RPA |
File / Directory
File launch
Use this operation to launch a file or a program.
This can be used to automatically launch a certain application, or open a specific file from Excel and Word.
For example, you can launch an Excel file to process data, or launch system or tool and start to operate on it.
File path used for launching can be stored in data save destination, allowing for more dynamic workflow.
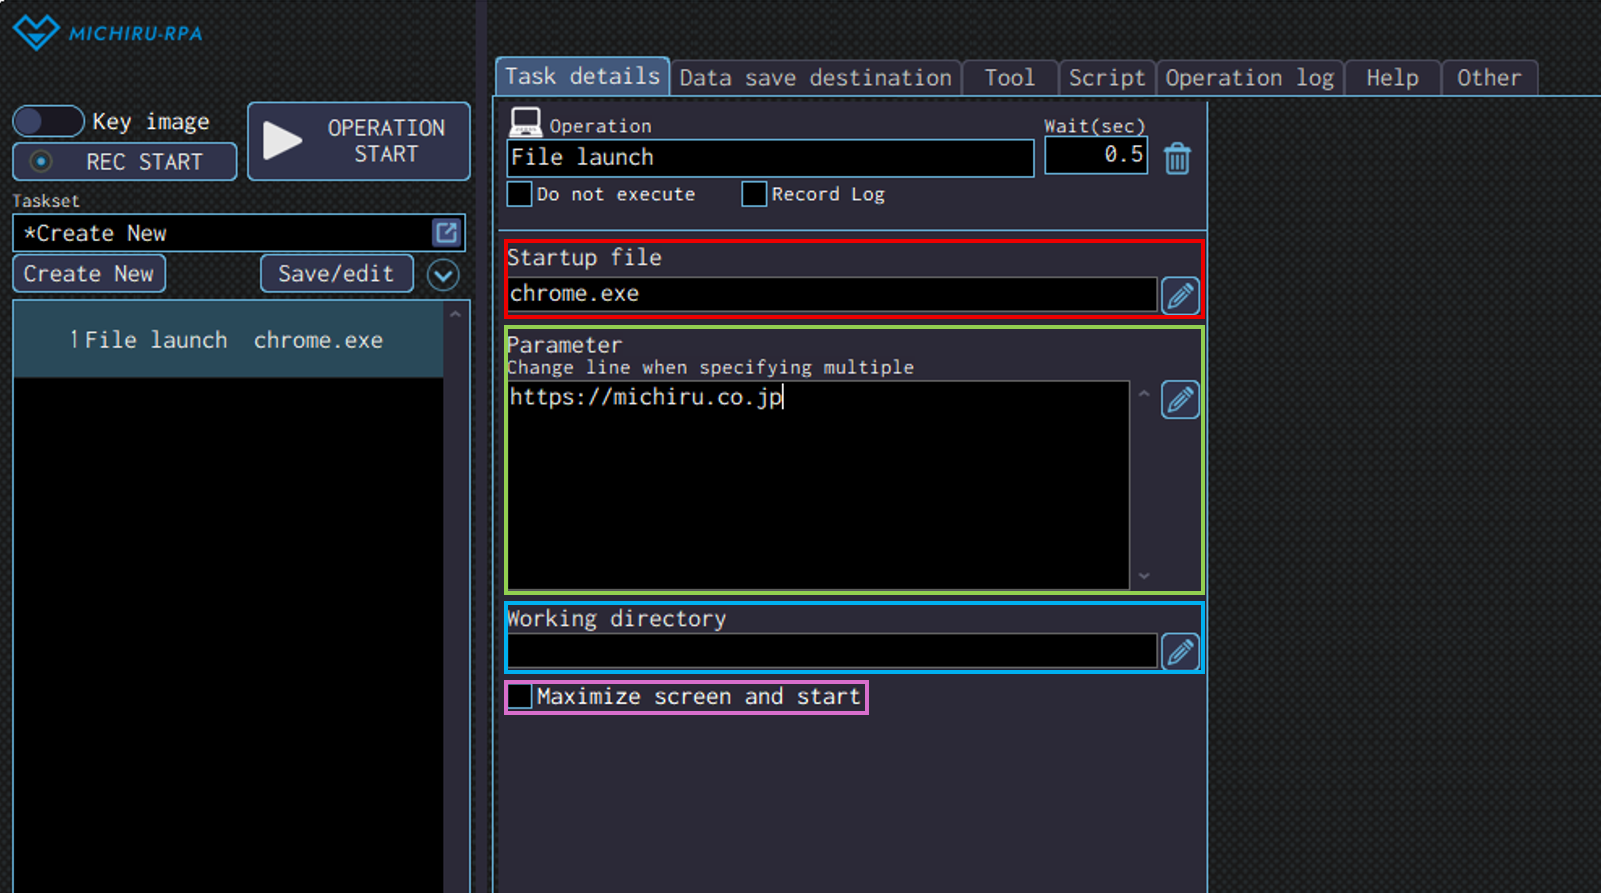
Detailed Setting for Operation
In the red frame below, specify the file you want to launch.
In addition to files, you can also specify program names, executable files, URLs to a home pages and etc..
Examples: Input “excel” to launch Microsoft Excel.
Input “chrome.exe” to launch Google Chrome.
Input “msedge.exe” to launch Microsoft Edge.
Input “https://michiru.co.jp/” to launch the home page of MICHIRU RPA’s website.
Sometimes, you may need to input parameters into the “Parameter” field. When displaying a web page, you can input the name of the browser in the “Startup file” field, and the URL in the “Parameter” field.
If you want to specify a working directory, you can do so by inputting the directory path in “Working directory” field.
Check on the “Maximize screen and start” if you want to maximize the screen when launching.
Get file / directory list
Use this operation to get the list of files or directories inside of a directory.
This can be used to process Excel files in a specific folder one by one, or check the contents of a specific folder and use that information for subsequent processing.
Detailed Setting for Operation
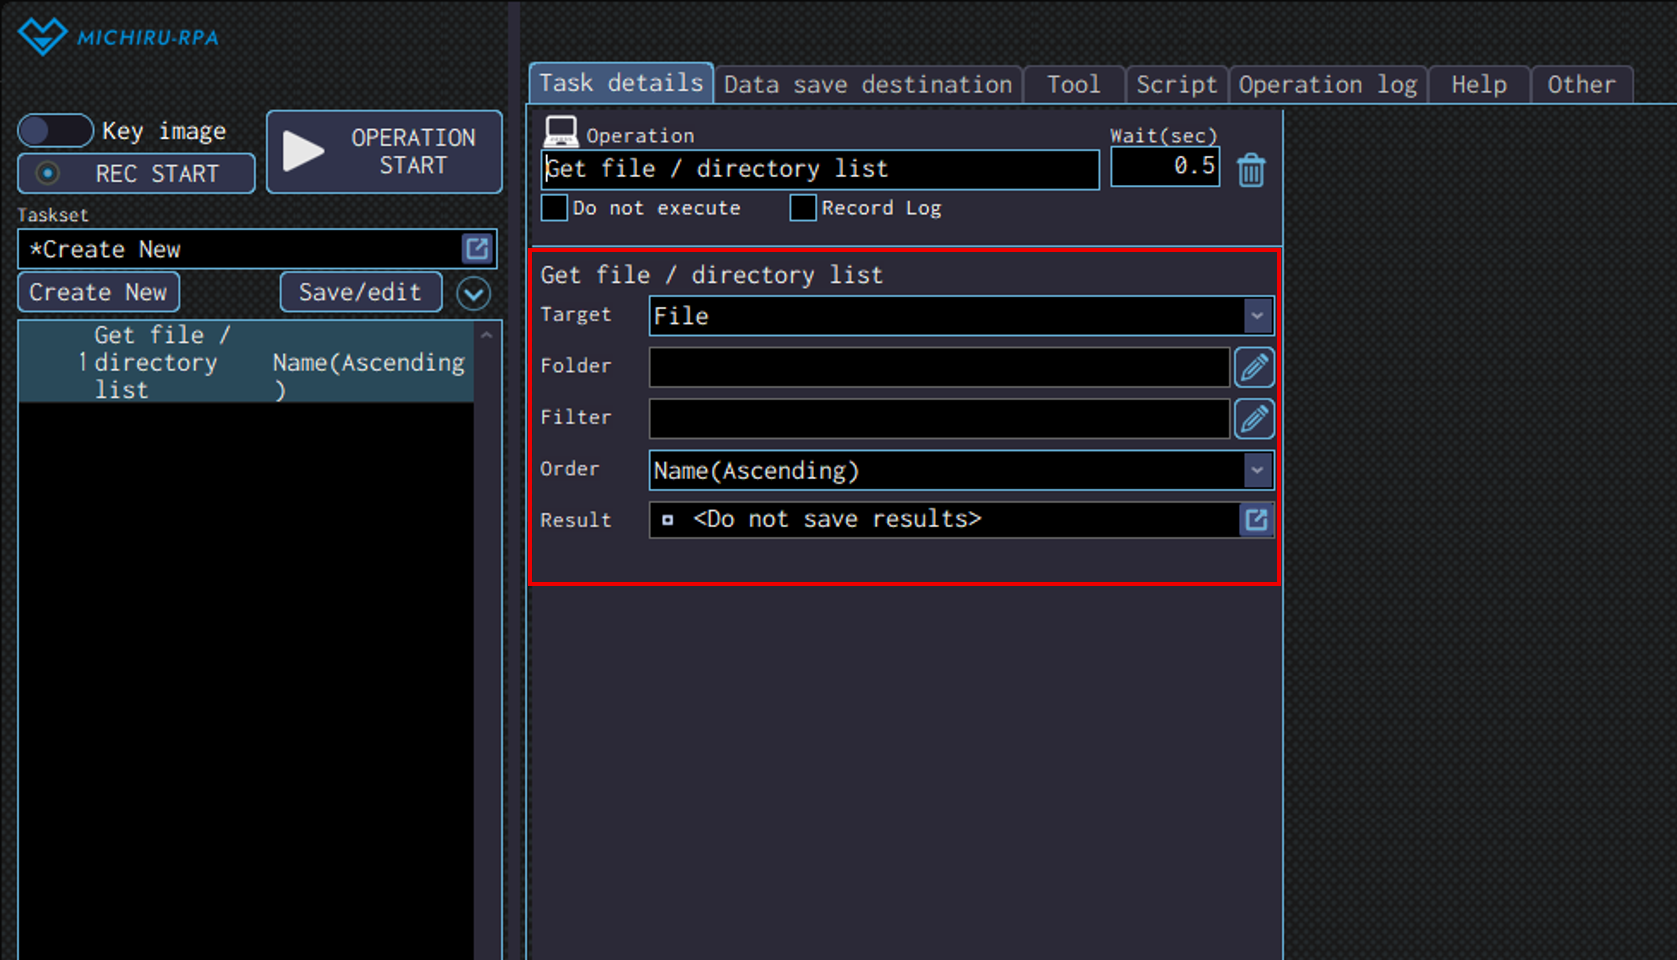
Select the target of retrieval in the dropdown menu.
Here is the list of the target you can select.
| File | Get a list of file names that exist in the specified directory. |
|---|---|
| Directory | Get a list of directory names that exist in the specified directory. |
| File path | Get a list of the file path of files that exist in the specified directory. |
| Directory path | Get a list of the file path of directories that exist in the specified directory. |
Specify the folder to retrieve the data in “Folder” field. If filtering is needed, you can input parts of file or folder name in “Filter” (Examples: .pdf, .txt and etc.).
With the filter configured, only the files or folders that contain the specified text is considered the target of the operation.
Specify the order from which the files or directories is retrieved and put into the list.
You can select from two options available.
| Name(Ascending) | Get the file or folder name in ascending order. |
|---|---|
| Name(Descending) | Get the file or folder name in descending order. |
| Update time(Ascending) | Get the file or folder name in ascending order based on “Last Updated”. |
| Update time(Descending) | Get the file or folder name in descending order based on “Last Updated”. |
Specify the data save destination to save the retreived list in “Result”
Directory creation
Use this operation to create a new diectory (folder) a the specified location.
This is useful when you want to create a new folder while the automation set is running.
For instance, you can use this to store files in folders organized by date, or create a file to collectively store files generated during the processing.
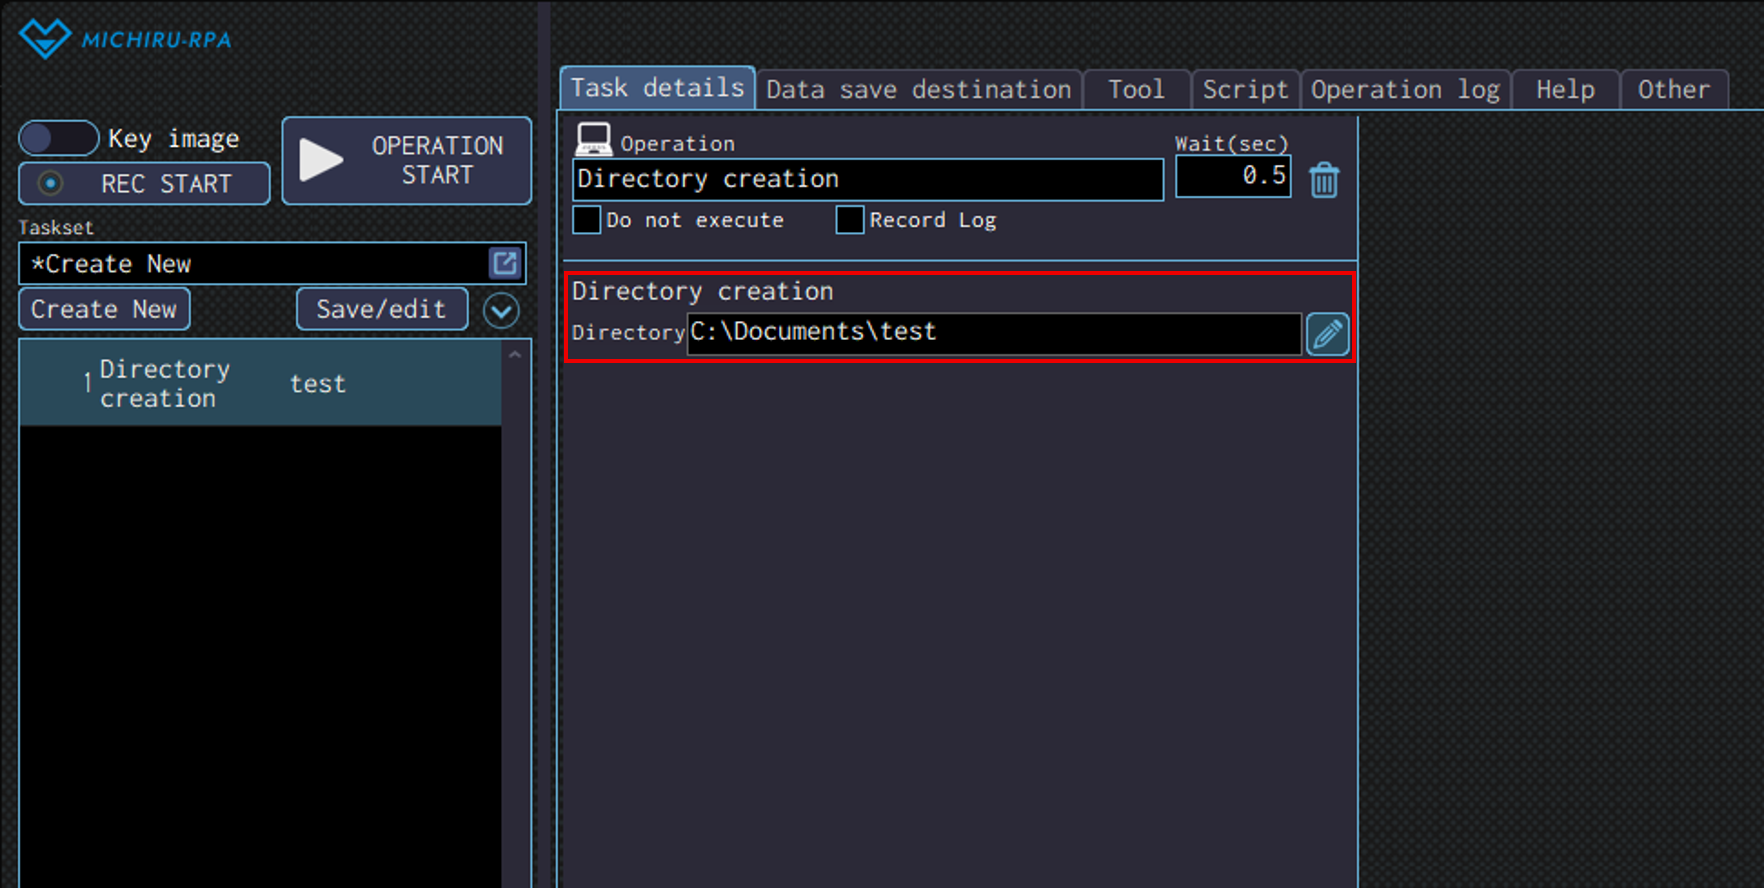
Detailed Setting for Operation
Specify a directory path that includes a new directory name in the “Directory” field. If a directory with the same name already exists, the directory will not be created.
The image below shows the case where a new directory called “test” is to be created in the “Documents” directory.
File writing
Use this operation to write text in a file.
This operation is intended to be used mainly on “.txt” and “.csv” files.
You can use this to record the result of a process, or output retrieved data as a file.
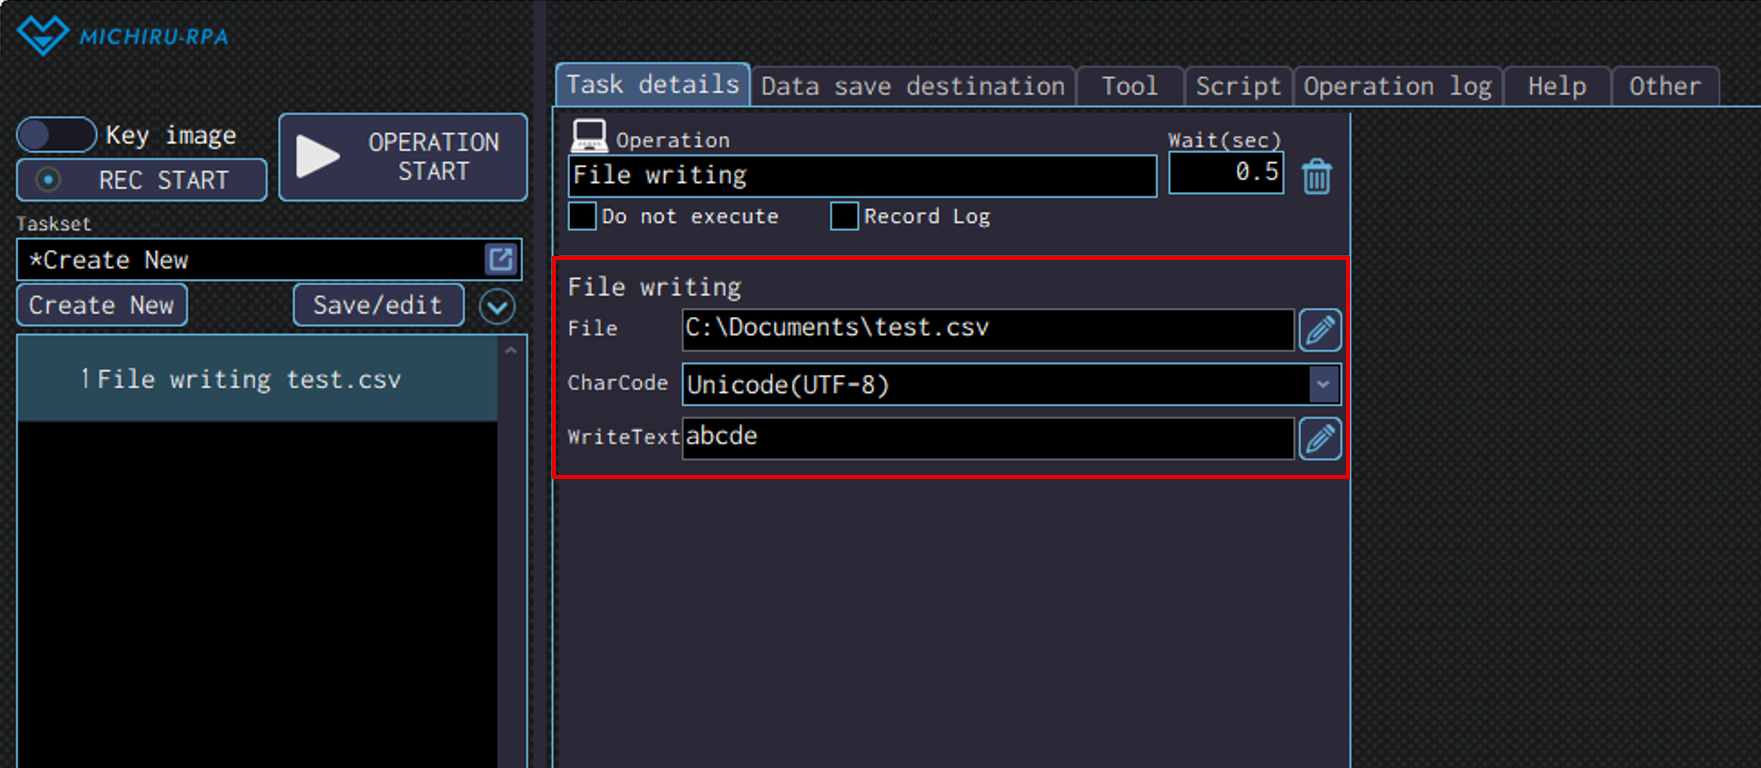
Detailed Setting for Operation
Specify the file path of the file you want to write in, in the “File” field. If the file already exists, it will overwrite the file.
In the “CharCode” dropdown list, you can select the desired character encoding (Shift_JIS, EUC‑JP, Unicode(UTF‑8), Unicode(UTF‑16), Unicode(UTF‑16,big endian)).
The text to write should be input in the “WriteText” field.
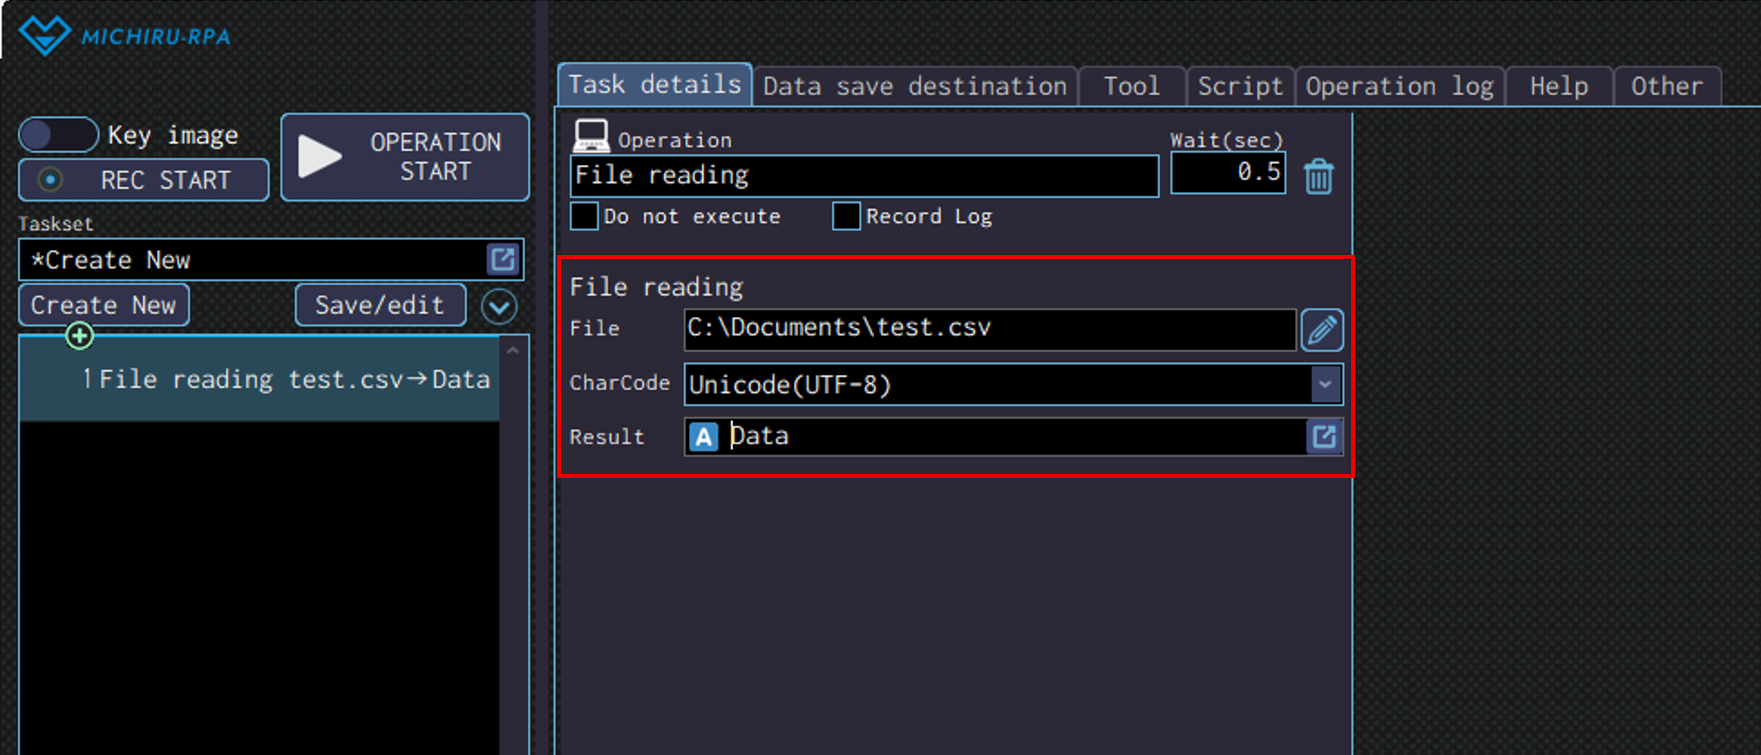
File reading
Use this operation to read text ifrom a file.
This operation is intended to be used mainly on “.txt” and “.csv” files.
Data read with this operation can be stored in data save destination, and later used for other process in the autoation set.
Detailed Setting for Operation
Specify the file path of the file you want to read from, in the “File” field.
In the “CharCode” dropdown list, you can select the desired character encoding (Shift_JIS, EUC‑JP, Unicode(UTF‑8), Unicode(UTF‑16), Unicode(UTF‑16,big endian)).
The text to read will be saved in the data save destination specified in the “Result” field.
File / Directory copy
Use this operation to copy file or directory.
If a directory is selected, all the files and subfolders inside will be copied as well.
The original data remains intact, meaning you are only creating a copy of the data on another location.
Detailed Setting for Operation
Select “File” or “Directory” from the dropdown menu in “Target” box, and specify a file or directory path in the “Copy Src” and “Copy Dst” field.
In the dropdown menu for ” If the Copy Dst file exists”, you will select how the RPA will work when files and directories specified as “Copy Dst” already exist.
The options available depend on the choice you selected for “Target”.
available options when selecting “File” or “Directory” is as shown below.
| Overwrite with Copy Src file | Overwrite the files in Copy Dst with the ones from Copy Src. The files that used to exist in the Copy Dst before the operation is executed will disappear. |
|---|---|
| Skip processing | The files with the same name will not be copied |
| Error stop | It will be considered an error, and the process will be stopped. |
| Collect in the destination | The content of the Copy Scr and the Copy Dst will be merged. The directories that exist in the Copy Dst and have the same name as the directories in the copy Src will be overwritten. If the directories with the same names do not exist, both will be kept. |
|---|---|
| Clear the Copy Dest and rewrite at the Copy Src | The content of the Copy Dst will be cleared, and replaced with th content of Copy Src. The directories that used to exist in the Copy Dst before the operation is executed will disappear. |
| Skip processing | The directories with the same name will not be copied |
| Error stop | It will be considered an error, and the process will be stopped. |
The image below shows the case where “test.txt” file in the ” Documents” directory is copied as “test-copy.txt”.

File / Directory move
Use this operation to move files or directories.
If a directory is selected, all the files and subfolders inside will be moved as well.
Unlike “File / Directory copy”, this operation will move the files or folders to a new location, with the files and folders removed from the original location.
This is useful when moving file that has already been processed, or when sorting and organizing files based on conditions.
Please refer to “File / Directory copy” for more information on how to configure.
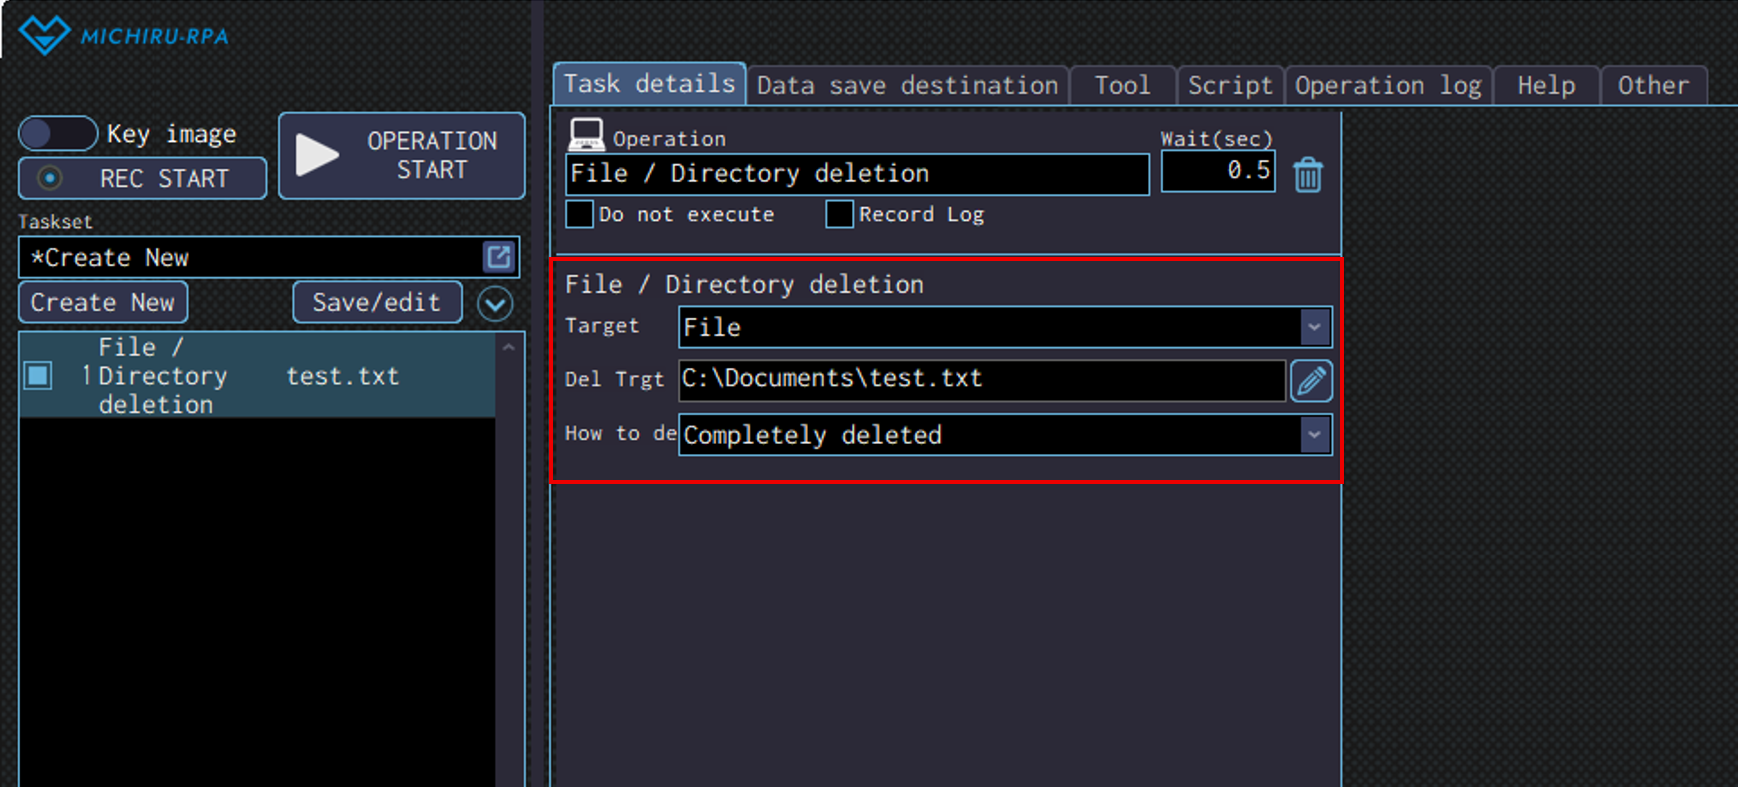
File / Directory delete.
Use this operation to delete files or directories.
If a directory is selected, all the files and subfolders inside will be deleted as well.
This operation can be used to remove unused files, or delete files and folders that are created temporarily during automation process.
Detailed Setting for Operation
Select “File” or “Directory” from the dropdown menu in “Target” box, and specify a file or directory path in the “Del Trgt” field.
In the dropdown menu for “How to del”, you will find the following menu
| Completely deleted | Completely delete the target files or directories. Data cannot be recovered after deletion. |
|---|---|
| Move to trash | Move the target file and directory to Recycle Bin. The target file and directory can be still be restored. |
The image below shows the case where “test.txt” file in the ” Documents” directory is deleted.
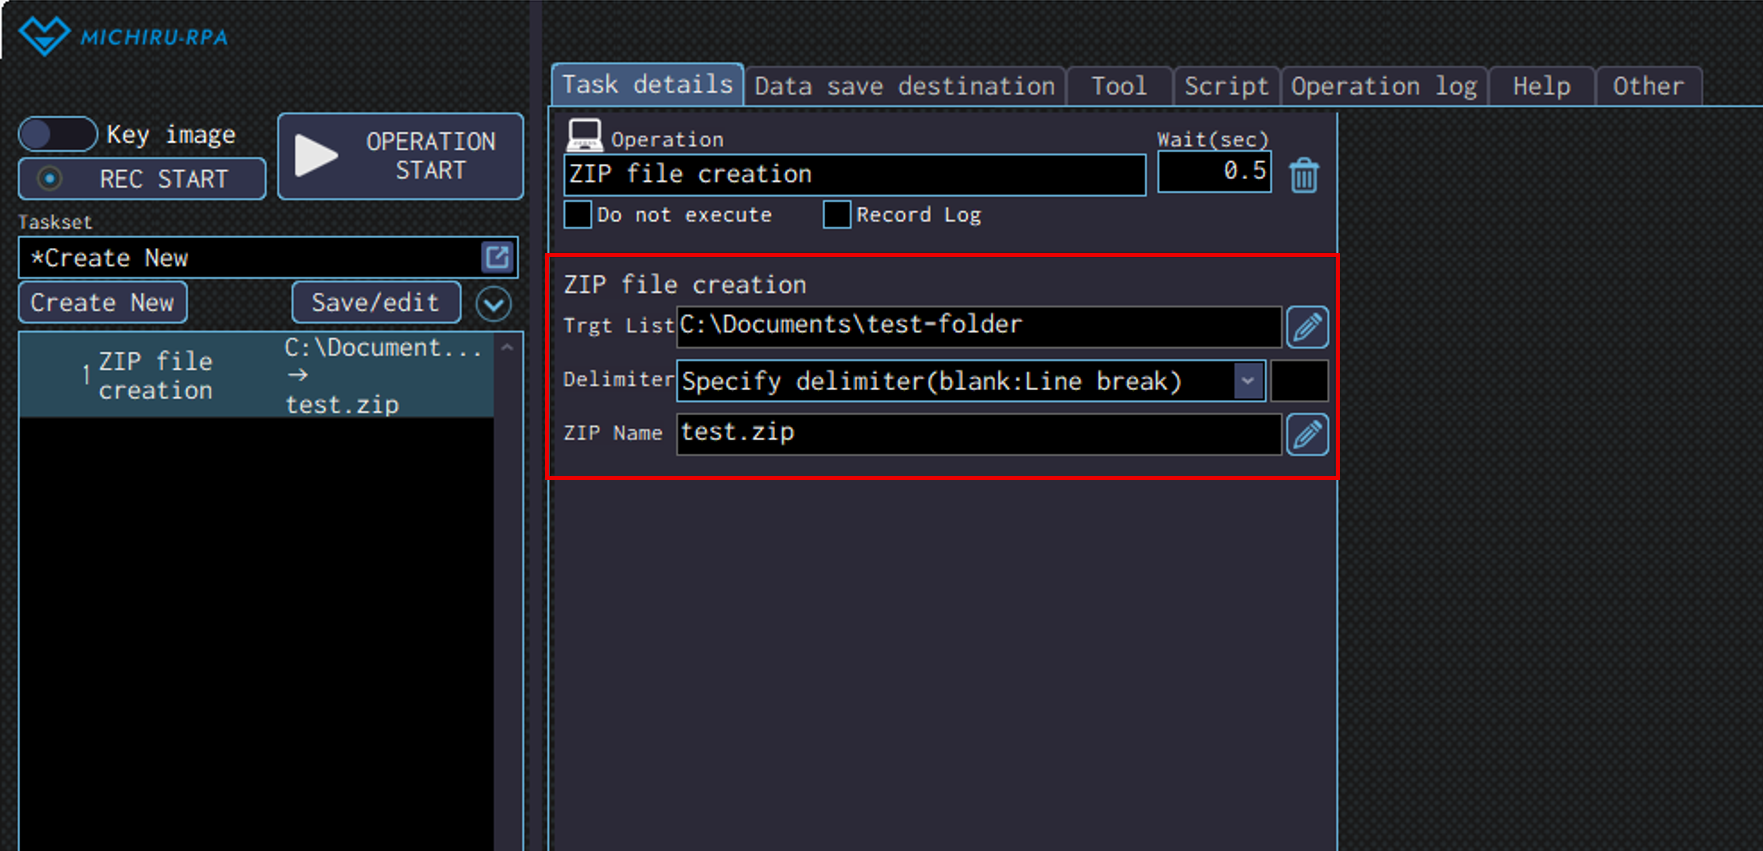
ZIP file creation
Use this operation to compress directories, and create a ZIP file
Detailed Setting for Operation
Specify the file or directory to be compressed in the “Trgt List” field.
You can specify multiple files and directories by connecting each with delimiters.
When specifying multiple files or directories, choose the delimiter used (line break, comma, TAB) from the “Delimiter” menu. You do not need to choose from the menu when only a single file or directory is selected.
In “ZIP Name” field, specify the name of the ZIP file to be output.
If the file extension in the file path is not specified as “.zip”, change it to “.zip”.
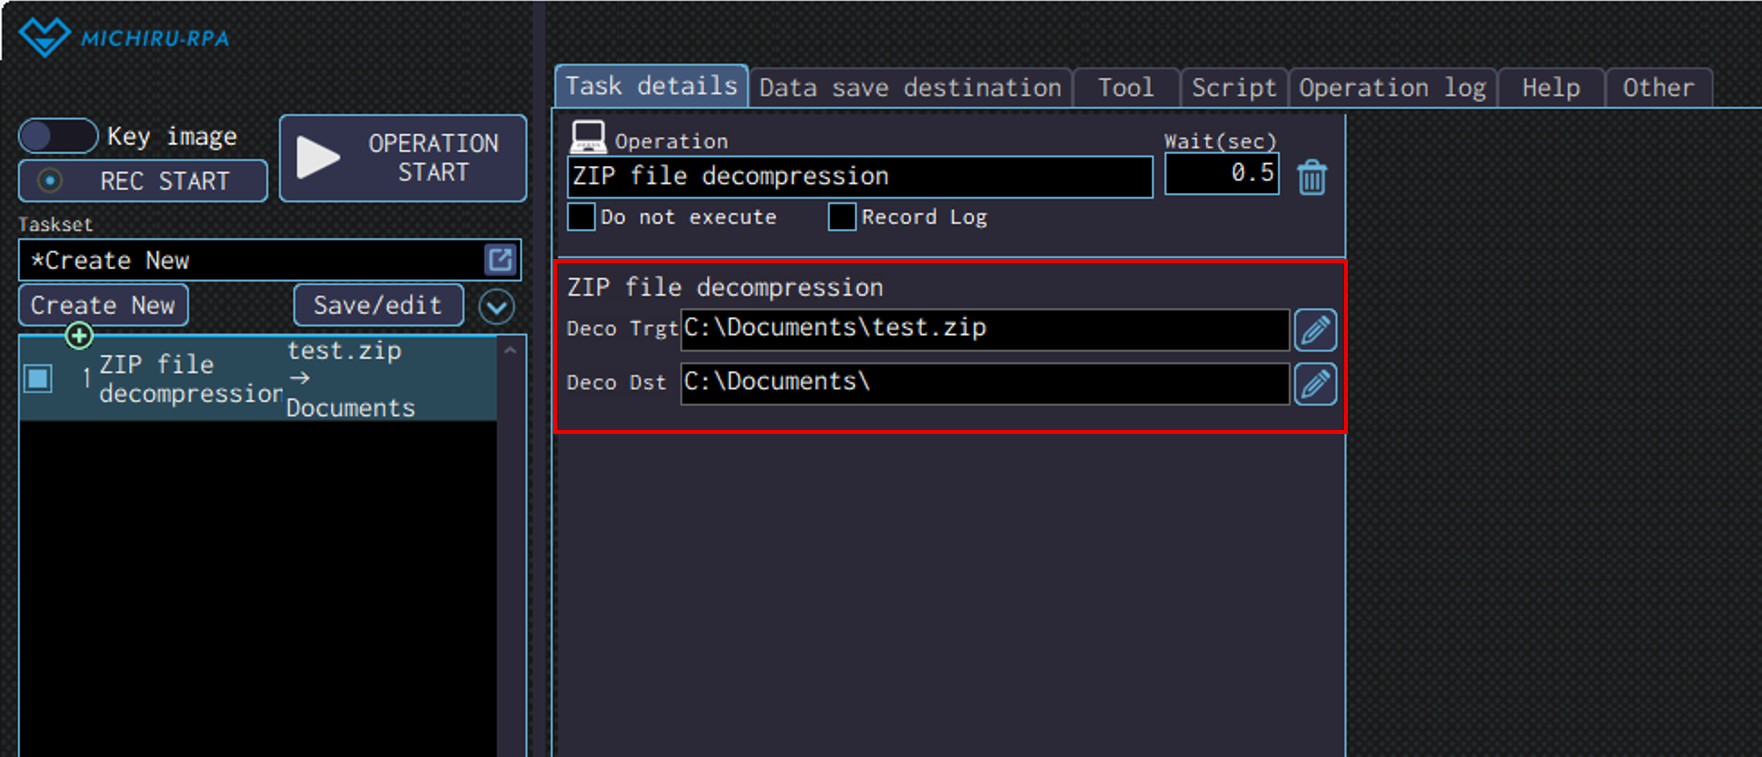
ZIP file decompression
Use this operation to extract or decompress a ZIP file.
Detailed Setting for Operation
Specify the file path of the ZIP file in “Deco Trgt”, directory path in “Deco Dst” field.
If directory specified in the field do not exist, the directory will be created before decompressing the ZIP file in the location.
The image below shows the case where “‘test.zip” in the “Documents” directory is decompressed to the same directory.
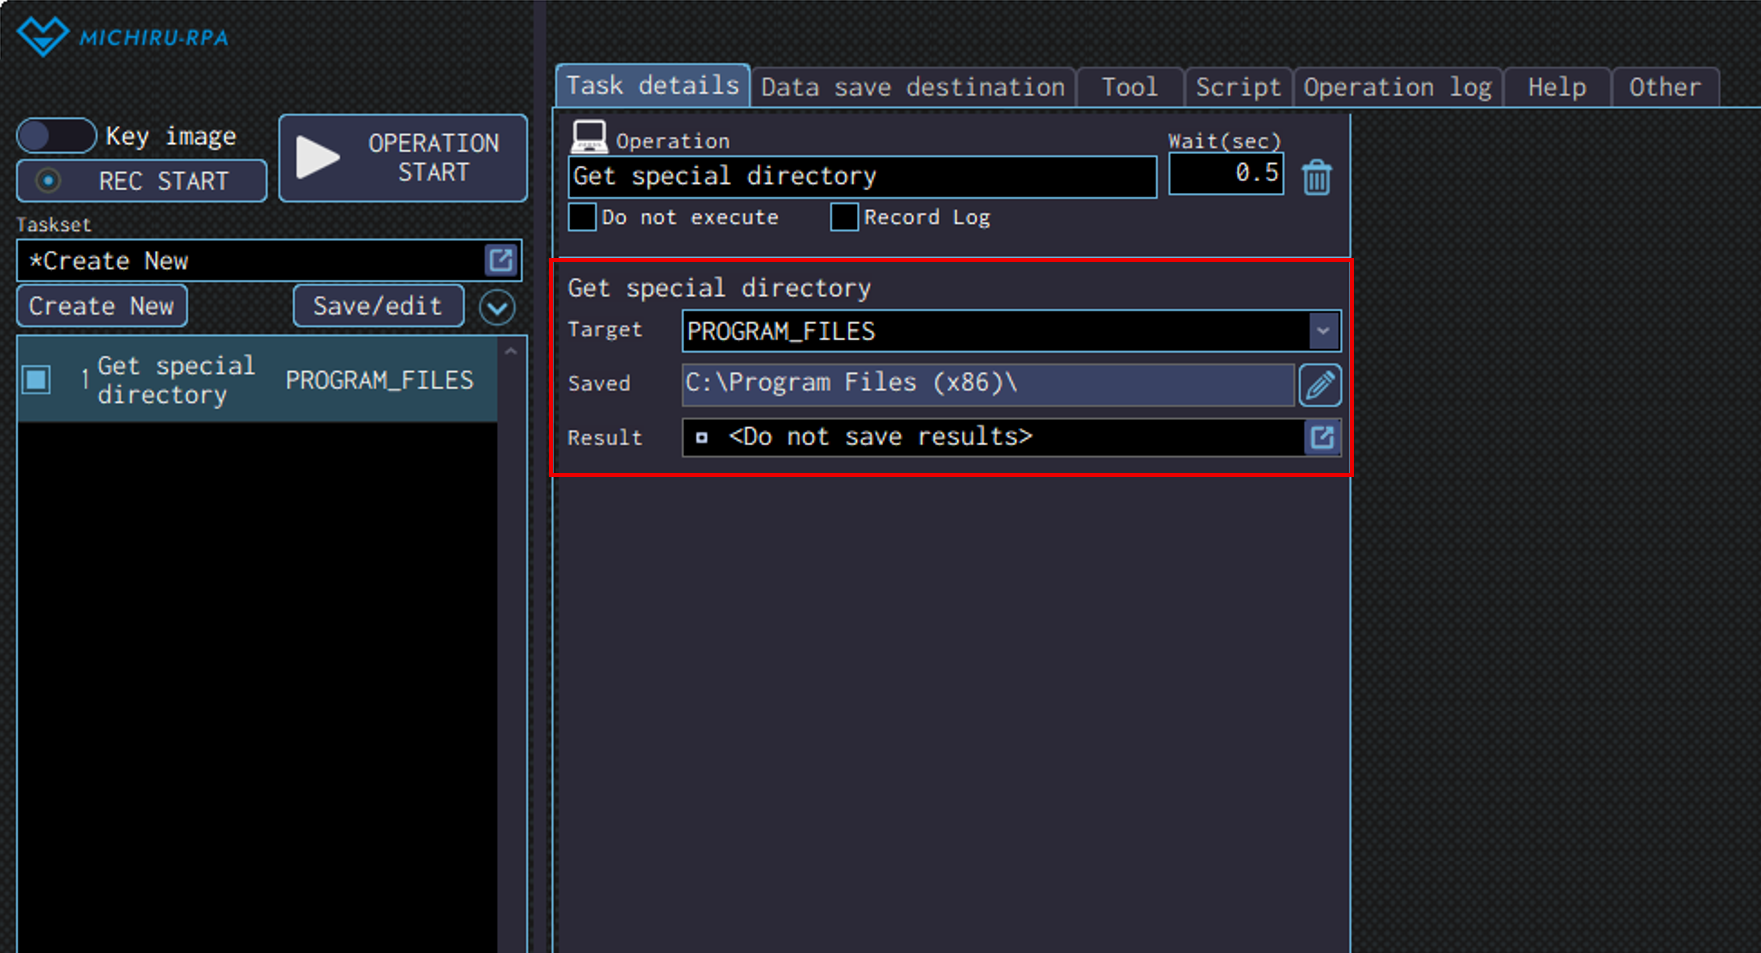
Get special directory
Use this operation to get the path of various directories defined by Windows.
This operation can be used to automatically retrieve folder locations that differ depending on the PC. This is very useful when you wan to make sure the same automation set operate correctly on any PC, even if folder structures vary by user or device.
For example, you can make the RPA download a file to a folder that is on the desktop of any PC by using this operation.
Specify the type of directory in the “Target” dropdown menu. Here is the table containing the options available.
| DESKTOP FAVORITES FONTS PERSONAL PROGRAM_FILES PROGRAMS STARTUP WINDOWS | SENDTO APPDATA TEMPLATES COMMON_STARTMENU COMMON_PROGRAMS COMMON_DESKTOPDIRECTORY COMMON_APPDATA COMMON_DOCUMENTS | COMMON_PICTURES COMMON_FAVORITES COMMON_ADMINTOOLS ADMINTOOLS LOCAL_APPDATA SYSTEM PROGRAM_FILES_COMMON PROFILE |
In “Saved ” field, the preview of the directory path to will be saved is shown.
This is automatically generated. Specify the data save destination to save the directory path in “Result” field.
Browser operation
Click
This is the same as “Click” in “Mouse operation”.
Please refer to that for details on how to use.
Text input
This is the same as “Text input” in “Text operation”.
Please refer to that for details on how to use.
Select from list
This is the same as “Select from list” in “Text operation”.
Please refer to that for details on how to use.
Select checkbox
This is the same as “Select checkbox” in “Text operation”.
Please refer to that for details on how to use.
Get element information
This is the same as “Get element information” in “Text operation”.
Please refer to that for details on how to use.
Get elements count
This is the same as “Get elements count” in “Text operation”.
Please refer to that for details on how to use.
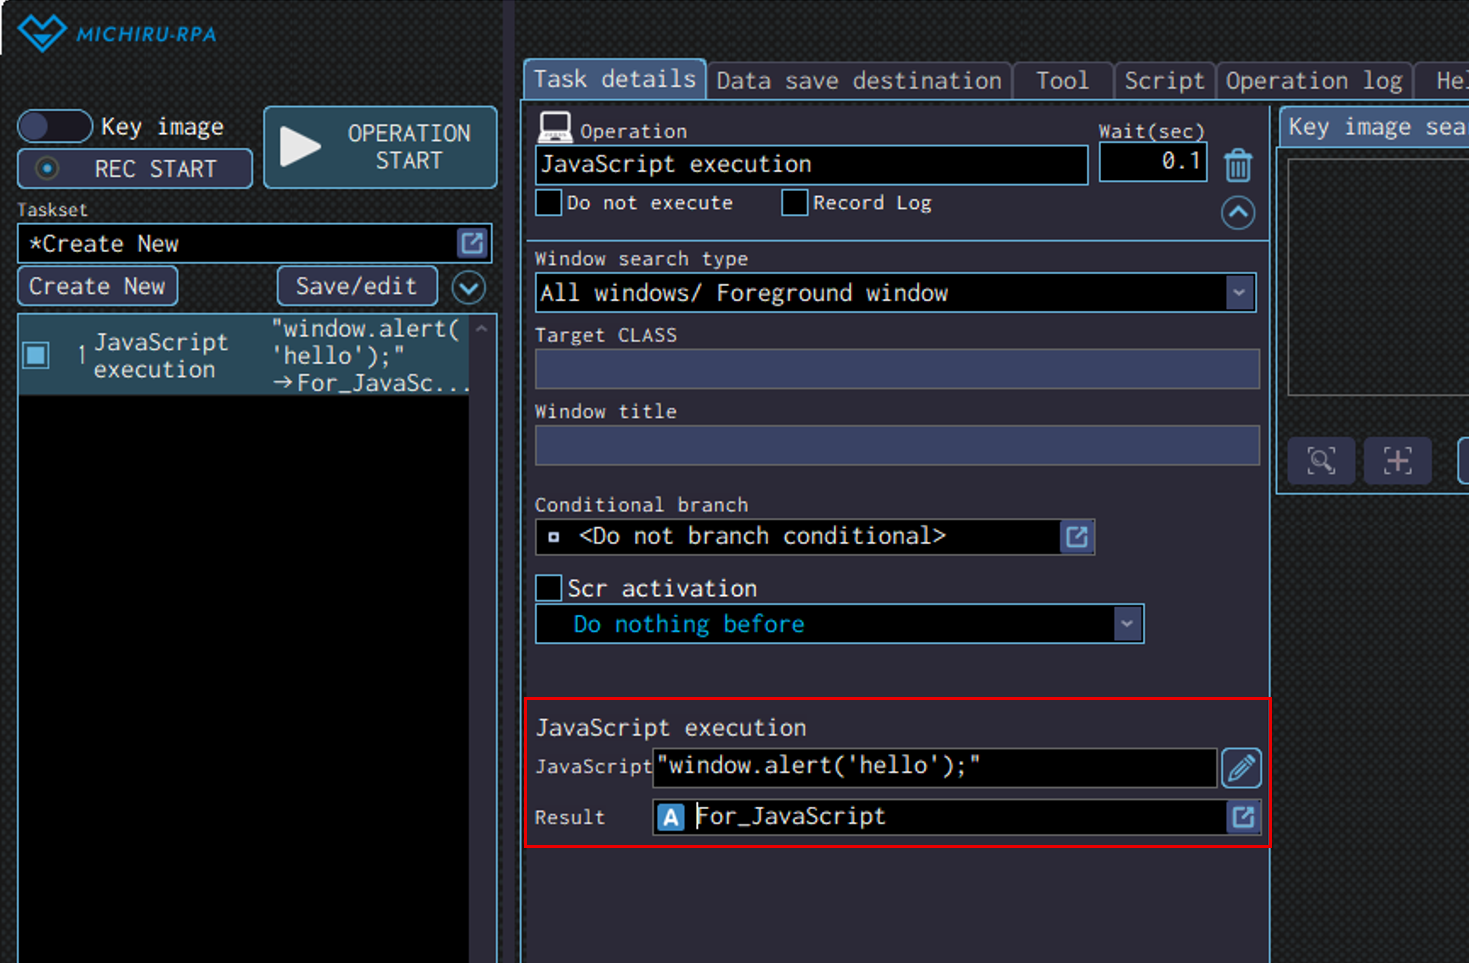
JavaScript execution
Use this to execute JavaScript on web pages.
Usings JavaScript allows for creating highly flexible operations.
JavaScript knowledge is required to use this.
Detailed Setting for Operation
Enter the JavaScript code to be executed in the “JavaScript” field.
For long and multi- line code, click the pencil icon on the right.
Wrap the entire code in double qoutes (” “), and use single quotes (‘ ‘) for strings within the code.
Specify the data save destination for the value returned from the JavaScript.
If you use command like “Console.log” within the Javascript, the logged value will be saved to the specified data save destination.
MICHIRU browser operation
Operations in the category use MICHIRU browser, a dedicated web browser for MICHIRU RPA.
It is used to automate processes on web pages.
For more information on how to use MICHIRU browser and Xpath, please refer to this page.
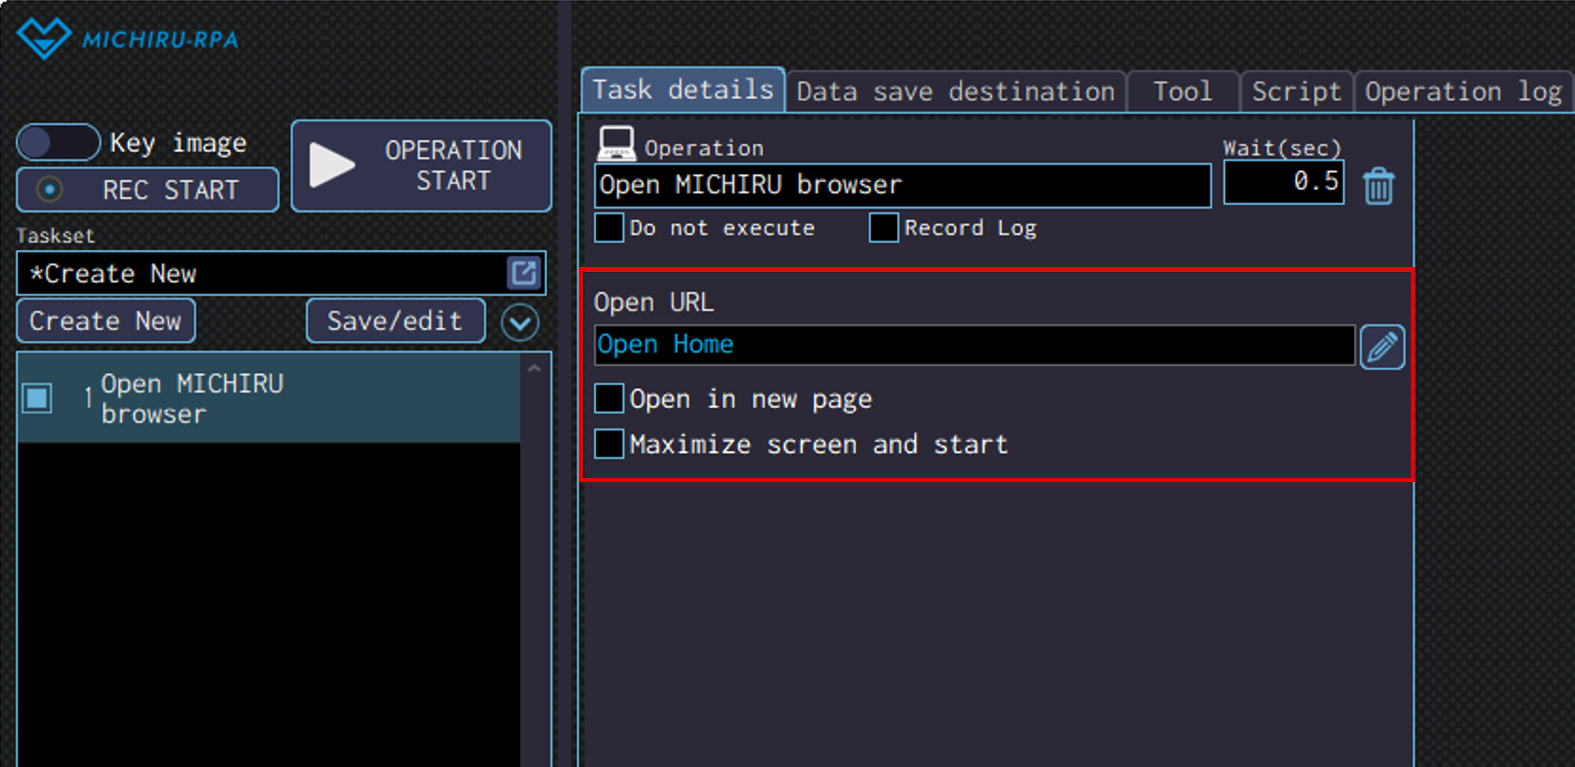
Open MICHIRU browser
Use this operation to launch MICHIRU browser
Detailed Setting for Operation
Specify the URL in the “OpenURL” field.
If no URL is specified, home screen will be launched.
Check on “Open in new page” if you want a new page to be created.
Also, Check on “Maximize screen and start” if you want the screen to be maximized when launched.
Click
This is the same as “Click” in “Mouse operation”.
Please refer to that for details on how to use.
Text input
This is the same as “Text input” in “Text operation”.
Please refer to that for details on how to use.
Select from list
This is the same as “Select from list” in “Text operation”.
Please refer to that for details on how to use.
Select checkbox
This is the same as “Select checkbox” in “Text operation”.
Please refer to that for details on how to use.
Get element information
This is the same as “Get element information” in “Text operation”.
Please refer to that for details on how to use.
Get elements count
This is the same as “Get elements count” in “Text operation”.
Please refer to that for details on how to use.
JavaScript execution
This is the same as “JavaScript execution” in “Browser operation”.
Please refer to that for details on how to use.
Close Page
Use this operation to close a page in MICHIRU browser.
If multiple pages is available in MICHIRU browser, you will be directed to other page.
If only a single page is available, you will be directed to the home screen of MICHIRU browser.
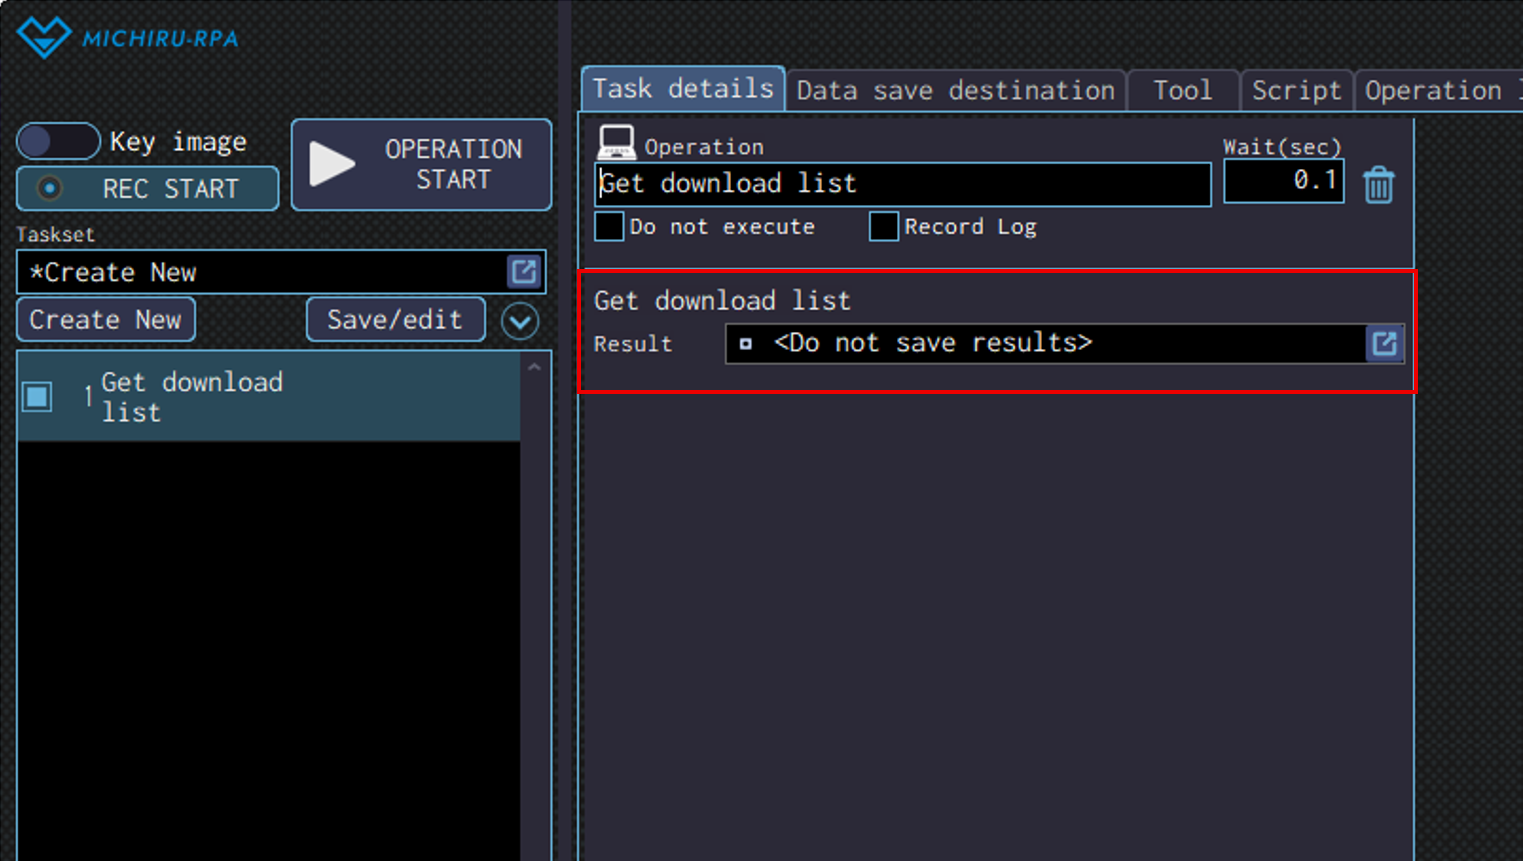
Get download list
Use this operation to get this list of downloaded files in MICHIRU browser.
Specify the data save destination to save the list of file path you get in the “Result” field.
The full file path for each file downloaded will be stored in the data save destination sorted by the downloaded date and time in descending order.
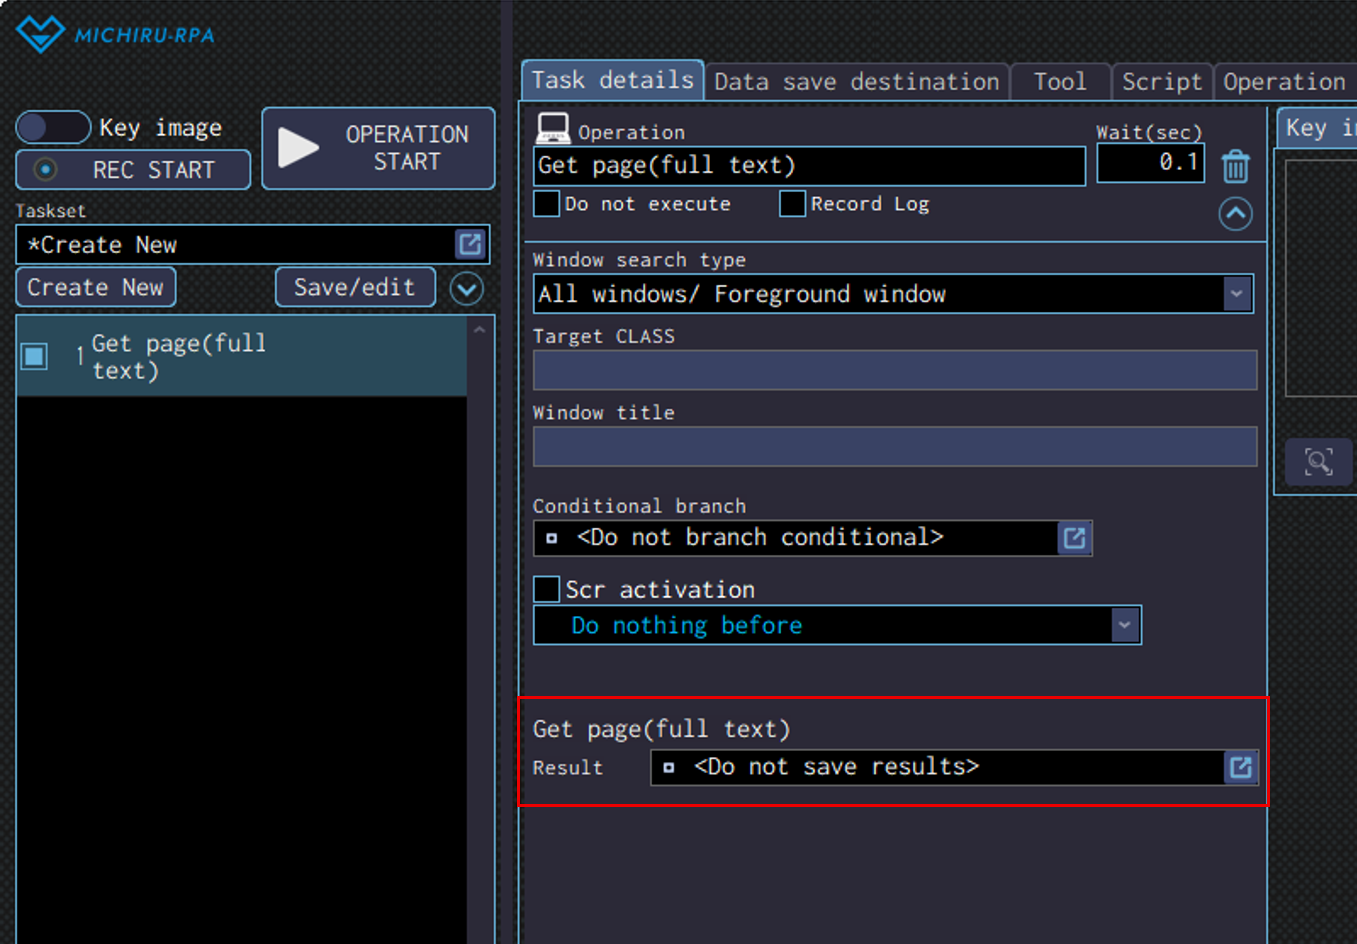
Get page(full text)
Use this operation to extract all text displayed in a webpage when using MICHIRU browser.
Specify the data save destination to save the extracted text in the “Result” field.
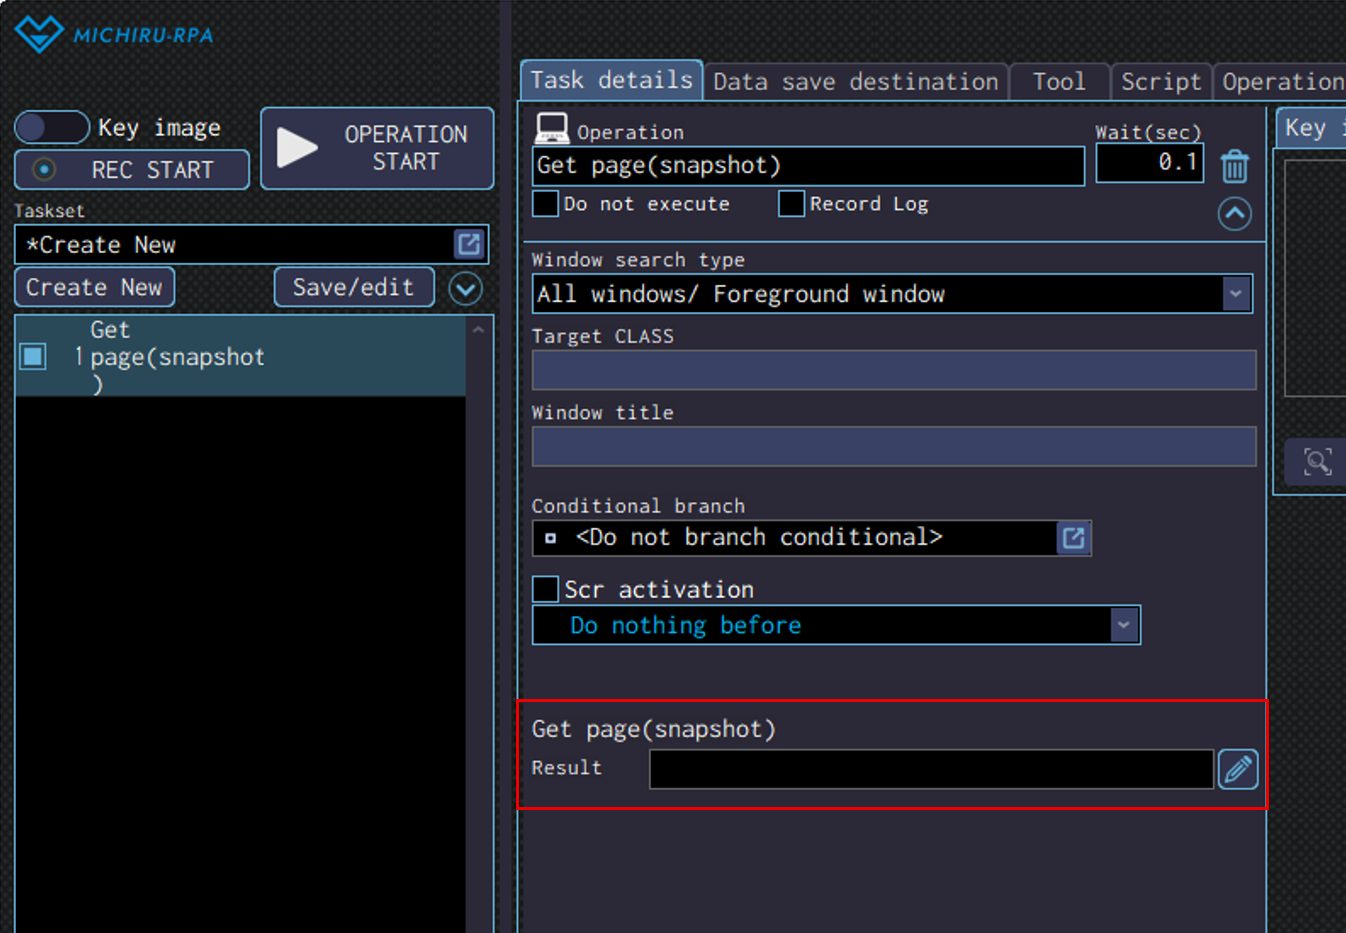
Get page(snap shot)
Use this operation to save an image file (Bitmap) of the displayed screen when using MICHIRU browser.
Specify the file path to save the image file in the”Result” field.
This image file cannot be saved in MICHIRU RPA’s data save destination.
Get page(full PDF)
Use this operation to save an image of the displayed screen as a PDF file when using MICHIRU browser.
Please refer to “Get page(snap shot)” for more information on how to configure.
Print page
Use this operation to open the print dialog for the displayed web page in MICHIRU browser.
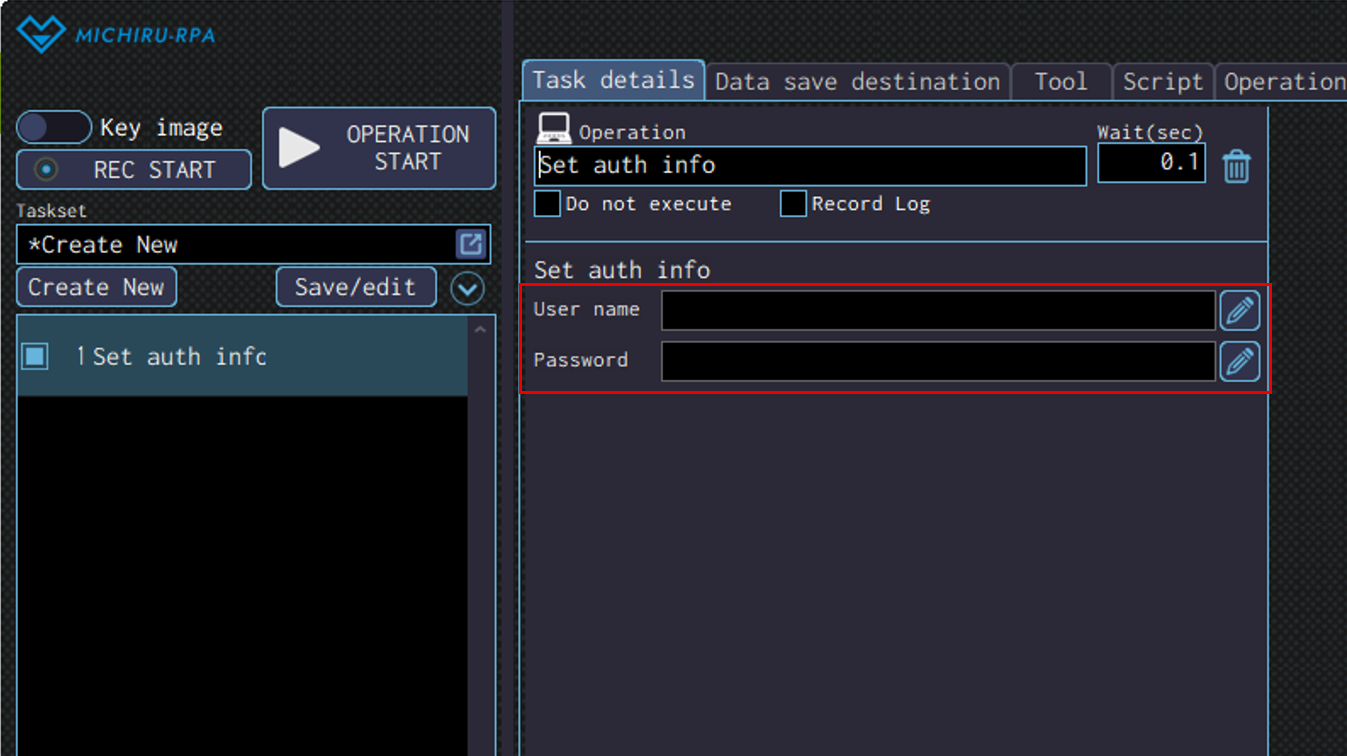
Set auth info
Use this operation to attempt authentication on a Basic authentication screen displayed in the MICHIRU browser.
Specify the user name in the “User name” field, the password in the “Password” field for authentication.
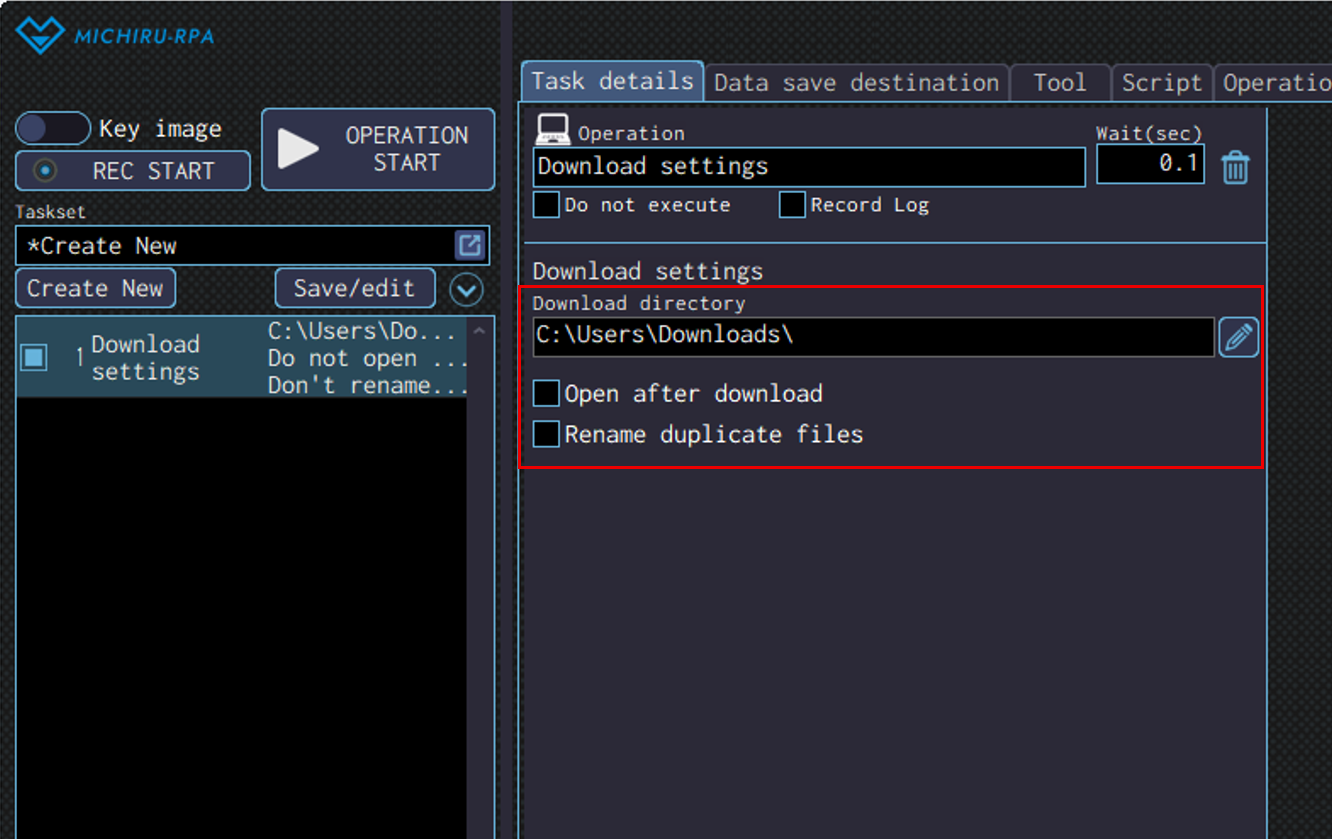
Download settings
Use this operation to configure how MICHIRU browser will handle downloading files
Detailed Setting for Operation
Specify the directory path for saving the downloaded files in the “Download directory” field.
Check on “Open after download” if you want to open files after downloading.
Check on “Rename duplicate files” to avoid file name duplication when a file with the same name alread exists at download time.
The setting configured by this operation will be saved for MICHIRU browser until new changes are made.
PDF operation
PDF operation is added to MICHIRU RPA in version Ver.1.4.1.0.
Get PDF text
Use the operation to get the text data from PDF file.
This operation works only when the PDF contains text data.
*This operation is added to MICHIRU RPA in version Ver.1.4.1.0
Enter the file path of the target PDF file to the “PDF File path” field.
If the target PDF file is protected by password, you can put the password to the file in the “Password” field.
In the “Page number” drop-down menu, you can select from “All pages”, “Specify page”, “Specify range” to specify the number of the pages in the PDF to set as the target of the operation.
For “Specify page” and “Specify range”, you will have to specify the pages using number.
In the “Text acquisition range” drop-down menu, you can select from “All text” and “Specify text range”.
When “Specify text range” is selected, you will be able to get only the text from the part specified.
Specify a data save destination to store the retrieved data in the “Result” field.

Specify text range
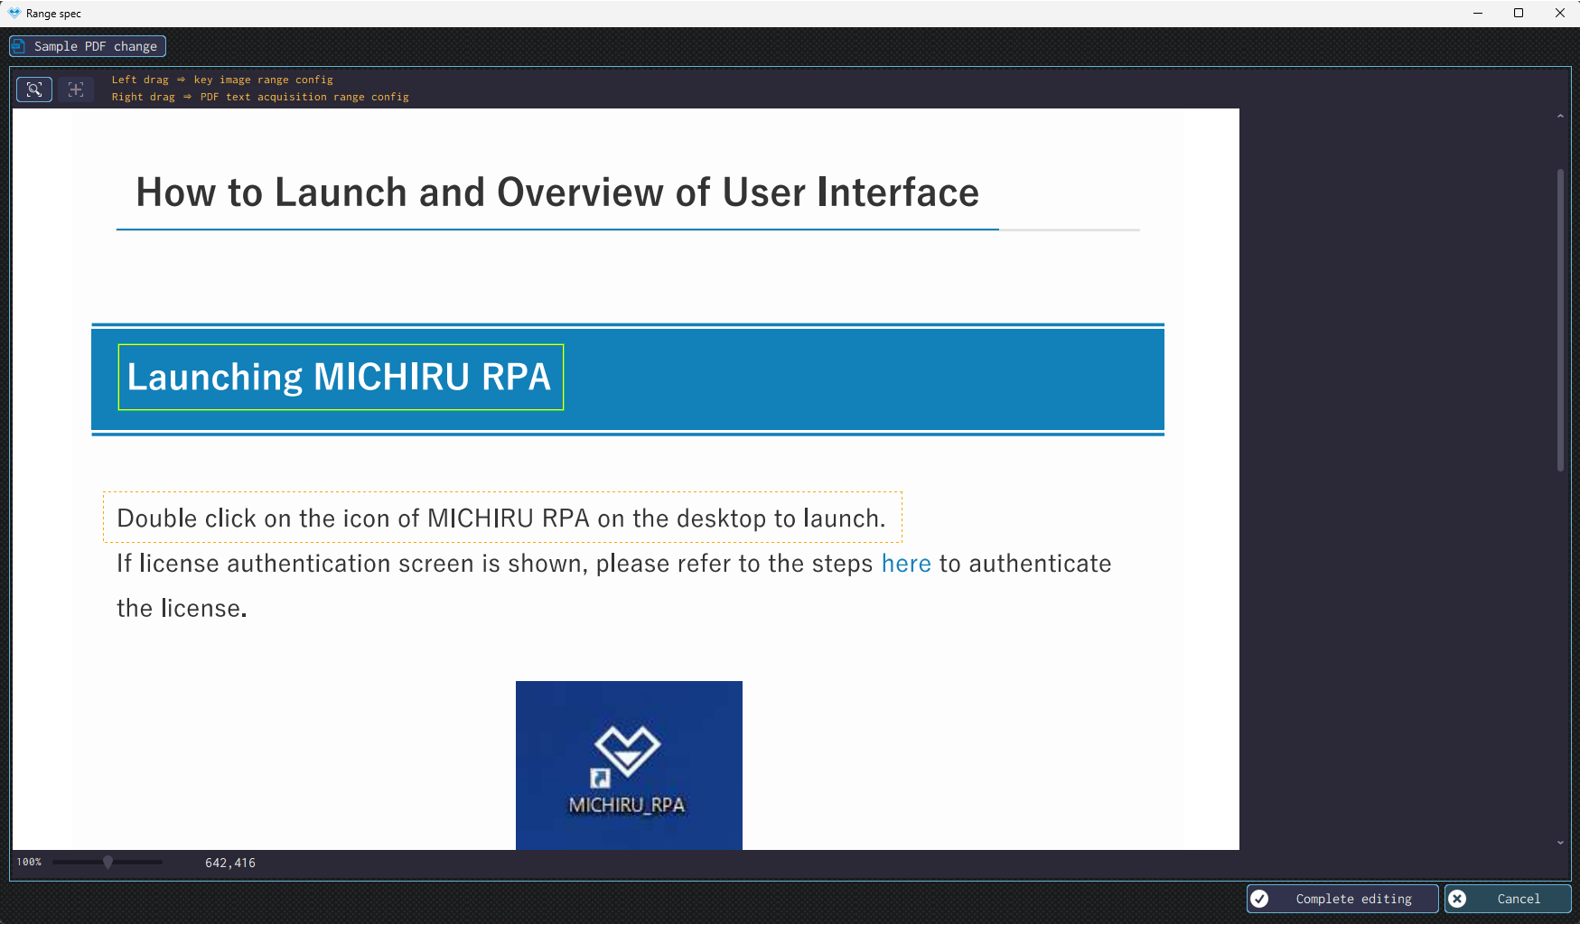
Here are the steps to configuring the operation so that it get only the text from the specified part.
Select “Specify text range” from the “Text acquisition range” drop-down menu.
Click on “Range spec” button in the “PDF key image search” subtab.
In the “Sample PDF” window that appears, click the arrow button to select the target page, then click “Reflect image settings” to complete the setting.
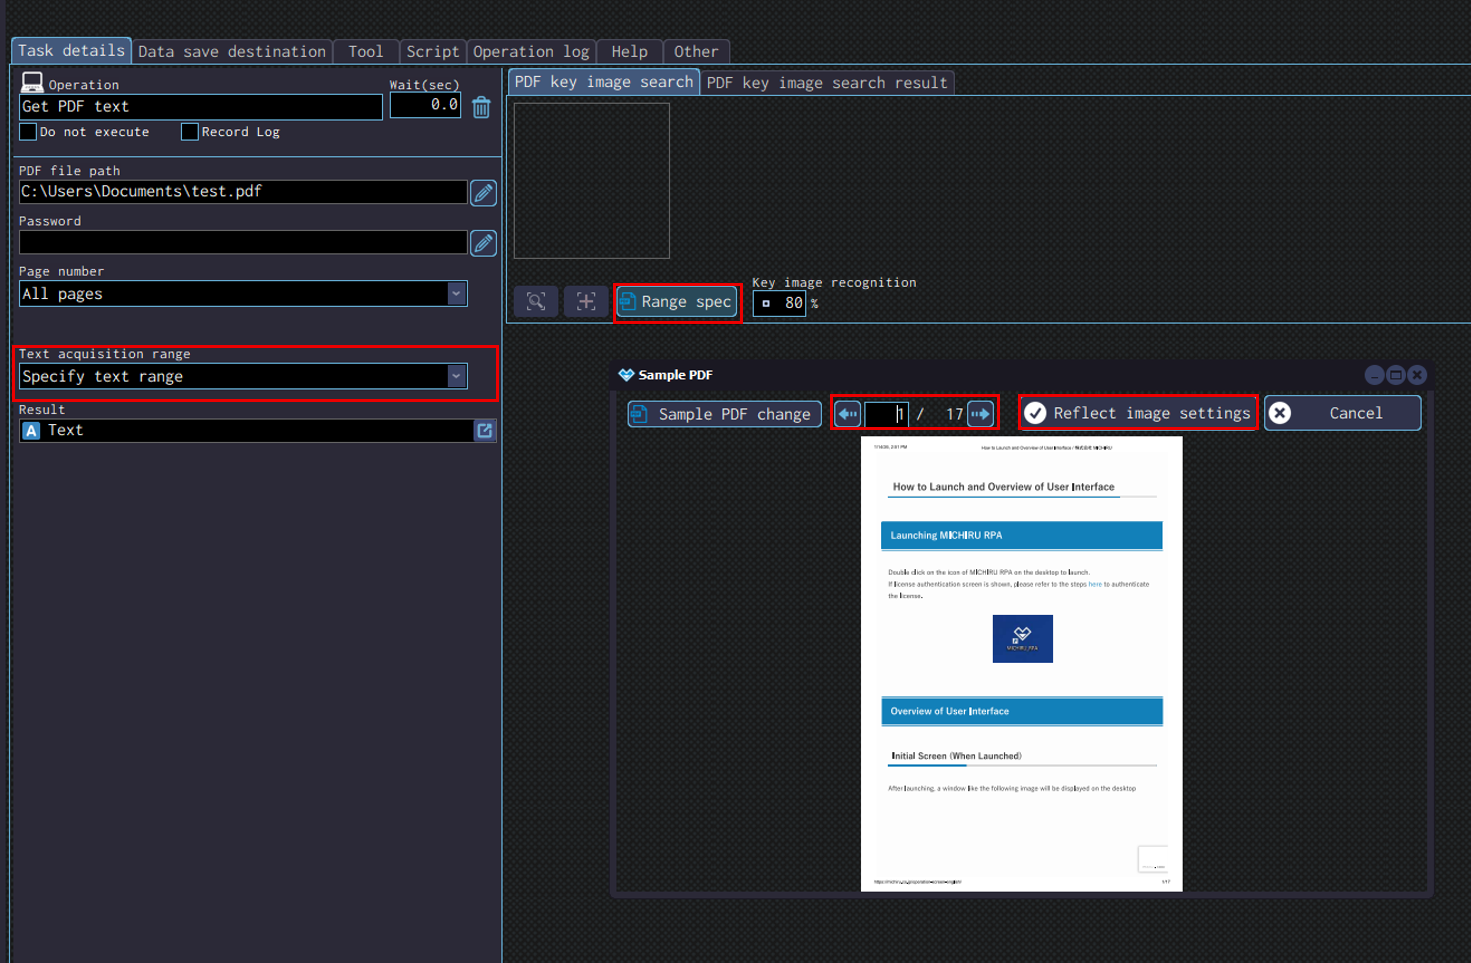
In the “Range spec” window, left-drag over the area to set as the reference point (key image).
Then, right-drag over the area to get text data (inidicated by dashed ouline).
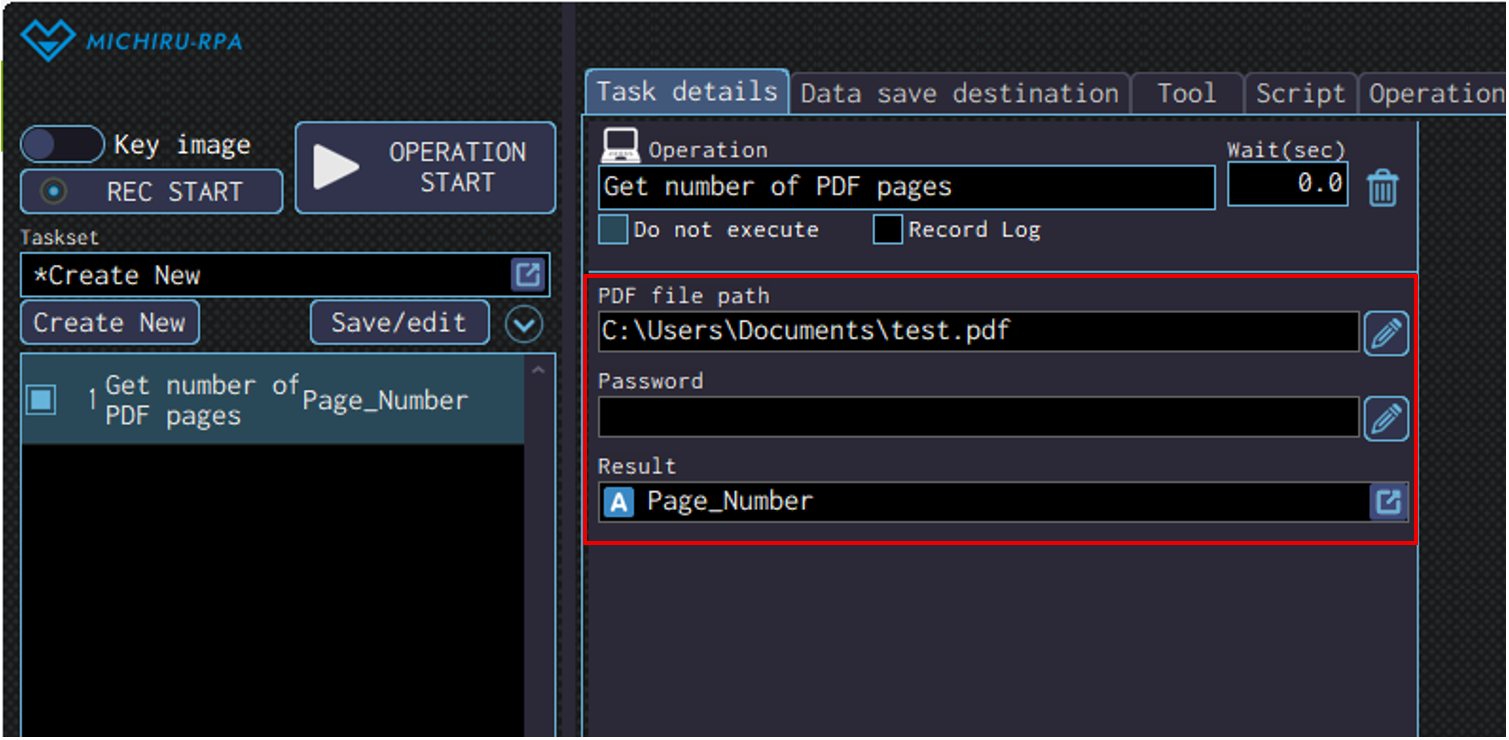
Get number of PDF pages
Use this operation to get the number of pages available in a PDF file.
*This operation is added to MICHIRU RPA in version Ver.1.4.1.0
Enter the file path of the target PDF file to the “PDF File path” field.
If the target PDF file is protected by password, you can put the password to the file in the “Password” field.
Specify a data save destination to store the retrieved data in the “Result” field.
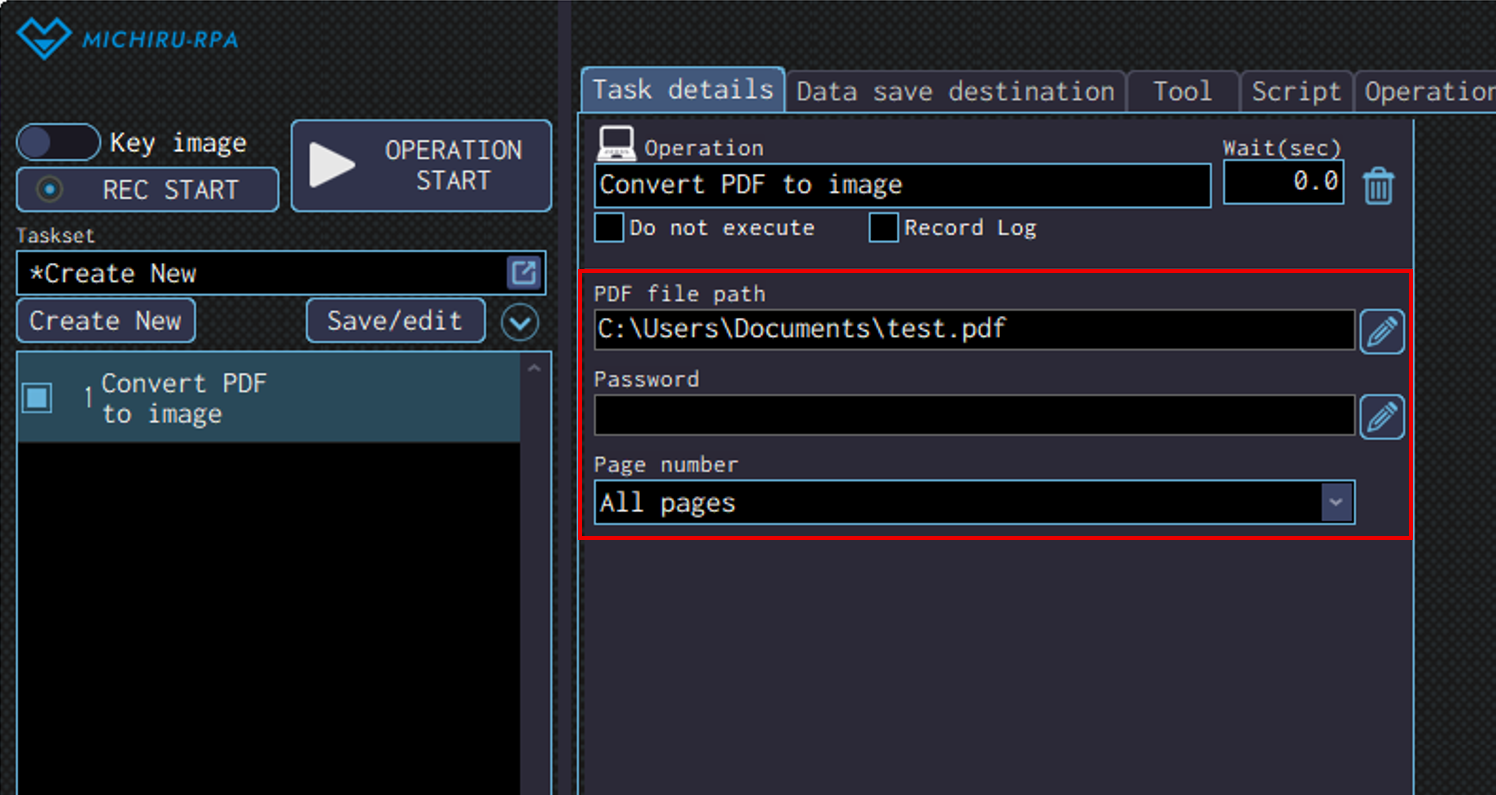
Convert PDF to image
Use this to convert PDF file to image.
*This operation is added to MICHIRU RPA in version Ver.1.4.1.0
Enter the file path of the target PDF file to the “PDF File path” field.
If the target PDF file is protected by password, you can put the password to the file in the “Password” field.
In the “Page number” drop-down menu, you can select from “All pages”, “Specify page”, “Specify range” to specify the number of the pages in the PDF to set as the target of the operation.
For “Specify page” and “Specify range”, you will have to specify the pages using number.
Images generated for each page are saved in t bitmap format in the same directory as the target PDF file.
Example: When converting page 1~3 of the “test.pdf” PDF file to image, “test_1.bmp”, “test_2.bmp”, and “test_3.bmp” will be generated as image files.
Notification
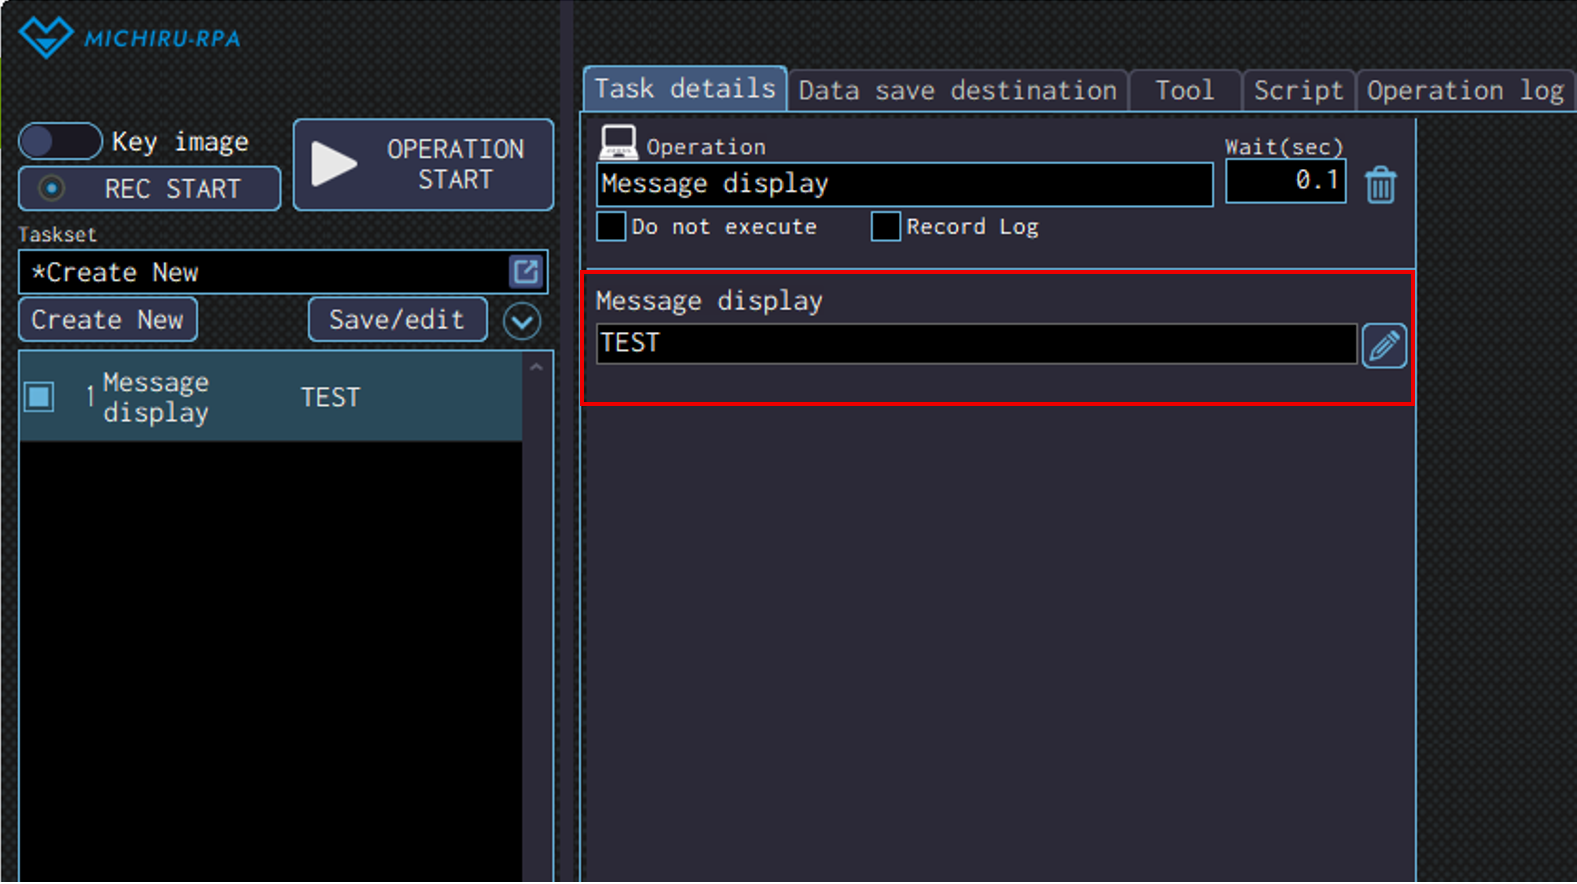
Message display
Use this operation to display message in a pop-up window.
Input message to be displayed in the “Message display” field.
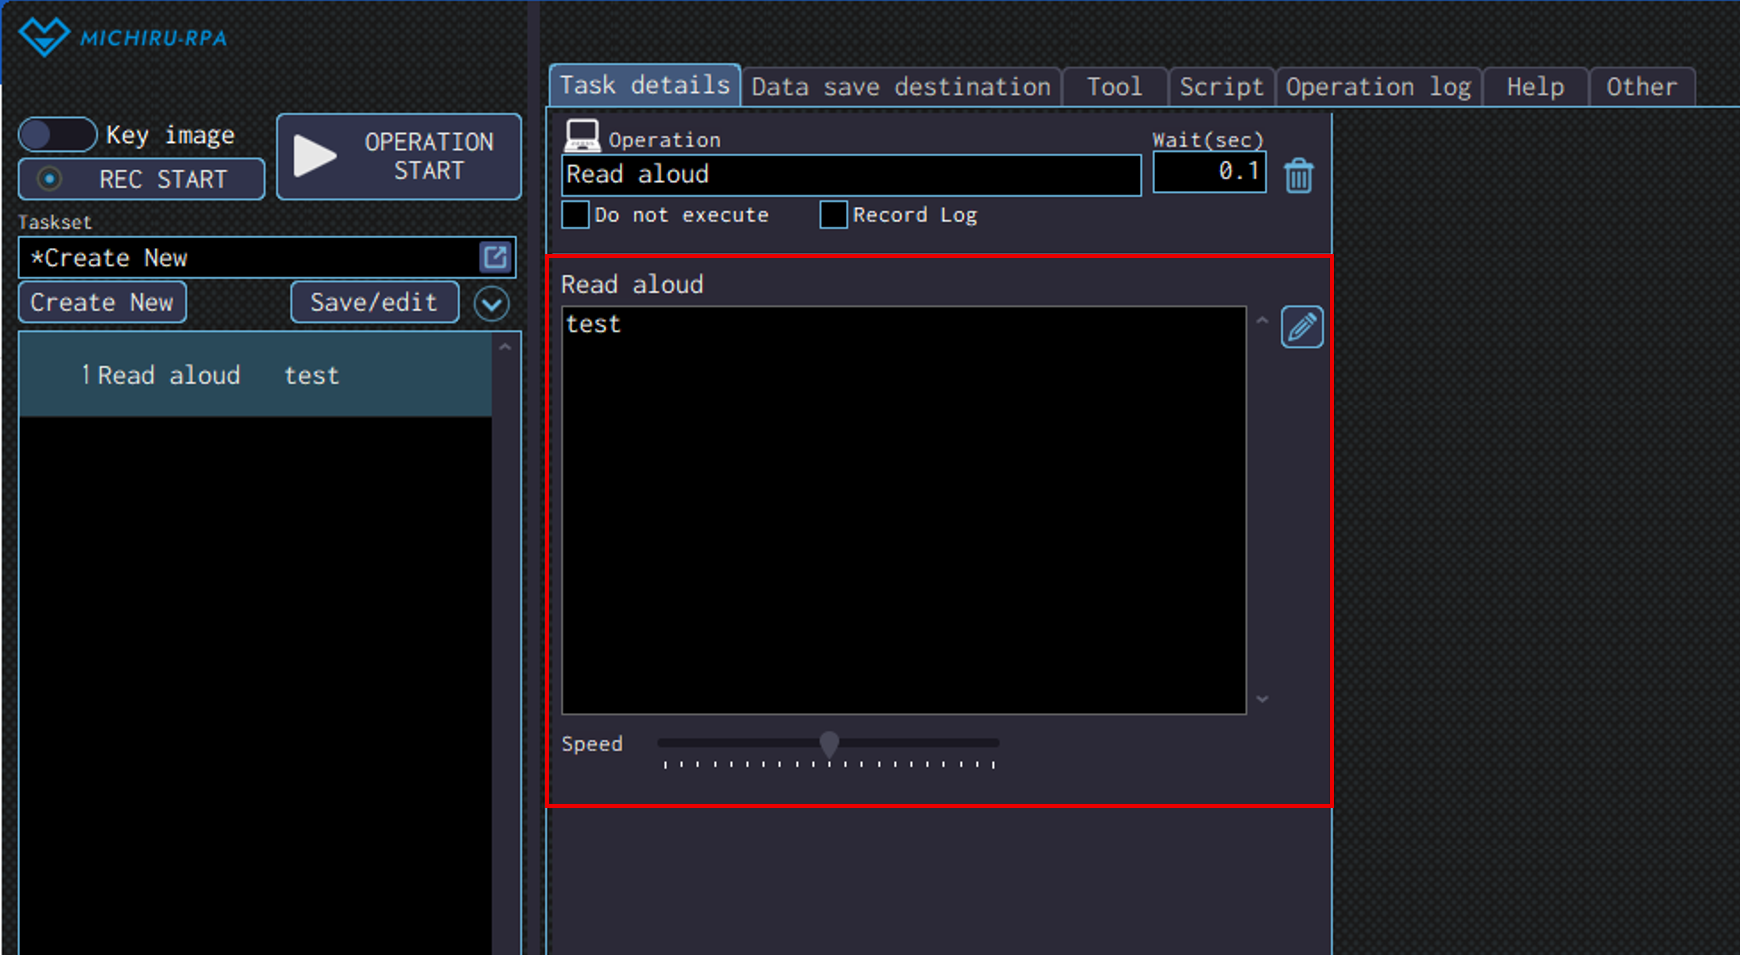
Read aloud
*This operation currently supports only Japanese. Text input using alphabets will be read with Japanese pronunciation.
Use this operation to make the RPA read out the specified content aloud using text-to-speech.
Specify the text to be read out in the “Read aloud” field. Adjust the speed of speech using the “Speed” bar.
LINE Send
Use this to send message using LINE.
A LINE Official Account must be created beforehand.
Registering LINE Messaging API
First, you will create a LINE Official Account.
For more information regarding the steps to creating the account, please refer to “Home | LINE Official Account Help Center“.
Log in to the “LINE Official Account Manager” and enable the Messaging API.
For detailed guide on how to enable the Messaging API, please refer to “Get started with the Messaging API” from the official source.
- Log in to “LINE Developers Console” using the account from STEP 2.
- Select the provider registered in STEP 2, then select the target channel.
- Copy the issued Channel Access Token and paste it into the “Channel access token” field in the “LINE send” operation of MICHIRU RPA.
Check the recipient’s LINE User ID, then paste it into the “Destination user ID” field in the “LINE send” operation of MICHIRU RPA.
The LINE User ID of the LINE account currently logged in to the LINE Developers Console can be found under ” Your user ID” on the Channel Basic Settings” screen”
For detailed steps to getting other User ID, please refer to “Get user IDs” from the official LINE Developers’ source.
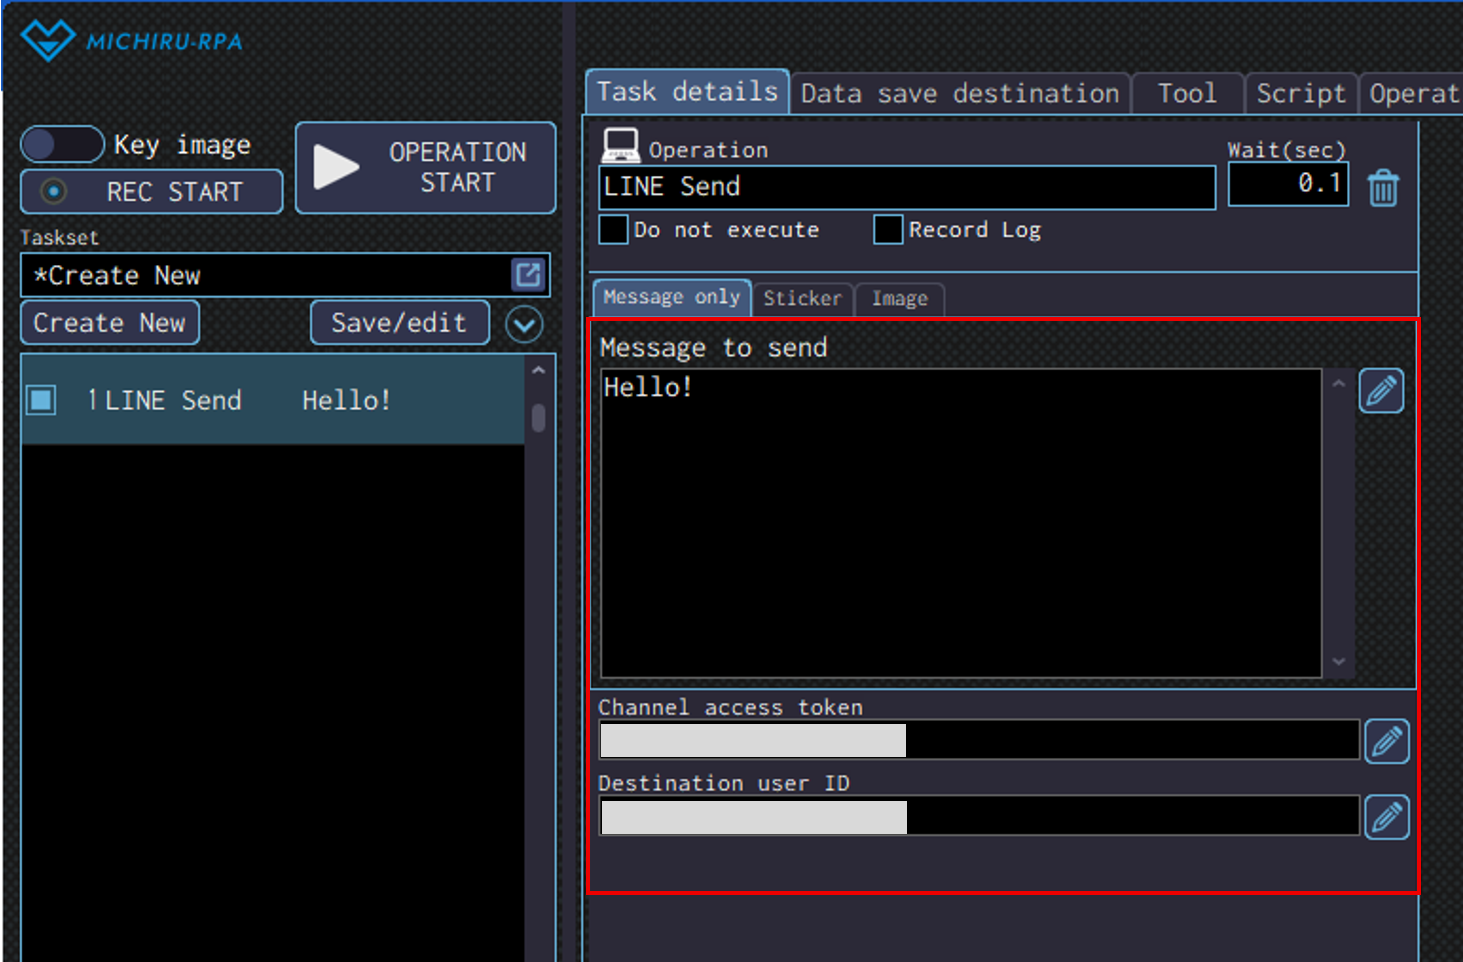
Message only
Select the “Message only” tab.
Enter the “Channel Access Token” of the sending channel and the “LINE User ID” of the recipient LINE account.
Enter the message to send in the “Message to send” field.
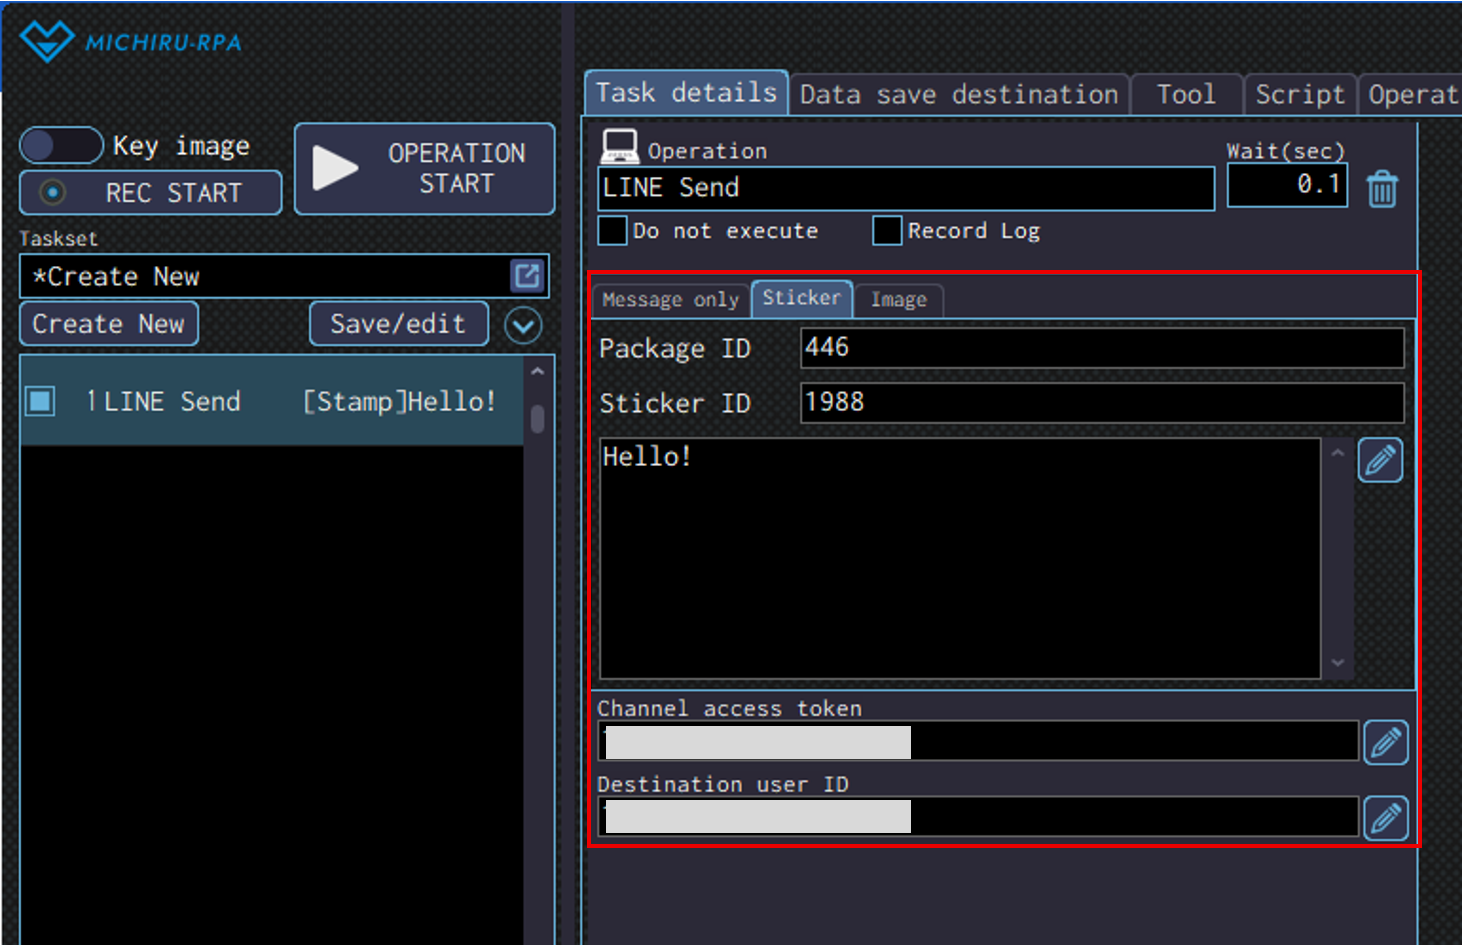
Sticker
Select “Sticker” tab.
Enter the “Channel Access Token” of the sending channel and the “LINE User ID” of the recipient LINE account.
Enter the “Package ID” and the “Sticker ID” of the sticker to be sent.
Please check “Stickers definitions” on LINE Developers website for more information on usable stamps.
Enter the message to send in the “Message to send” field.
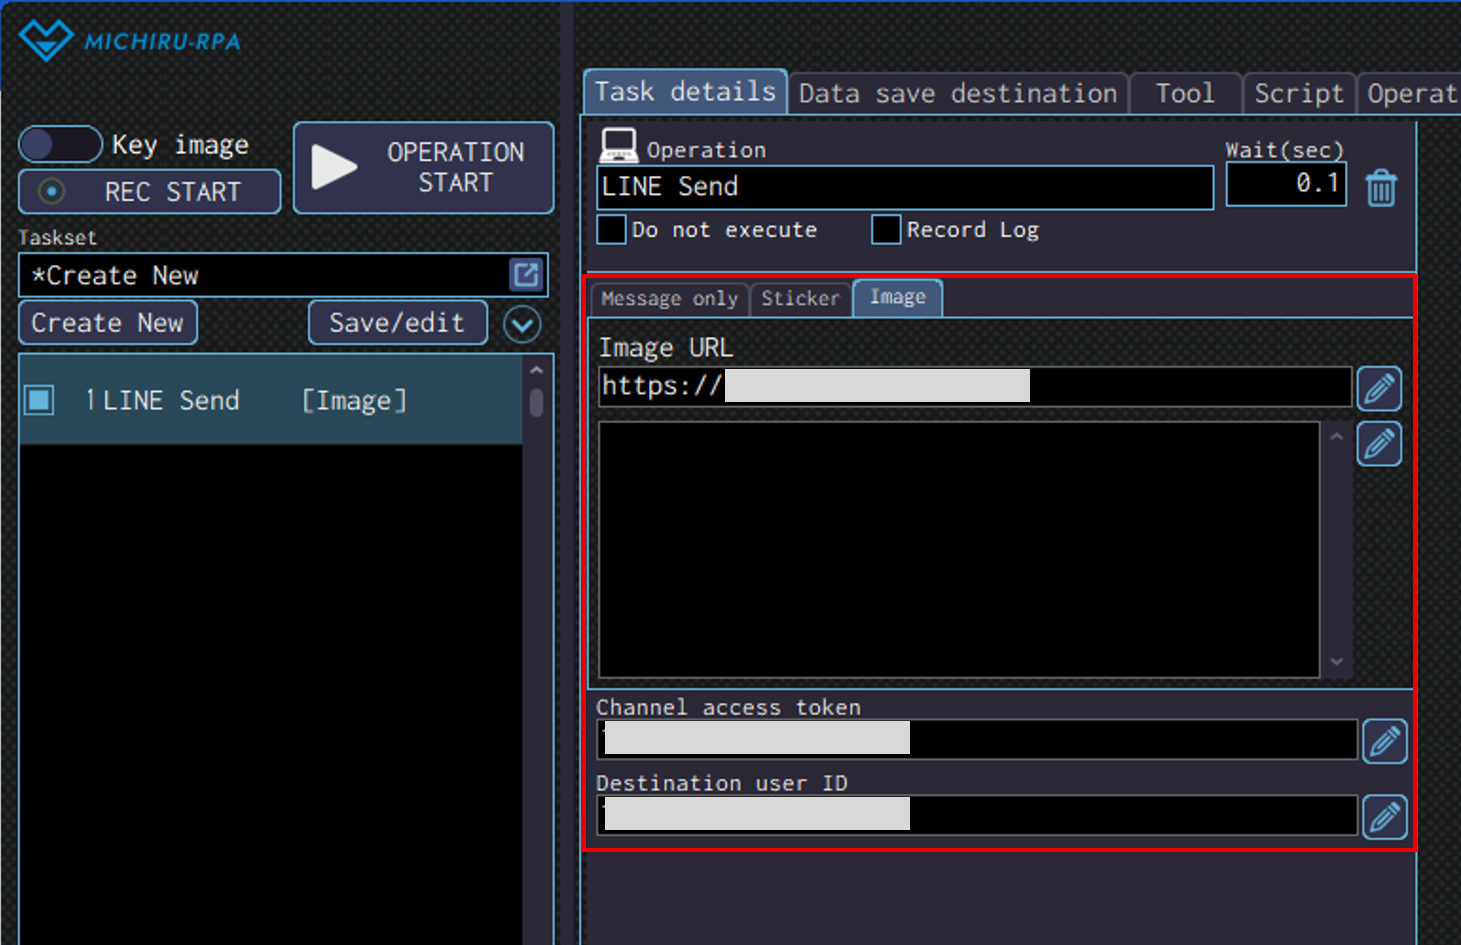
Image
Upload the image to be sent to a network location in advance.
In the following example, we will use an image saved on Google Drive.
Select “Image” tab.
Enter the “Channel Access Token” of the sending channel and the “LINE User ID” of the recipient LINE account.
Insert the Google Drive sharing link edited using the steps below into the “Image URL” field.
- Retrieve the sharing link of the image from Google Drive.
- Right-click on the image file in Google Drive, and select “Share”.
- Change the general access to “Anyone with the link”, and the role to “Editor”. Copy the sharing link.
- From the copied link, remove “file/d/” before the file ID (the ●●● part) and “/view?usp=sharing” after it. After that, add “uc?id=” right before the file ID inside the copied URL.
Before edit:https://drive.google.com/file/d/●●●/view?usp=sharing
After edit:https://drive.google.com/uc?id=●●●
Insert the edited sharing link inside the “Image URL” field.
Enter the message to send in the “Message to send” field.
Chatwork send
This operation is used to send message in Japan-based service “Chatwork”. This requires a Chatwork account to use. Please refer to this page (in Japanese) for more information.
Function / Script
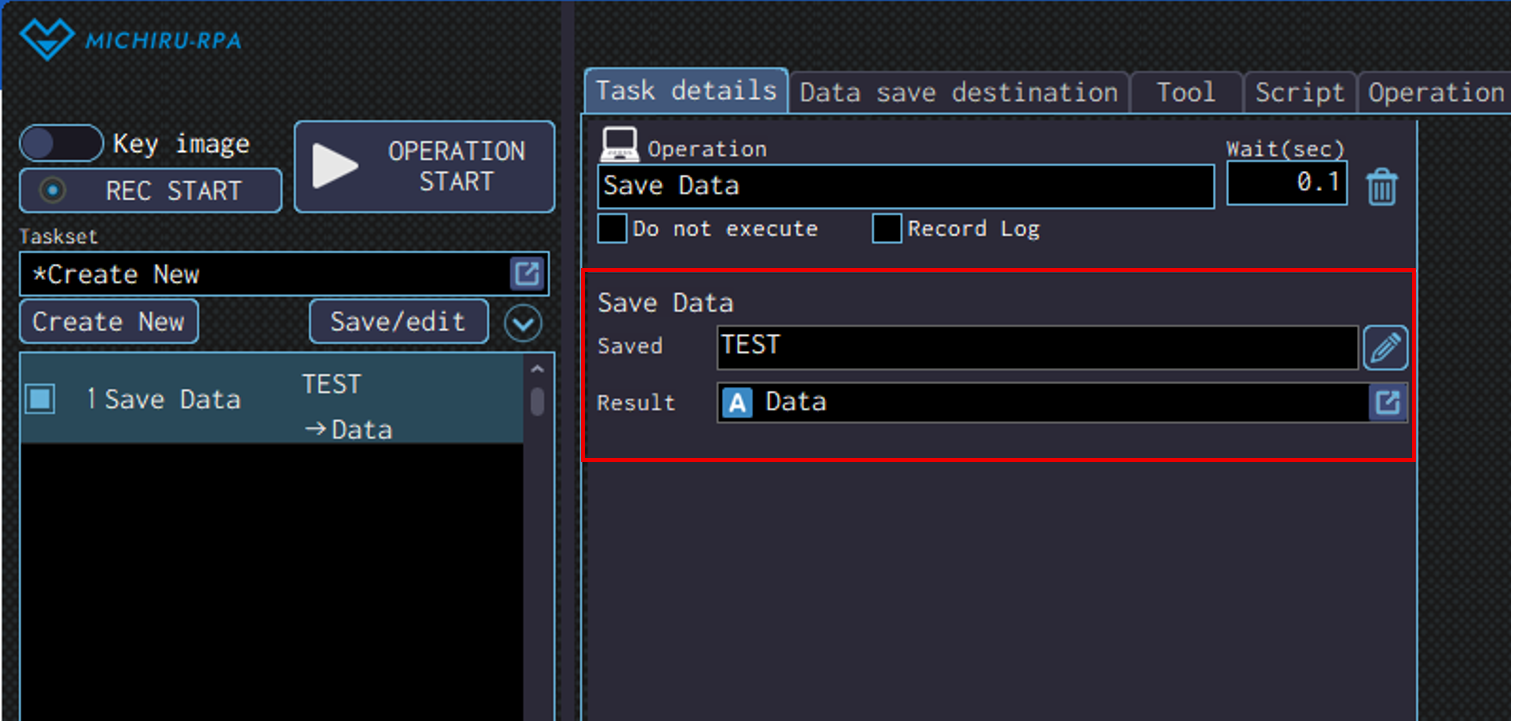
Save Data
Use this operation to store values in the specified data save destination.
Specify the value to be saved in the “Saved” field, the data save destination to store the value in the “Result” field.
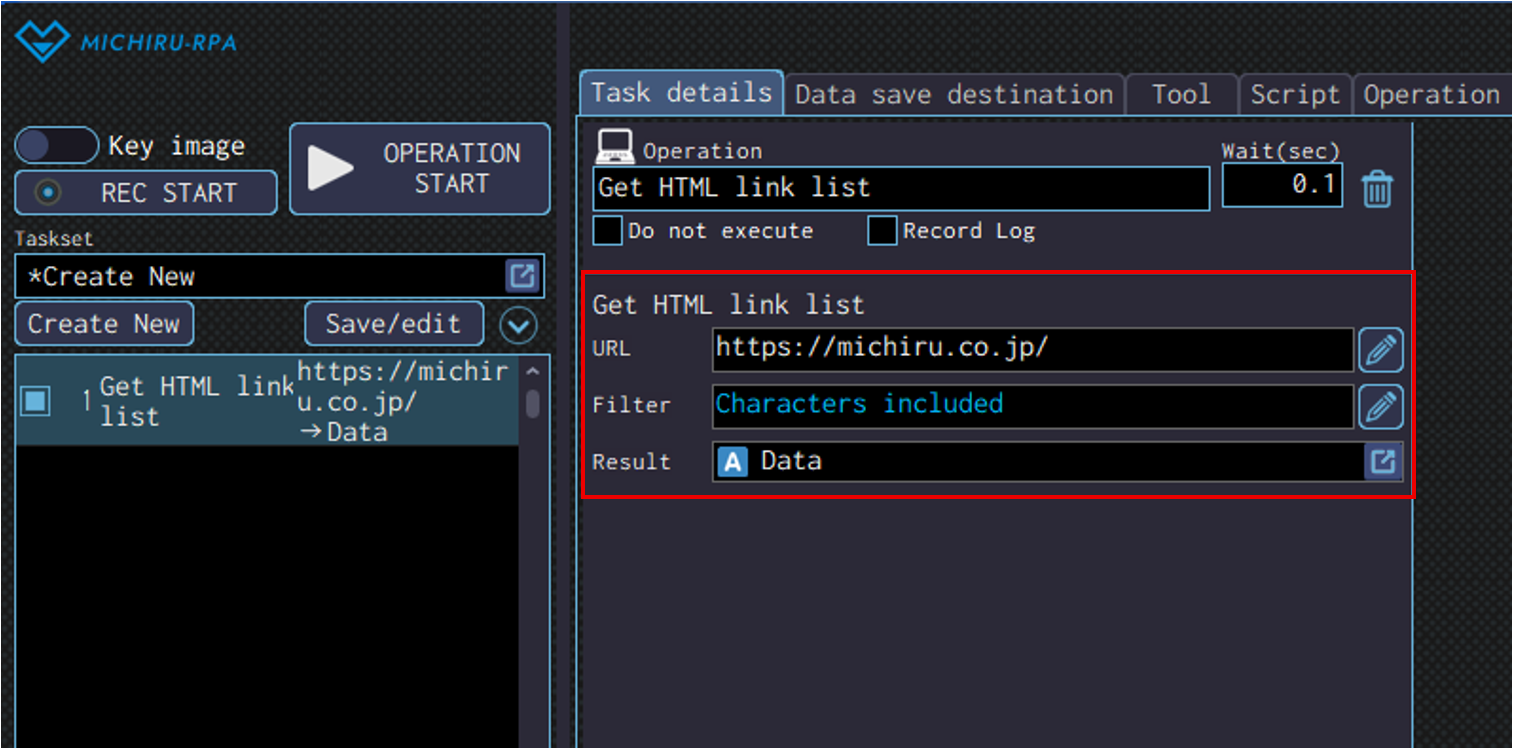
Get HTML link list
Use this operation to get the list of URL links that is contained in the specified web page.
Specify the URL of the web page to get the list in the ” URL” field. In case filtering is needed, input a part of the the URL name in the “Filter” field.
Note that only the URL name that contains the specified character will be targeted.
Specify a data save destinatio in the”Result” field.
Extract text
Use this operation to extract the text from the specified source.
Specify the source text you want to extract from in the “Src” field, the position to start extracting the text in the “Cut pos” field. The image below shows the case where the extraction start from the 4th character.
Specify the number of characters to be extracted starting from the starting position. If no number is input, all characters after the starting position will be extracted. Specify the data save destination for the extracted value in the “Result” field.

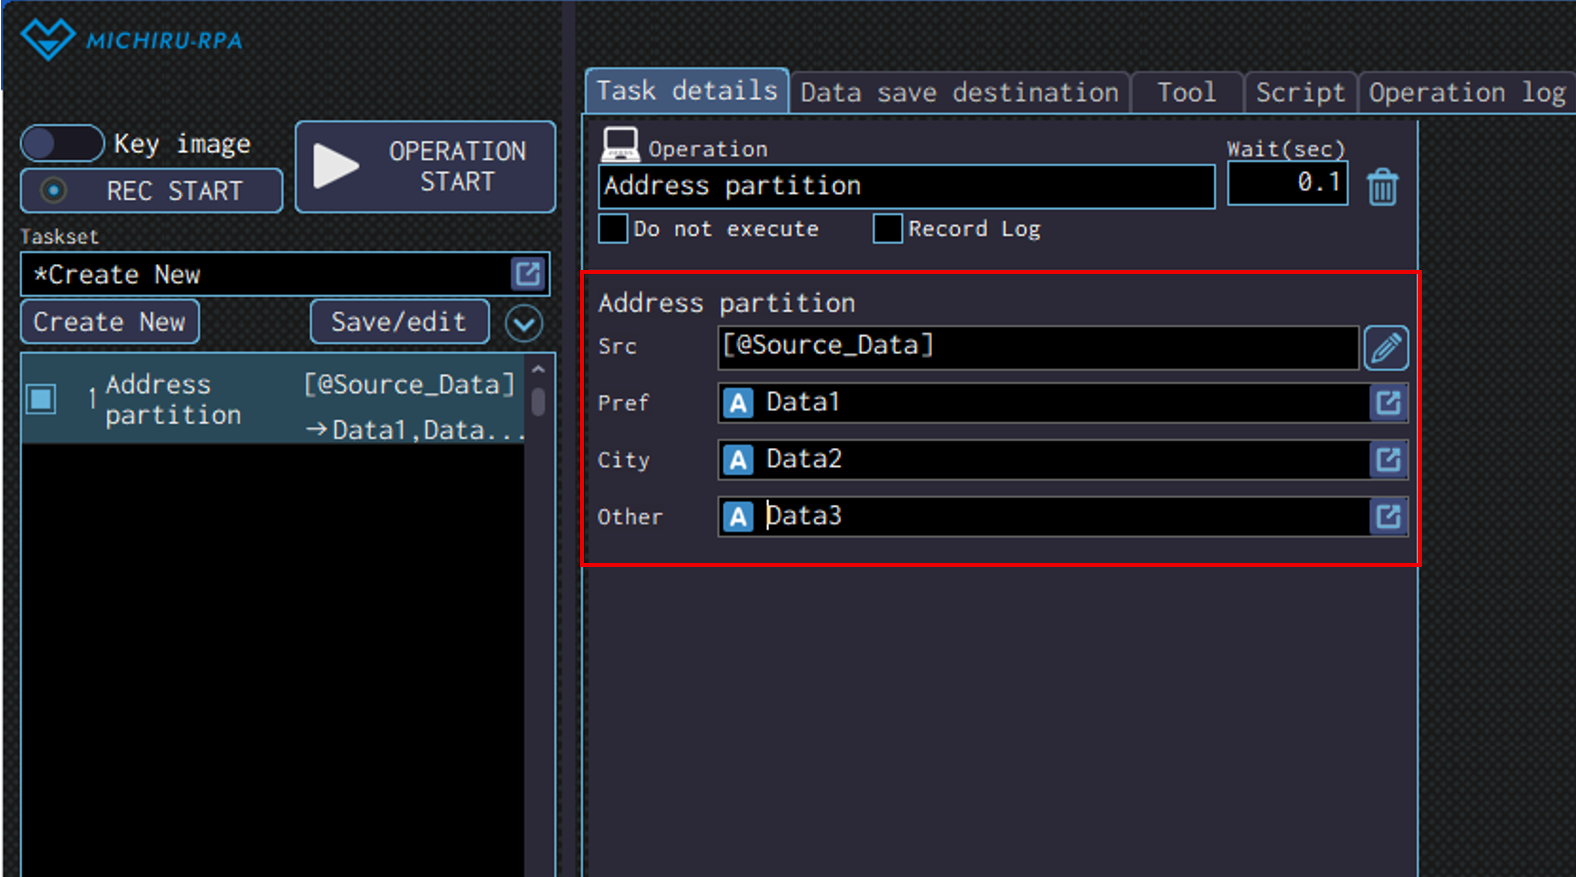
Address partition
(For Japanese address only) Use this operation to split an address into prefecture, city/ward/town/village, and the remaining part from the specified source
Specify the source text that you want to split in the “Src” field.
Specify different data save destination for “Pref”, “City” and “Other”.
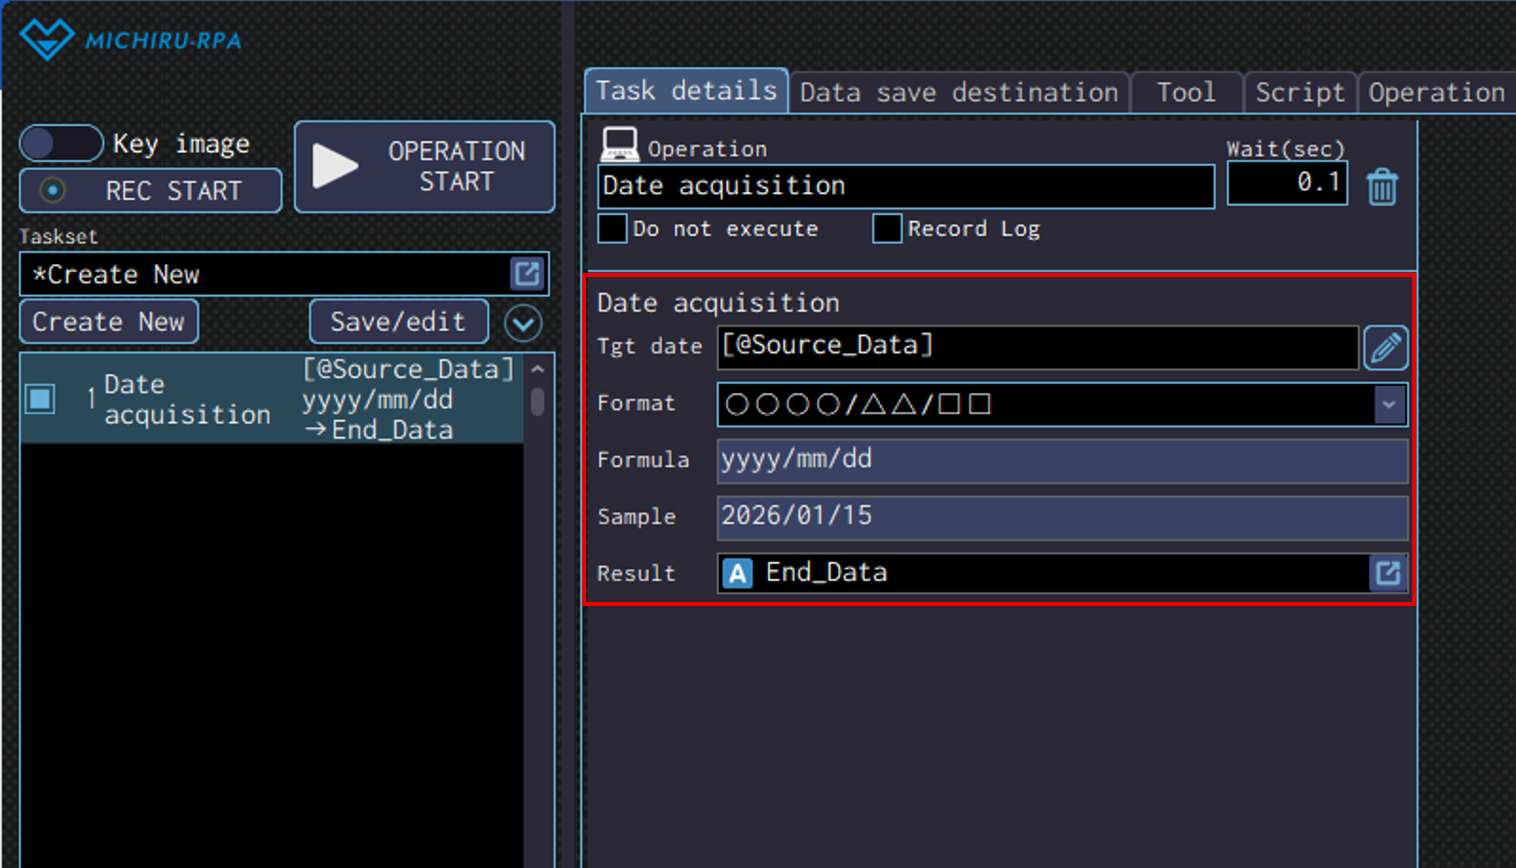
Date acquisition
Use this operation to acquire the date specified as the target, in the specified format.
Please refer to this link for more information on how to acquire various dates such as date of a few days later or the late date of a month.
Specify the date that you want to convert with the desired date format in the “Tgt date” field.
Please note that text like 20200401 cannot be converted.
In order to directly input that, you need to enclose it in double qoutes, e.g., “2020/04/01”.
Specify the desired date format in the “Date format” drop down menu.
Specify the data save destination to save the converted date in the “Result” field.
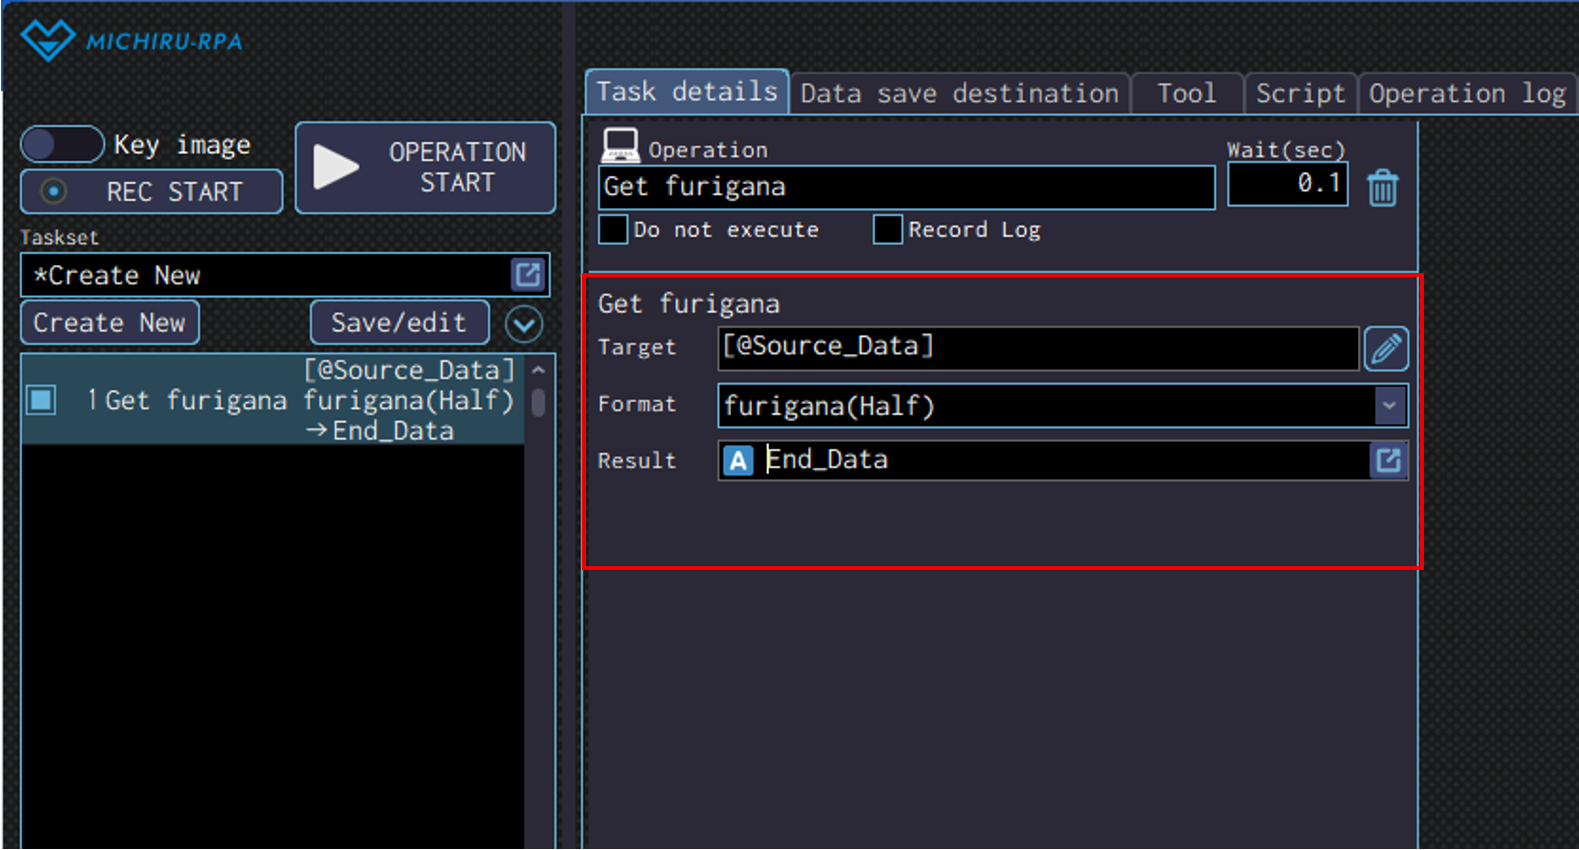
Get furigana
Use the operation to get furigana from the specified item.
Specify the text that you would like to get the furigana in the “Target” field.
You can get the furigana of text written in kanji, hiragana, katakana.
Specify the format you want to get in the “Format” dropdown menu.
Specify the data save destination you want in the “Result” field.
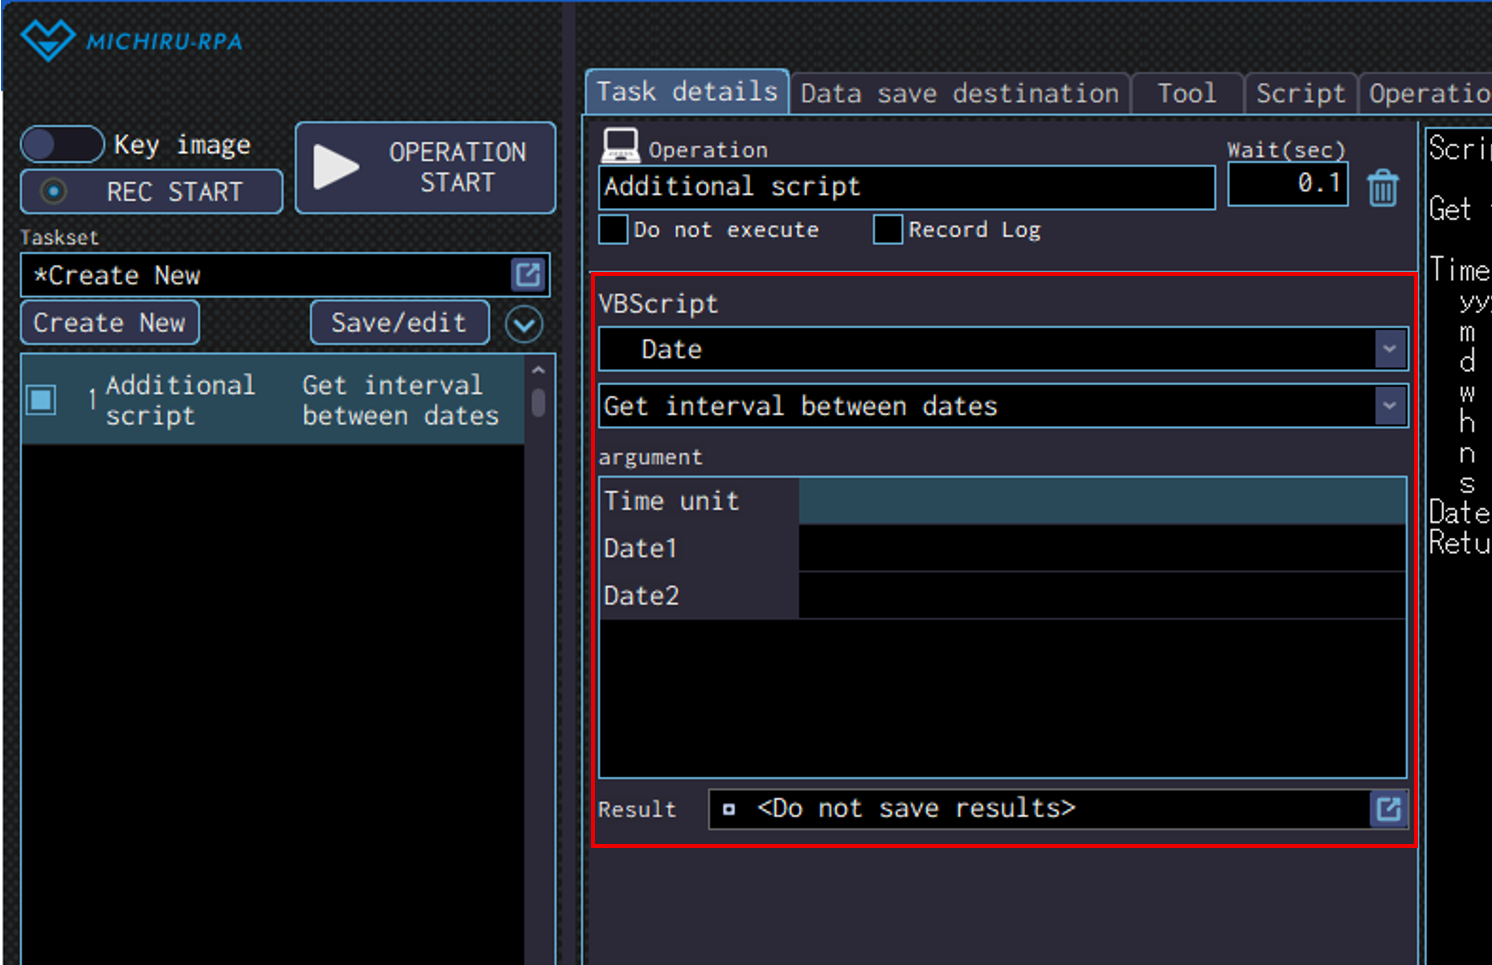
Additional script
Use this operation to execute functions within VBScript file.
Select the desired VBScript file from the first dropdown menu.
Then, select the function (method) to use from the second dropdown menu.
Specify the parameter required for the selected function (method) in the “argument” field.
Additional Script Available by Default
Please refer to the script explanation on the right side in the “Task details” tab for more information regarding detailed configurations of each operation.
- Date
-
Date input Display an input box for date.
Input data will be saved to the specified data save destination.Get yesterday’s date Get the date of yesterday and save it in the specified data save destination Get interval between dates Get the interval between 2 dates and save it in the specified data save destination. You can specify the time unit to retrieve as follows.
Year: yyyy
Month: m
Day: d
Week: w
Hour: h
Minute: n
Second: sCheck day of week and if holiday or not Return a number, depending on the result of the day of the week and holidays evaluation that is based on the list of holidays.
<Configuring Arguments>
■Date to confirm
Specify the date to check.
▼Input Method
・Directly inputting date
Example: ”2025/01/12″
・Using function
Example: Date | DateAdd(“d”,1,date)
・Specifying data save destination
■Holiday list
Specify the list of the holidays delimited by linebreak.
You can directly specify the date or select from data save destination.
▼Example
2025/01/01
2025/01/13
2025/02/11
▼Method using text file to specify the holiday list
1. Copy and move the “holiday.txt” stored in the script file directory (access by clicking “Open Script file directory” in the “Script” tab) to the another folder.
2. Use “File reading” operation to read and store the data from the holiday.txt file to a data save destination in advance. Specify the data save destination as Holiday list.
*You can customize the holiday by making change to the holiday.txt file.
<Weekdays and Holidays Corresponding to the Judgement Result Value>
0:Cannot be considered a date
1:Monday, not a holiday
2:Tuesday, not a holiday
3:Wednesday, not a holiday
4:Thursday, not a holiday
5:Friday, not a holiday
6:Saturday, not a holiday (If Saturday, Sunday and holidays are considered not a working day, every number after this is not considered a working day))
7:Sunday, not a holiday
11:Monday, a holiday
12:Tuesday, a holiday
13:Wednesday, a holiday
14:Thursday, a holiday
15:Friday, a holiday
16:Saturday, a holiday
17:Sunday, a holiday
*If return value is higher than 6, it means the date is Saturday, Sunday, or a holiday. - Excel Operation
-
Select sheet Select a sheet in Excel Select cell Select a cell in Excel Select cell with specified sheet Select a sheet and a cell in Excel. Move selected cell Move the active cell for as much as the number specified. Hidden cells are also counted when moving. Move selected cells between displayed cells Move the active cell for as much as the number specified. Hidden cells are not counted when moving. Get value of cell Get value of a cell or a range of cells. Values of hidden cells are also targeted. Get the value of displayed cell Get value of a cell or a range of cells. Values of hidden cells are not targeted. Get formatted text of cell Get text that is already formatted from a cell or a range of cells. Values of hidden cells are also targeted. Get formatted text of the displayed cell Get text that is already formatted from a cell or a range of cells. Values of hidden cells are not targeted. Enter value in cell Enter value into a cell or a range of cells. Insert Row Insert row in the specified position. Insert Column Insert column in the specified position. Get font color of cell Get the font color from a cell in Excel in decimal number format.
Here is the list of commonly used colors and their corresponding number.
Black: 0
White: 16777215
Red: 255
Green: 65280
Blue: 16711680
Yellow: 65535
Cyan: 16776960
Magenta: 16711935
Grey: 8421504
Dark red: 192
Orange: 33023Get background color of cell Get the background color from a cell in Excel in decimal number format.
Here is the list of commonly used colors and their corresponding number.
Black: 0
White: 16777215
Red: 255
Green: 65280
Blue: 16711680
Yellow: 65535
Cyan: 16776960
Magenta: 16711935
Grey: 8421504
Dark red: 192
Orange: 33023Set font color of cell Set the font color of a cell in Excel
The color can be specify using RGB value, decimal number, or color constant.
Here is the list of commonly used colors and their corresponding value.
Black: rgb(0,0,0) / 0 / vbBlack
White: rgb(255,255,255) / 16777215 / vbWhite
Red: rgb(255,0,0) / 255 / vbRed
Green: rgb(0,255,0) / 65280 / vbGreen
Blue: rgb(0,0,255) / 16711680 / vbBlue
Yellow: rgb(255,255,0) / 65535 / vbYellow
Cyan: rgb(0,255,255) / 16776960 / vbCyan
Magenta: rgb(255,0,255) / 16711935 / vbMagenta
Grey: rgb(128,128,128) / 8421504 / –
Dark red: rgb(128,0,0) / 192 / –
Orange: rgb(255,128,0) / 33023 / –
*Color constant is only available for black, white, red, green, blue, yellow, cyan, magenta.Set background color of cell Set the font color of a cell in Excel
The color can be specify using RGB value, decimal number, or color constant.
Here is the list of commonly used colors and their corresponding value.
Black: rgb(0,0,0) / 0 / vbBlack
White: rgb(255,255,255) / 16777215 / vbWhite
Red: rgb(255,0,0) / 255 / vbRed
Green: rgb(0,255,0) / 65280 / vbGreen
Blue: rgb(0,0,255) / 16711680 / vbBlue
Yellow: rgb(255,255,0) / 65535 / vbYellow
Cyan: rgb(0,255,255) / 16776960 / vbCyan
Magenta: rgb(255,0,255) / 16711935 / vbMagenta
Grey: rgb(128,128,128) / 8421504 / –
Dark red: rgb(128,0,0) / 192 / –
Orange: rgb(255,128,0) / 33023 / –
*Color constant is only available for black, white, red, green, blue, yellow, cyan, magenta.Run macro Run macro that is already set. Check if Excel is running Check if Excel is running.
“True” is returned if running, “False” if not. - File and Directory
-
Run application Run the application specified. Check directory existence Return a number based on whether the specified directory exists or not. Check file existence Return a number based on whether the specified file exists or not. Read from file Read a text file, then save its content to a data save destination. Read from file(Encoding) Read a text file with the encoding specified, then save its content to a data save destination. Write to file Write in a text file. Write to file(Encoding) Write in a text file the encoding specified. Copy file Copy and paste the specified file. If a file with the same name already exists in the destination, it will be overwritten. Move file Move the specified file. If a file with the same name already exists in the destination, it will be overwritten. Delete file Delete the specified file. If the specified does not exist, nothing will happen. Get file name Get the file name from the specified file path, then save it to a data save destination. Get extension name Get the extension of the specified file, then save to a data save destination. The extension retrieved is lowercase. Get a list of subdirectories Get a list of subdirectories inside the specified directory, then save to a data save destination. Get a list of files within the specified file size Get a list of files that fall into the range of file sizes specified, then save the to a data save destination. - Notification
-
Message display Display the specified meesage in a pop-up window
The RPA will remained paused until “OK” is clicked in the message box.Send e-mail Send an e-mail. smTP server name, port, and other settings are required.
Please contact your network administrator if you do not have these information. - Map
-
Distance between two points Calculate the distance between two points based on latitude and longitude (using Hubeny’s formula) - String manipulation
-
Name of the function How to use Count search strings Argument:
Target string (text or data that the search will be executed on)
Search string (text to search for in the target)
Usage:
This will count the number of the Search string within the Target string.
This can be utilised in data analysis, and can also be used with conditional branching to branch the process when a specific word is included.
Example:
Target string: “apple orange apple banana apple”
Search string: “apple”
Return value: 3Replace string Argument:
Target string (text and data that the replacement will be executed on)
Search string (text to be replaced)
Replacement string (text to replace with)
Usage:
This will replace the Search string in the Target string with the Replacement string.
You can streamline tasks like standardizing terminology and fixing typos, by automatically correcting (replacing) specific words.
Example:
Target string: “It is sunny today. Tomorrow will also be sunny.”
Search string: “sunny”
Replacement string: “rainy”
Return value: “It is rainy today. Tomorrow will also be rainy.”Replace string using conversion file Argument:
Target string (text and data that the replacement will be executed on)
Conversion file (file path to the CSV file that contains the rule for replacing text)
Encoding (character encoding for the conversion file: [0:shift_jis][1:utf-8][2:utf-16le][3:utf-16be][blank: auto detection]
Usage:
Mass-replace specific texts in the the target string based on the rules defined in the CSV file.
You can reduce manual work and automate tasks like standardizing terminology and formatting data since multiple words can be converted at once.
Example: Conversion file (Conversion.csv)
Col A (before conversion) | Col B (after conversion)
Inc. Incorporated
Ltd. Limited
Co. Company
Target string: “MICHIRU Inc.”
Conversion file: “Conversion.csv”
Return value: “MICHIRU Incorporated”
*The conversion file (Conversion.csv) is kept inside the directory where the script files are stored. This can be found in the “Script” tab. Please copy, edit, and moved to other folder before using.Remove blanks at both ends of string Argument:
Target string (text to be be processed by the function)
Usage:
This is useful when deleting unnecessary spaces when inputting data, improving the accuracy of comparison processing.
Example:
Target string: “Hello “
Return value: “Hello”Cut to search string Argument:
Target string (text to be processed by the function)
Search string (text used as the cut-off point)
Usage:
This will search for the position of the first Search string in the Target string, then get only the text before the Search string. This is useful when you need to extract data before specific keyword, or delete unnecessary information.
Example:
Target string: “Product ID: 12345 Product Name: Apple”
Search string: ” Product Name:
Return value: “Product ID: 12345 “Get byte length of string Argument:
Target string (text to be processed by the function)
Usage:
This will get the byte length (data size) of the Target string.
This is useful when checking for differences that may come from the characters being full-width or half-width, or when checking for limitations on the number of characters for a system.
Example:
Target string: “Hello”
Return value: 5
(In MICHIRU RPA, a single full-width character is considered to be 2 bytes, while a half-width one is 1 byte)Check for full-width characters Argument:
Target string (text to be checked)
Usage:
This will evaluate if full-width charaters are included in the Target string, and return 1 (included) or 0 (not included) as a result.
This can be used to check the format of the data, assist the process standardizing full-width and half-width characters.
Example:
Target string: “Hello123”
Return: 0 (full-width character not included)
Target string: “こんにちは123”
Return: 1 (full-width character included)Get string at specified index from list (Comma separated) Argument:
List (list of texts delimited by comma)
Number (number of the text to get, starting from 0)
Usage:
Get a text (string) from the position (index) specified in “Number” in a comma-delimited list.
This is useful when extracting a specific item from a list.
Example:
List: “apple,orange,grape,banana”
Number: 2
Return value: “grape” (number 2 counting from 0)Get string at specified index from list (Specify delimiter) Argument:
List (list of texts delimited by delimiter)
Delimiter (character used to delimit each item in the list, will be considered a line break if blank)
Number (number of the text to get, starting from 0)
Usage:
Get a text (string) from the position (index) specified in “Number” in a list delimited by the specified delimiter.
This is useful when manipulating data that is delimited by a delimiter which is not a comma (space, line break, semicolon).
Example:
List: “apple|orange|grape|banana”
Delimiter: “|”
Number: 2
Return value: “grape” (number 2 counting from 0)Get number of items in a list Argument:
List (list of texts delimited by delimiter)
Delimiter (character used to delimit each item in the list, will be considered a line break if blank)
Usage:
Get the number of items in a list that is delimited by the specified delimiter.This is useful when checking the number of items in the list, or deciding the number of times to repeat processes.
Example:
List: “apple,orange,grape,banana”
Number: 2
Return value: “grape” (item number 2 counting from 0)Filter a list of strings using the search string Argument:
List (list of texts delimited by delimiter)
Delimiter (character used to delimit each item in the list, will be considered a line break if blank)
Search string (text to search for in the list)
Usage:
Get only the item that contains the “Search string” in a list that is delimited by the specified delimiter.
This useful when filtering data, or filtering for information that matches a particular condition.
Example:
List: “apple,orange,grape,banana”
Delimiter: “,”
Search string: “n”
Return value: “orange,banana” (only the items that contain “n”)Get index of a search string from a list of strings Argument:
List (list of texts delimited by delimiter)
Delimiter (character used to delimit each item in the list, will be considered a line break if blank)
Search string (text to search for in the list)
Usage:
Get the index number of the first item that is equal to the “Search string” in a list that is delimited by the specified delimiter.
Getting the index of items can help with list manipulation or conditional branching.
Example:
List: “apple,orange,grape,banana”
Delimiter: “,”
Search string: “orange”
Return value: 2 (item number 2 counting from 0)Sort a list of strings Argument:
List (list of texts delimited by delimiter)
Delimiter (character used to delimit each item in the list, will be considered a line break if blank)
Sorting direction (ascending 0 / descending 1)
Usage:
Sort a list that is delimited by the specified delimiter in ascending or descending order.
This can be used for cleaning or preparation for data manipulation that requires the data to be in certain order.
Example:
List: “apple,orange,grape,banana”
Delimiter: “,”
Sorting direction: 0
Return value: “banana,grape,orange,apple” (descending order)Get the strings between the start string and end string Argument:
Target string (text to be processed by the function)
Start string (Text the marks the start of extraction; if not specified, extraction starts from the beginning)
End string (Text the marks the end of extraction; if not specified, extraction continues to the end)
Usage:
This will extract the text from the “Target string” that is between “Start string” and “End string”.
This is useful for extracting data or specific information.
Example:
Target string: “Product ID: 12345 Product Name: Apple Price: 100 Yen”
Start string: “Product Name: “
End string: “Price:”
Return value: “Apple “Check existence of a string Argument:
Target string (text to be processed by the function)
Search string (text to search for)
Usage:
Get the index number of the first item that is equal to the “Search string” in the “Target string”.
This helps with identifying reference positions fpr data analysis and string processing.
Example:
Target string: “abcde”
Search string: “e”
Return value: 5 (because “e” is the 5th letter) - Window information
-
Get active window class Return the class of the active window. Get active window title Return the title of the active window. Check window existence Check if the specified window exists.
Other additional script
There are also othe script that is not included by default but can be downloaded and added to MICHIRU RPA.
Please refer to this page for more information.
Other
Cursor reference movement
Use this operation to move the cursor reference point of the specified operation number.
Specify the number of the operation in the “Operation number” field. Specify the amount of movement hoizontally and vertically in the “X” and “Y” field.

OCR reading
Use this operation to make the RPA read the text from the screen using OCR (Optical Character recognition).
In order to use this function, you need to install Microsoft PowerToys.
Installing PowerToys
You can download PowerToys for free from this page (the link will redirected you to Microsoft website).
Please install the program to your device.
You need to launch PowerToys application first before using the OCR function. Please choose whether to launch manually from Windows menu, or to have it launched automatically when the PC is turned on (refer to the image below).
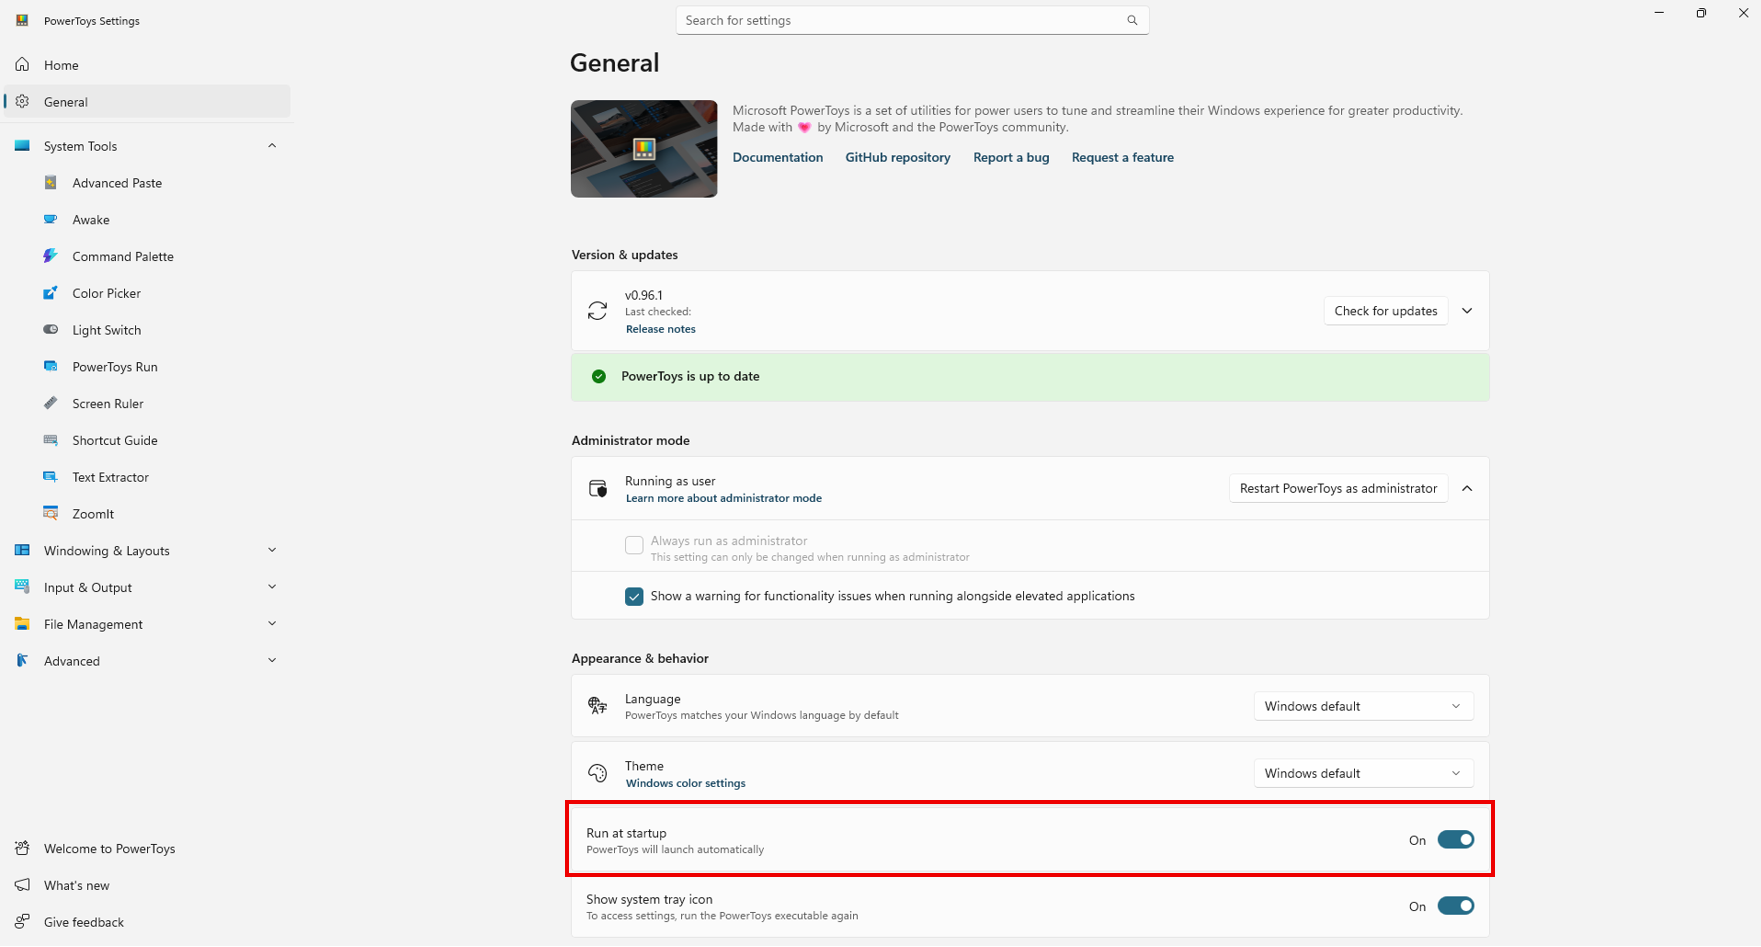
Next, turn on the “Enable Text Extractor” in the setting page for Text Extractor, which can be located on the side bar of the program.
The default shortcut key is set to “Win + Shift + T”. If you want to change the shortcut key for this, make sure to make the same change to the “Preconfigured OCR startup shortcut key” in the “Tool” tab in MICHIRU RPA as well.

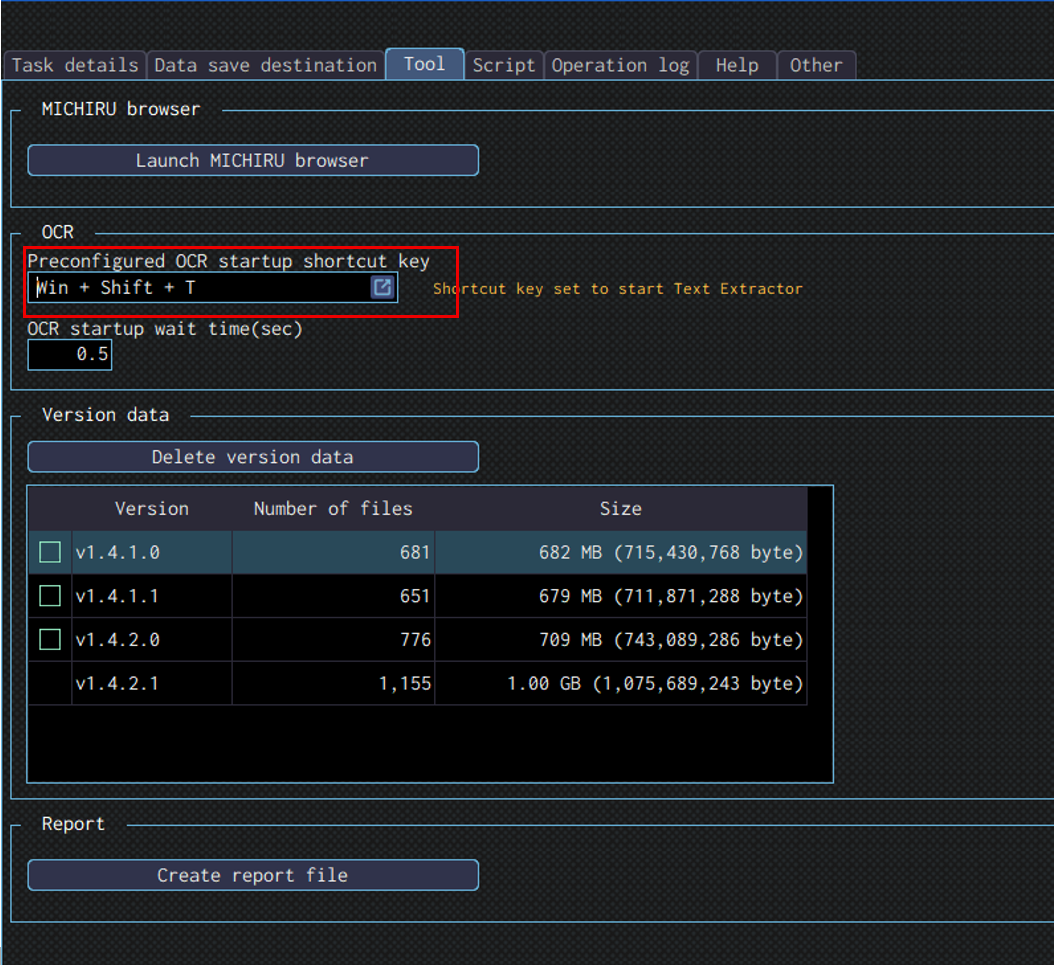
Configuring the Operation Position
- When in Key Image Mode
-
Press the shortcut key to capture the image / element. Open the “Edit” screen, specify the the area of the image you want to mark as key image by left mouse drag, and specify the area you want the OCR to read by right mouse drag.
The image below shows the case where the RPA look for “Launching MICHIRU RPA” (in the orange frame), then drag on the text that is below the the key image (in the frame with dotte line). - When in Element Mode
-
After pressing the element capture shortcut key, change the operation type in the operation box to “OCR reading” in the “Other” menu. You can also set the operation to “OCR reading” in the “Other” from the beginning, by moving the cursor to the desired position and right-clicking to display the operation menu.
Open the “Edit” screen, and specify the area to read text from using right mouse drag.
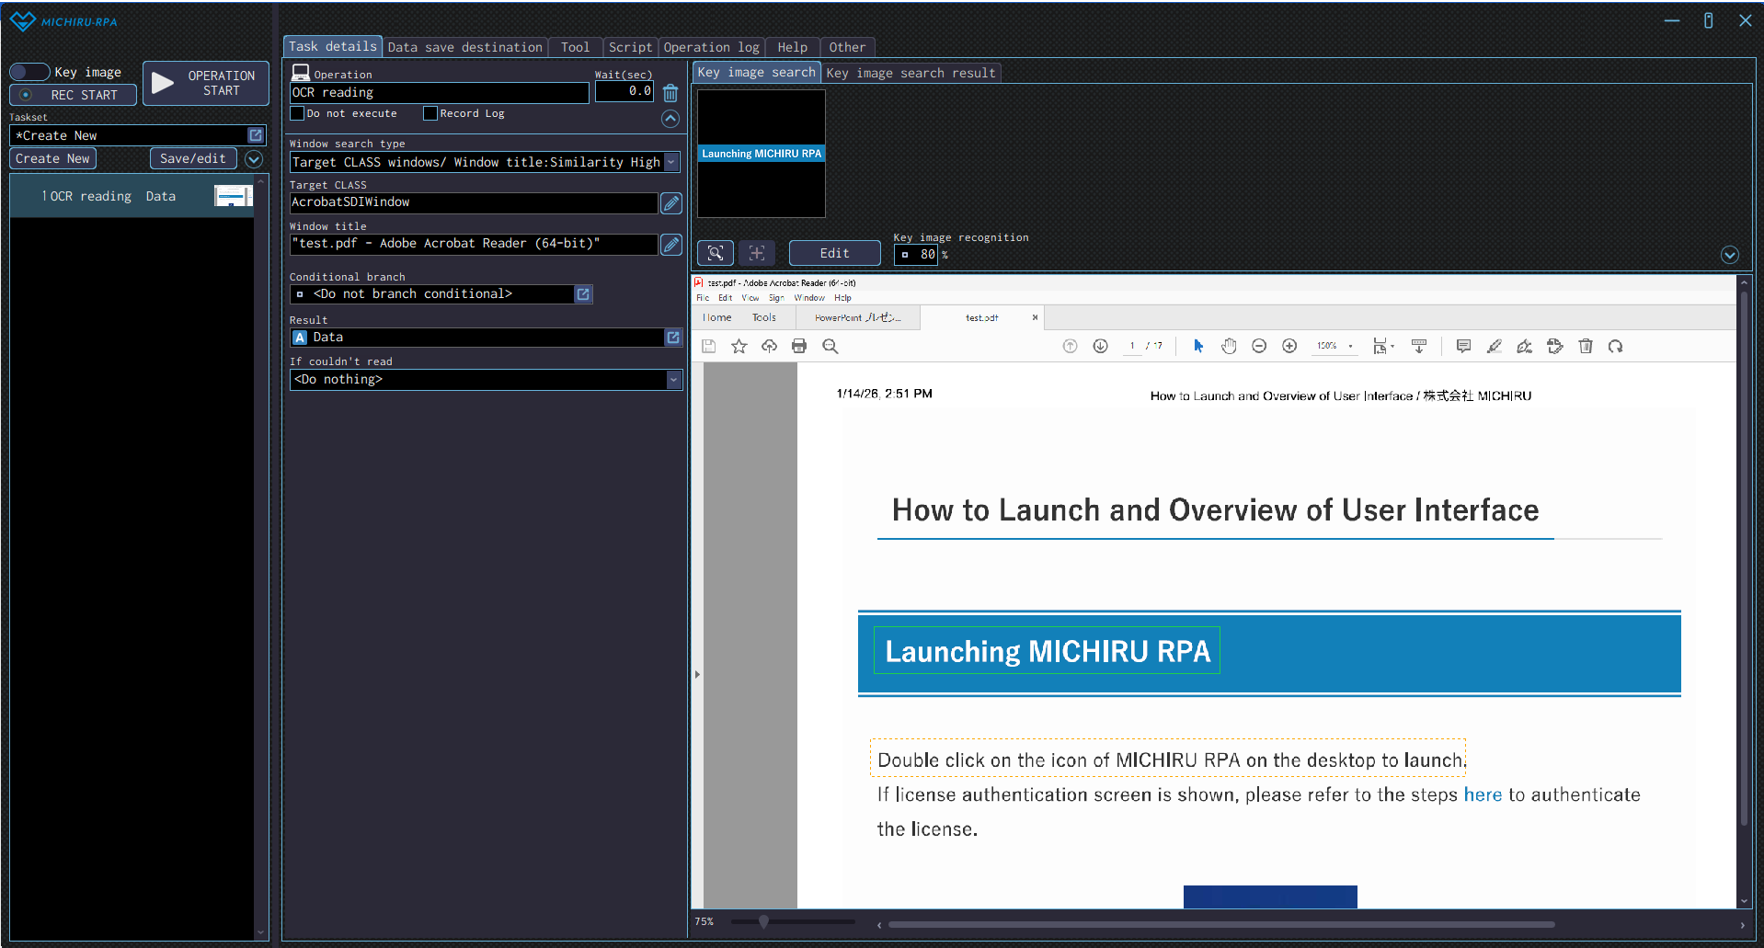
Detailed Setting for Operation
Specify the data save destination to save the data read in the “Result” field.
Specify how the RPA should work in case the data can not be read in the “If couldn’t read” drop down menu.
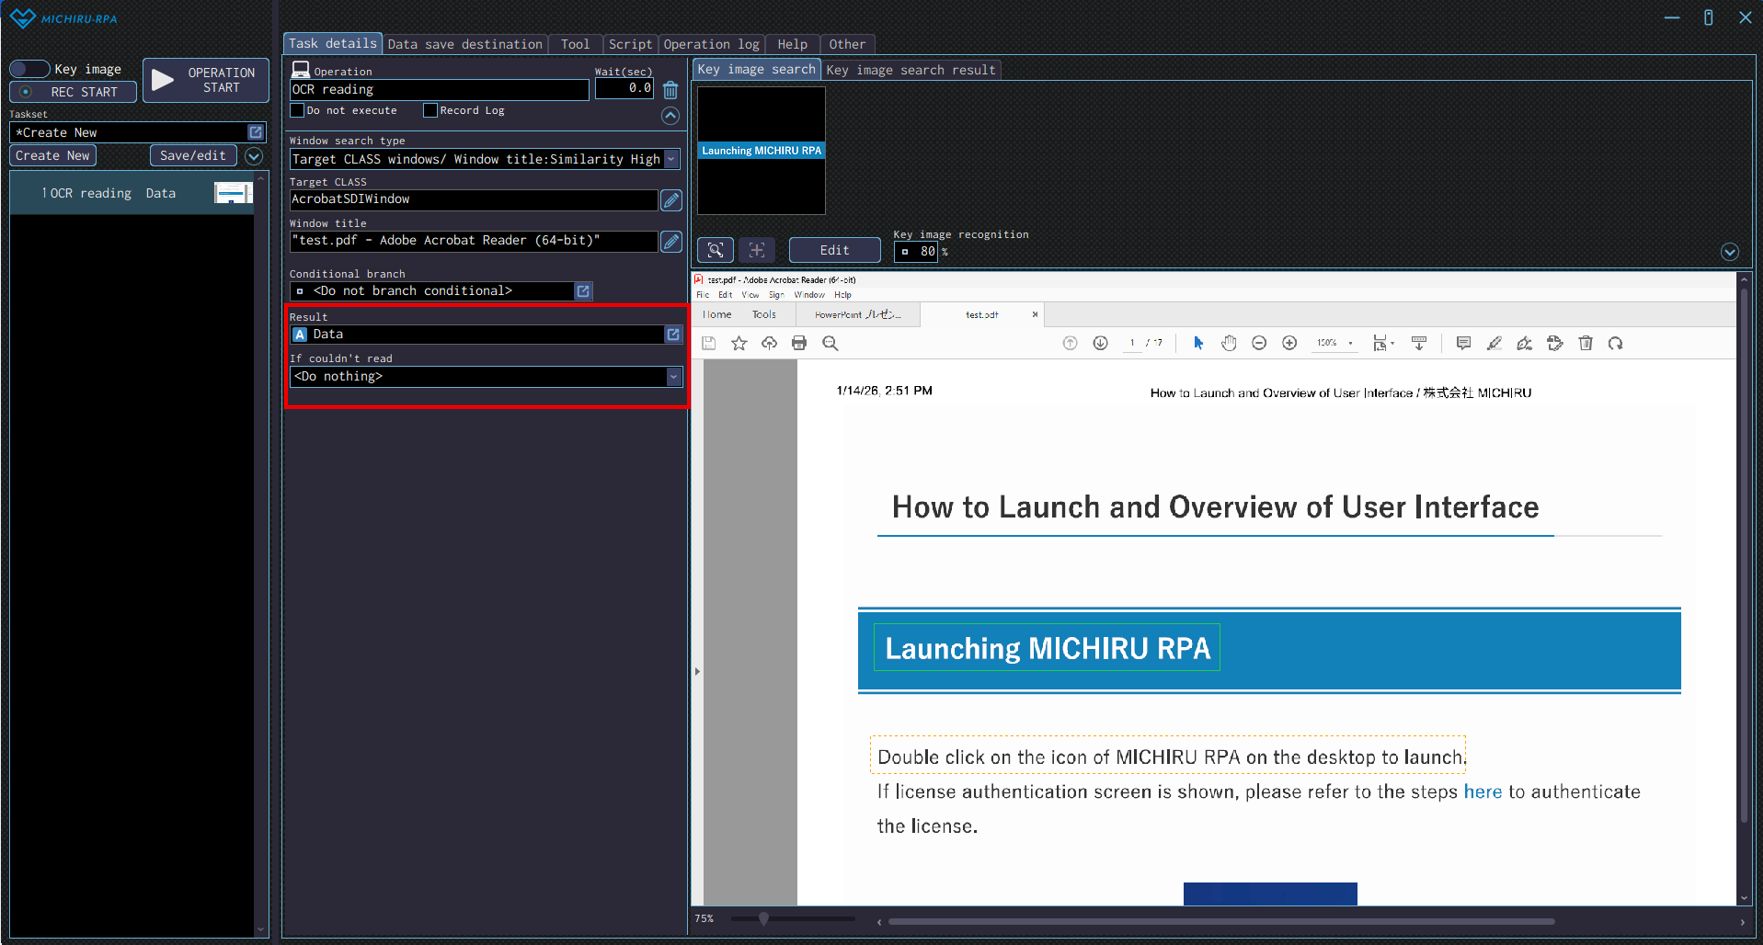
| <Do nothing> | The process will continue as is. |
|---|---|
| Move to the specified number if it cannot be read | Move to the specified number. |
| Call the automation set if it cannot be read | Call an automation set that is already saved. |
